

Carry with greater comfort, confidence and ease.
These sixteen illustrated steps bring together twenty-five years of PsLing experience,
helping the sling work naturally with your body.
Carry with comfort and confidence.
Sixteen illustrated steps refined through
twenty-five years of PsLing experience.
What Is a Ring Sling?
A baby ring sling is a baby carrier made from one wide piece of fabric secured through two rings. It supports the baby while distributing weight across the wearer’s shoulder and back.
01 / STRUCTURE
The fabric passes through two rings so its length and tension can be adjusted.
02 / SUPPORT
The pouch wraps the baby while the broad fabric spreads weight across the shoulder and back.
03 / CARRY
It can be used from a newborn cradle carry to an upright carry after head control develops.
The aim is not to sink the baby deeply into the fabric. Keep the face and airway visible, and use the fabric width and tension to support a stable position.
Parts of a Ring Sling
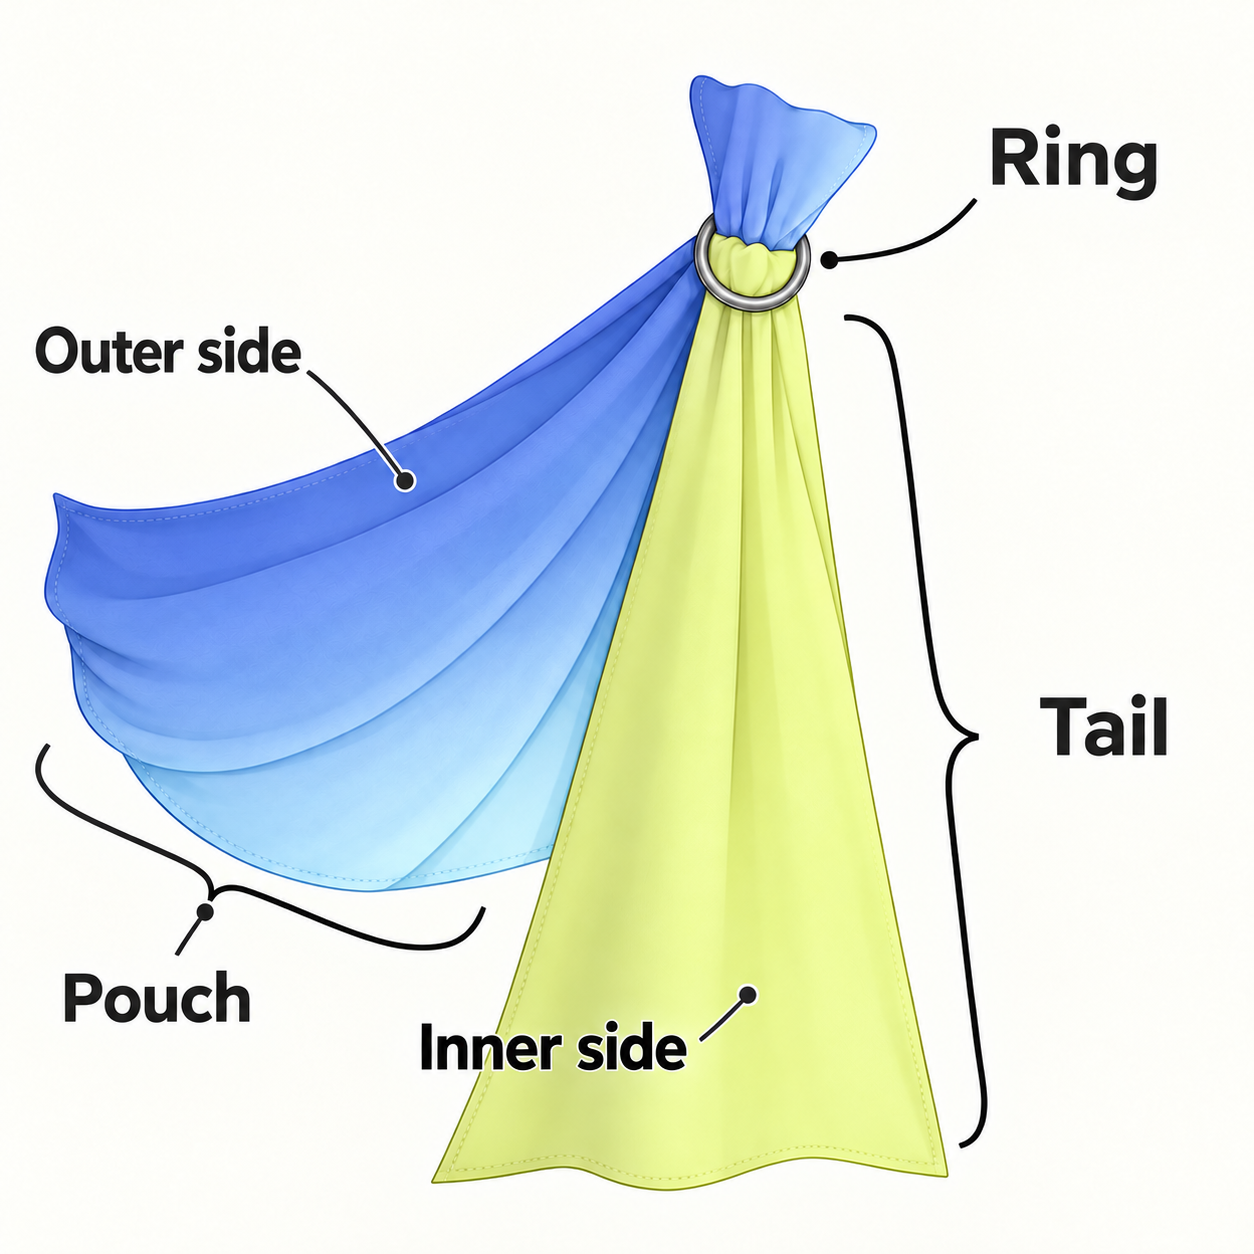
The outer side faces outward when worn, while the inner side rests against the body. Before use, identify the tail hanging from the rings and the pouch that supports the baby.
Ring
The two rings secure the fabric and adjust the loop size and fit. Position them just below the collarbone.
Tail
The loose end hanging from the rings. Use it to check for twists and to adjust each fabric edge.
Pouch
The central fabric that supports the baby. Use its full width without narrowing it into a tight bag, and keep the face and airway visible.
Preparation Guide
Preparation
Step 01
First State
First State
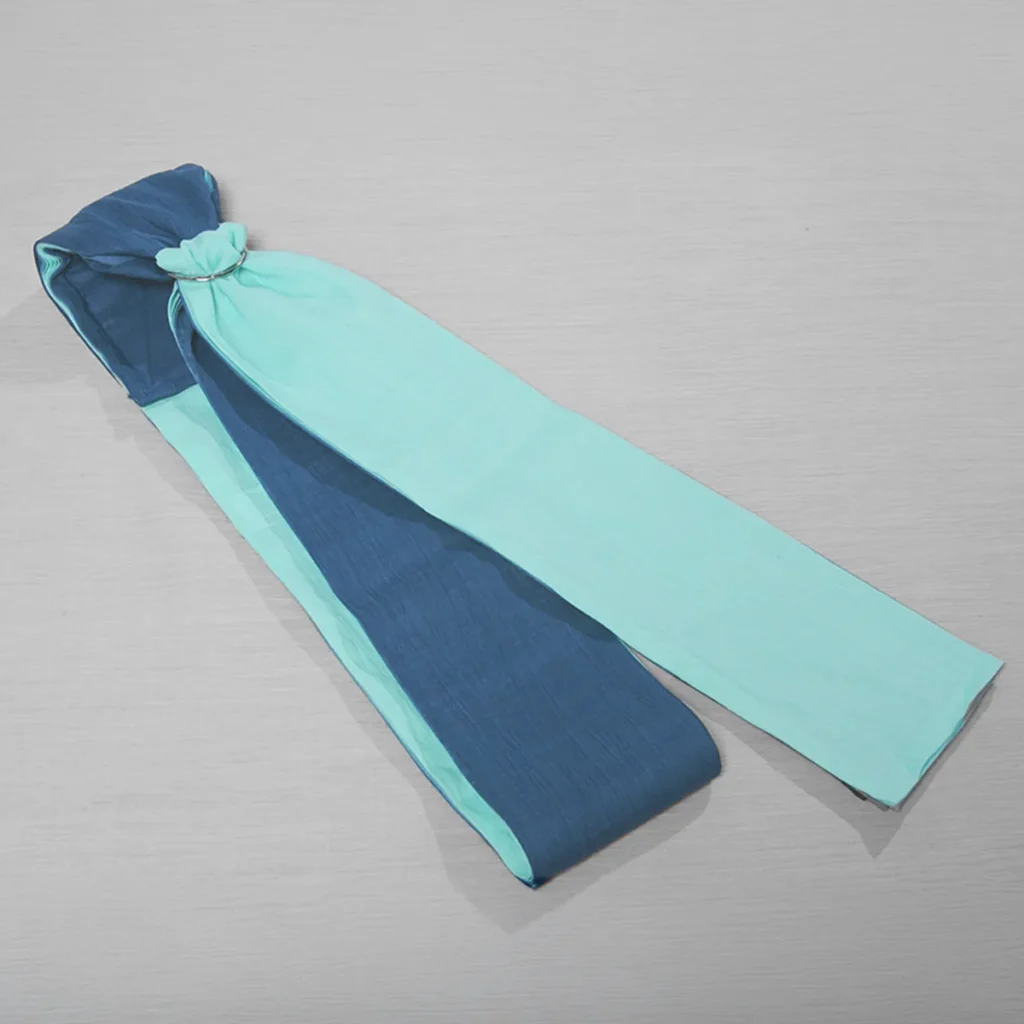
How Your PsLing Arrives
How Your PsLing Arrives
Every PsLing begins with the care given to each stitch and fold.
The sling is threaded temporarily for packaging. Gently remove the fabric from the rings, then rethread it correctly by following the steps below.
Every PsLing begins with the care given to each stitch and fold.
The sling is threaded temporarily for packaging. Remove the fabric gently and rethread it using the steps below.
Threading Fundamentals
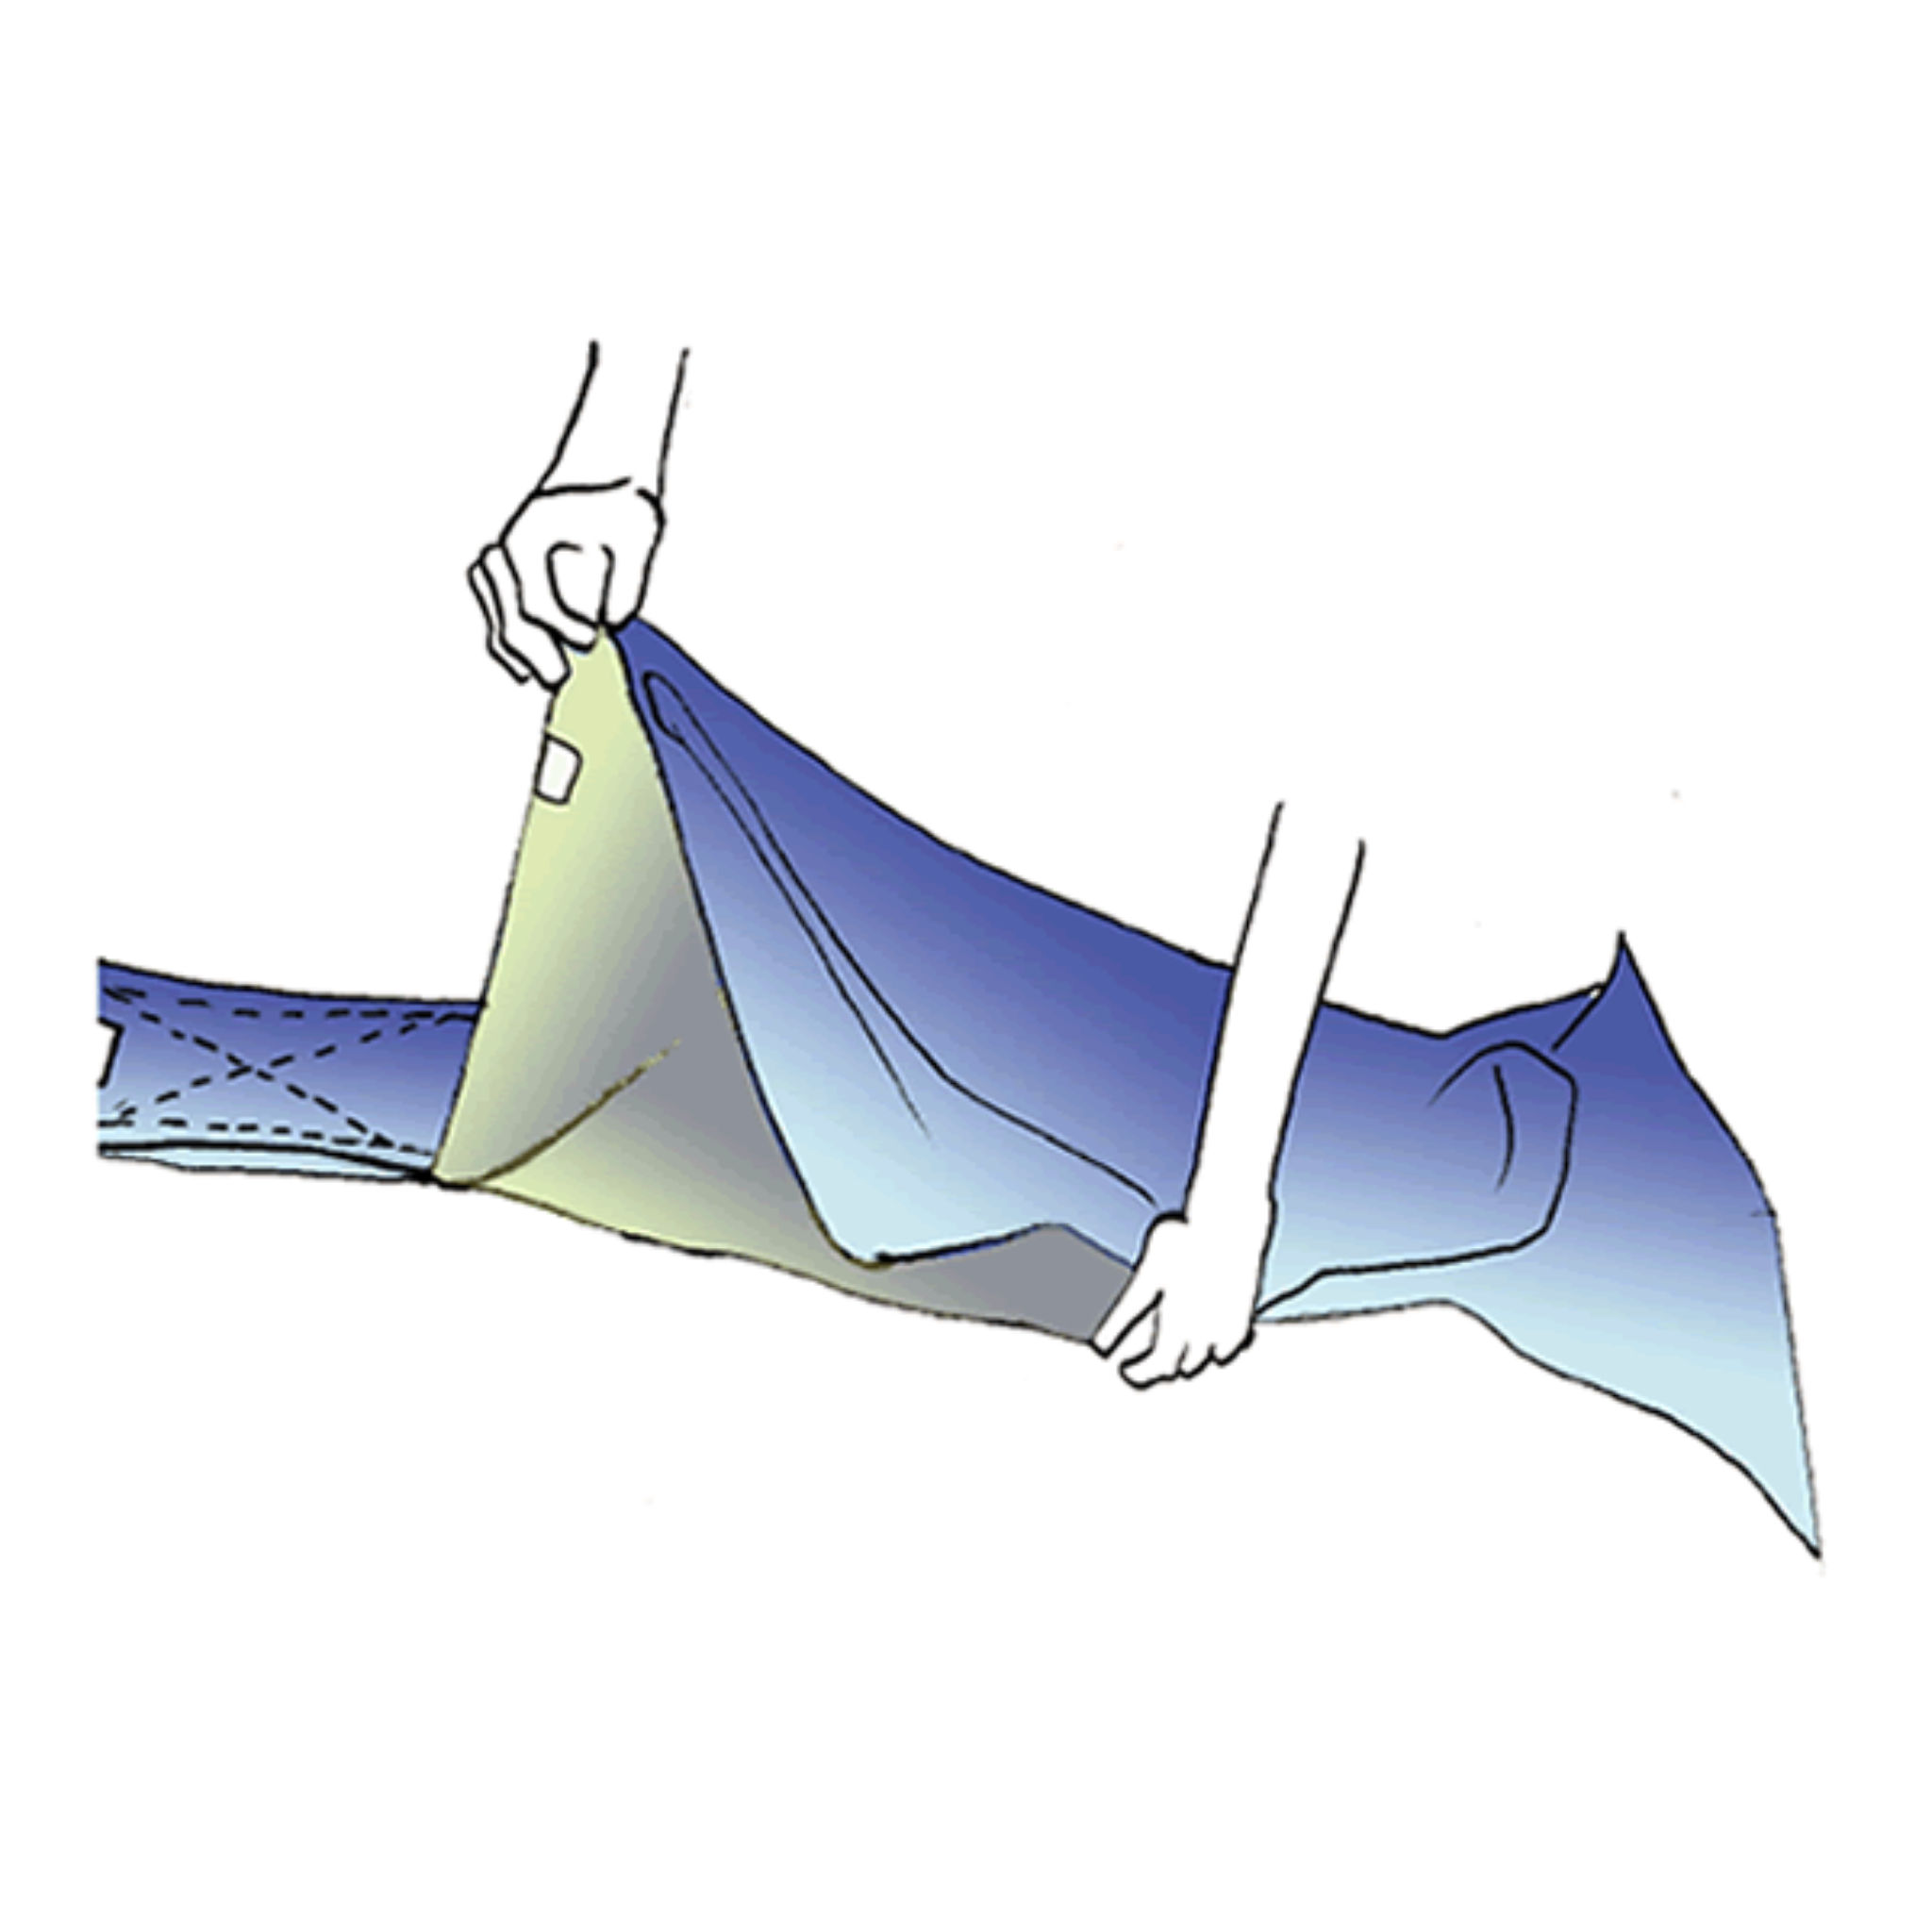
01 Check the Orientation
Hold the shoulder section with the brand label facing up, then unfold the tail gently while checking the care label on its reverse side.
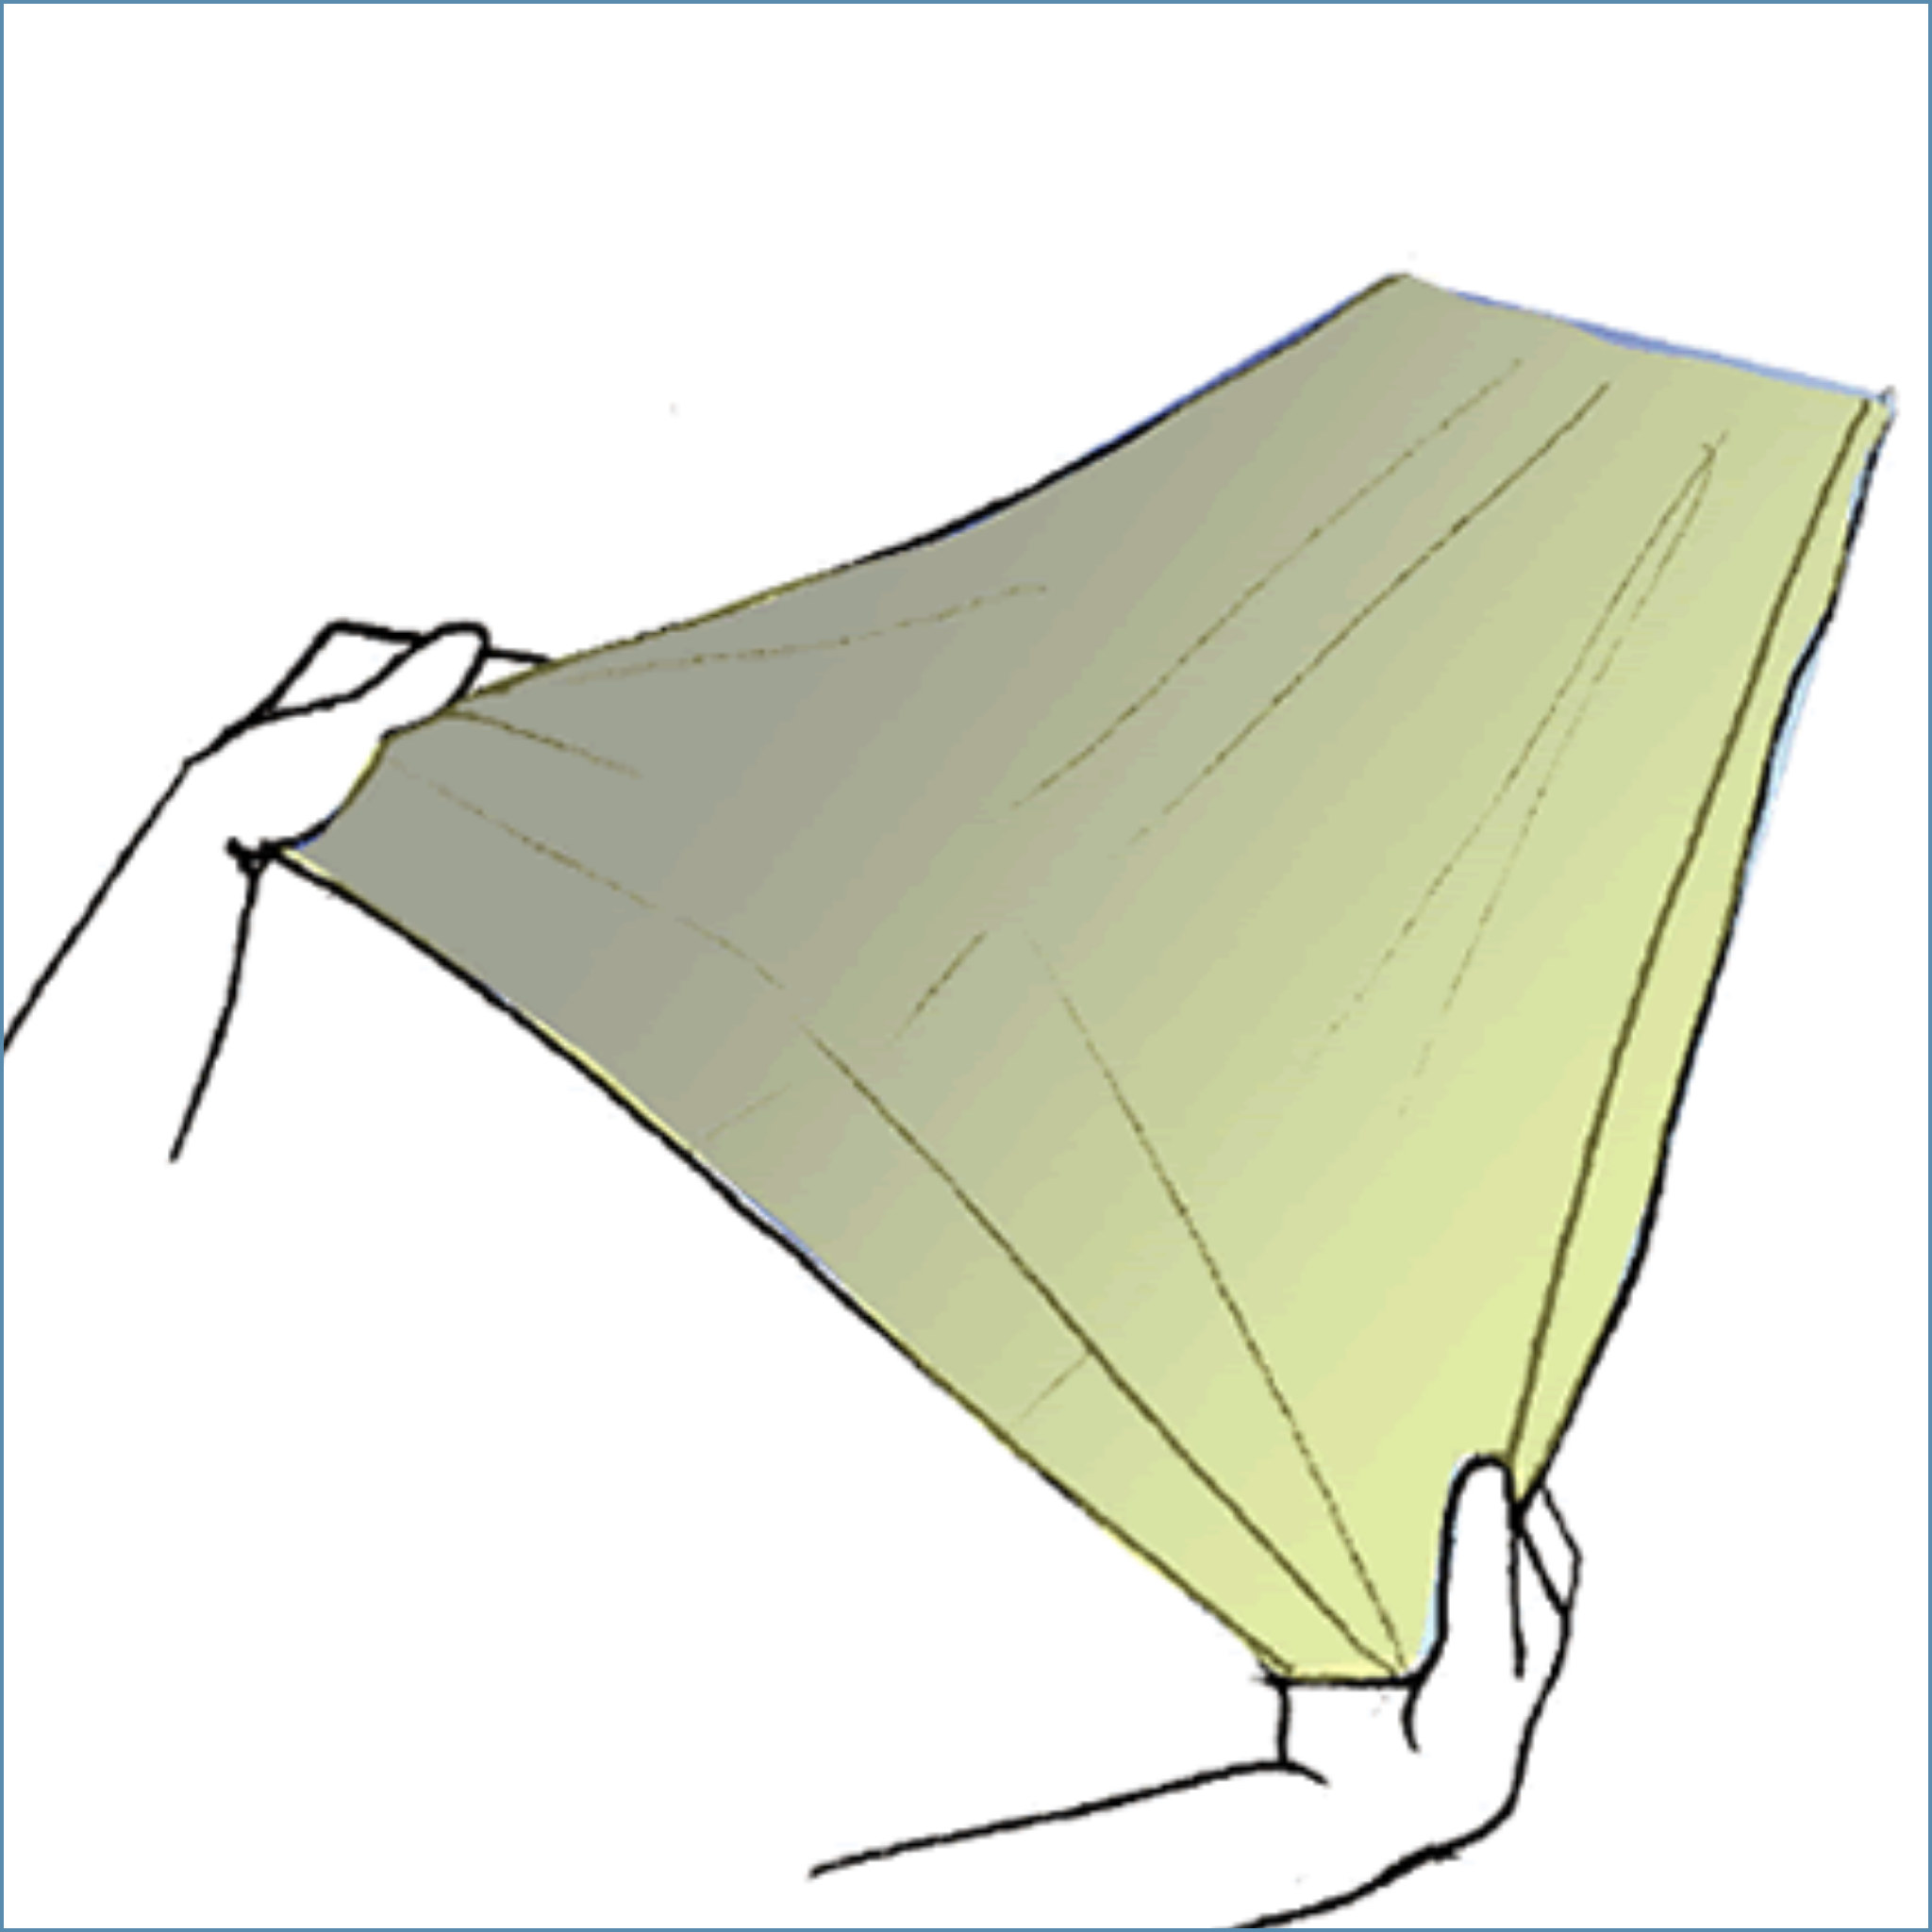
02 Open the Tail
Open the folded tail to its full width. Hold both outer edges at the end and spread them gently.
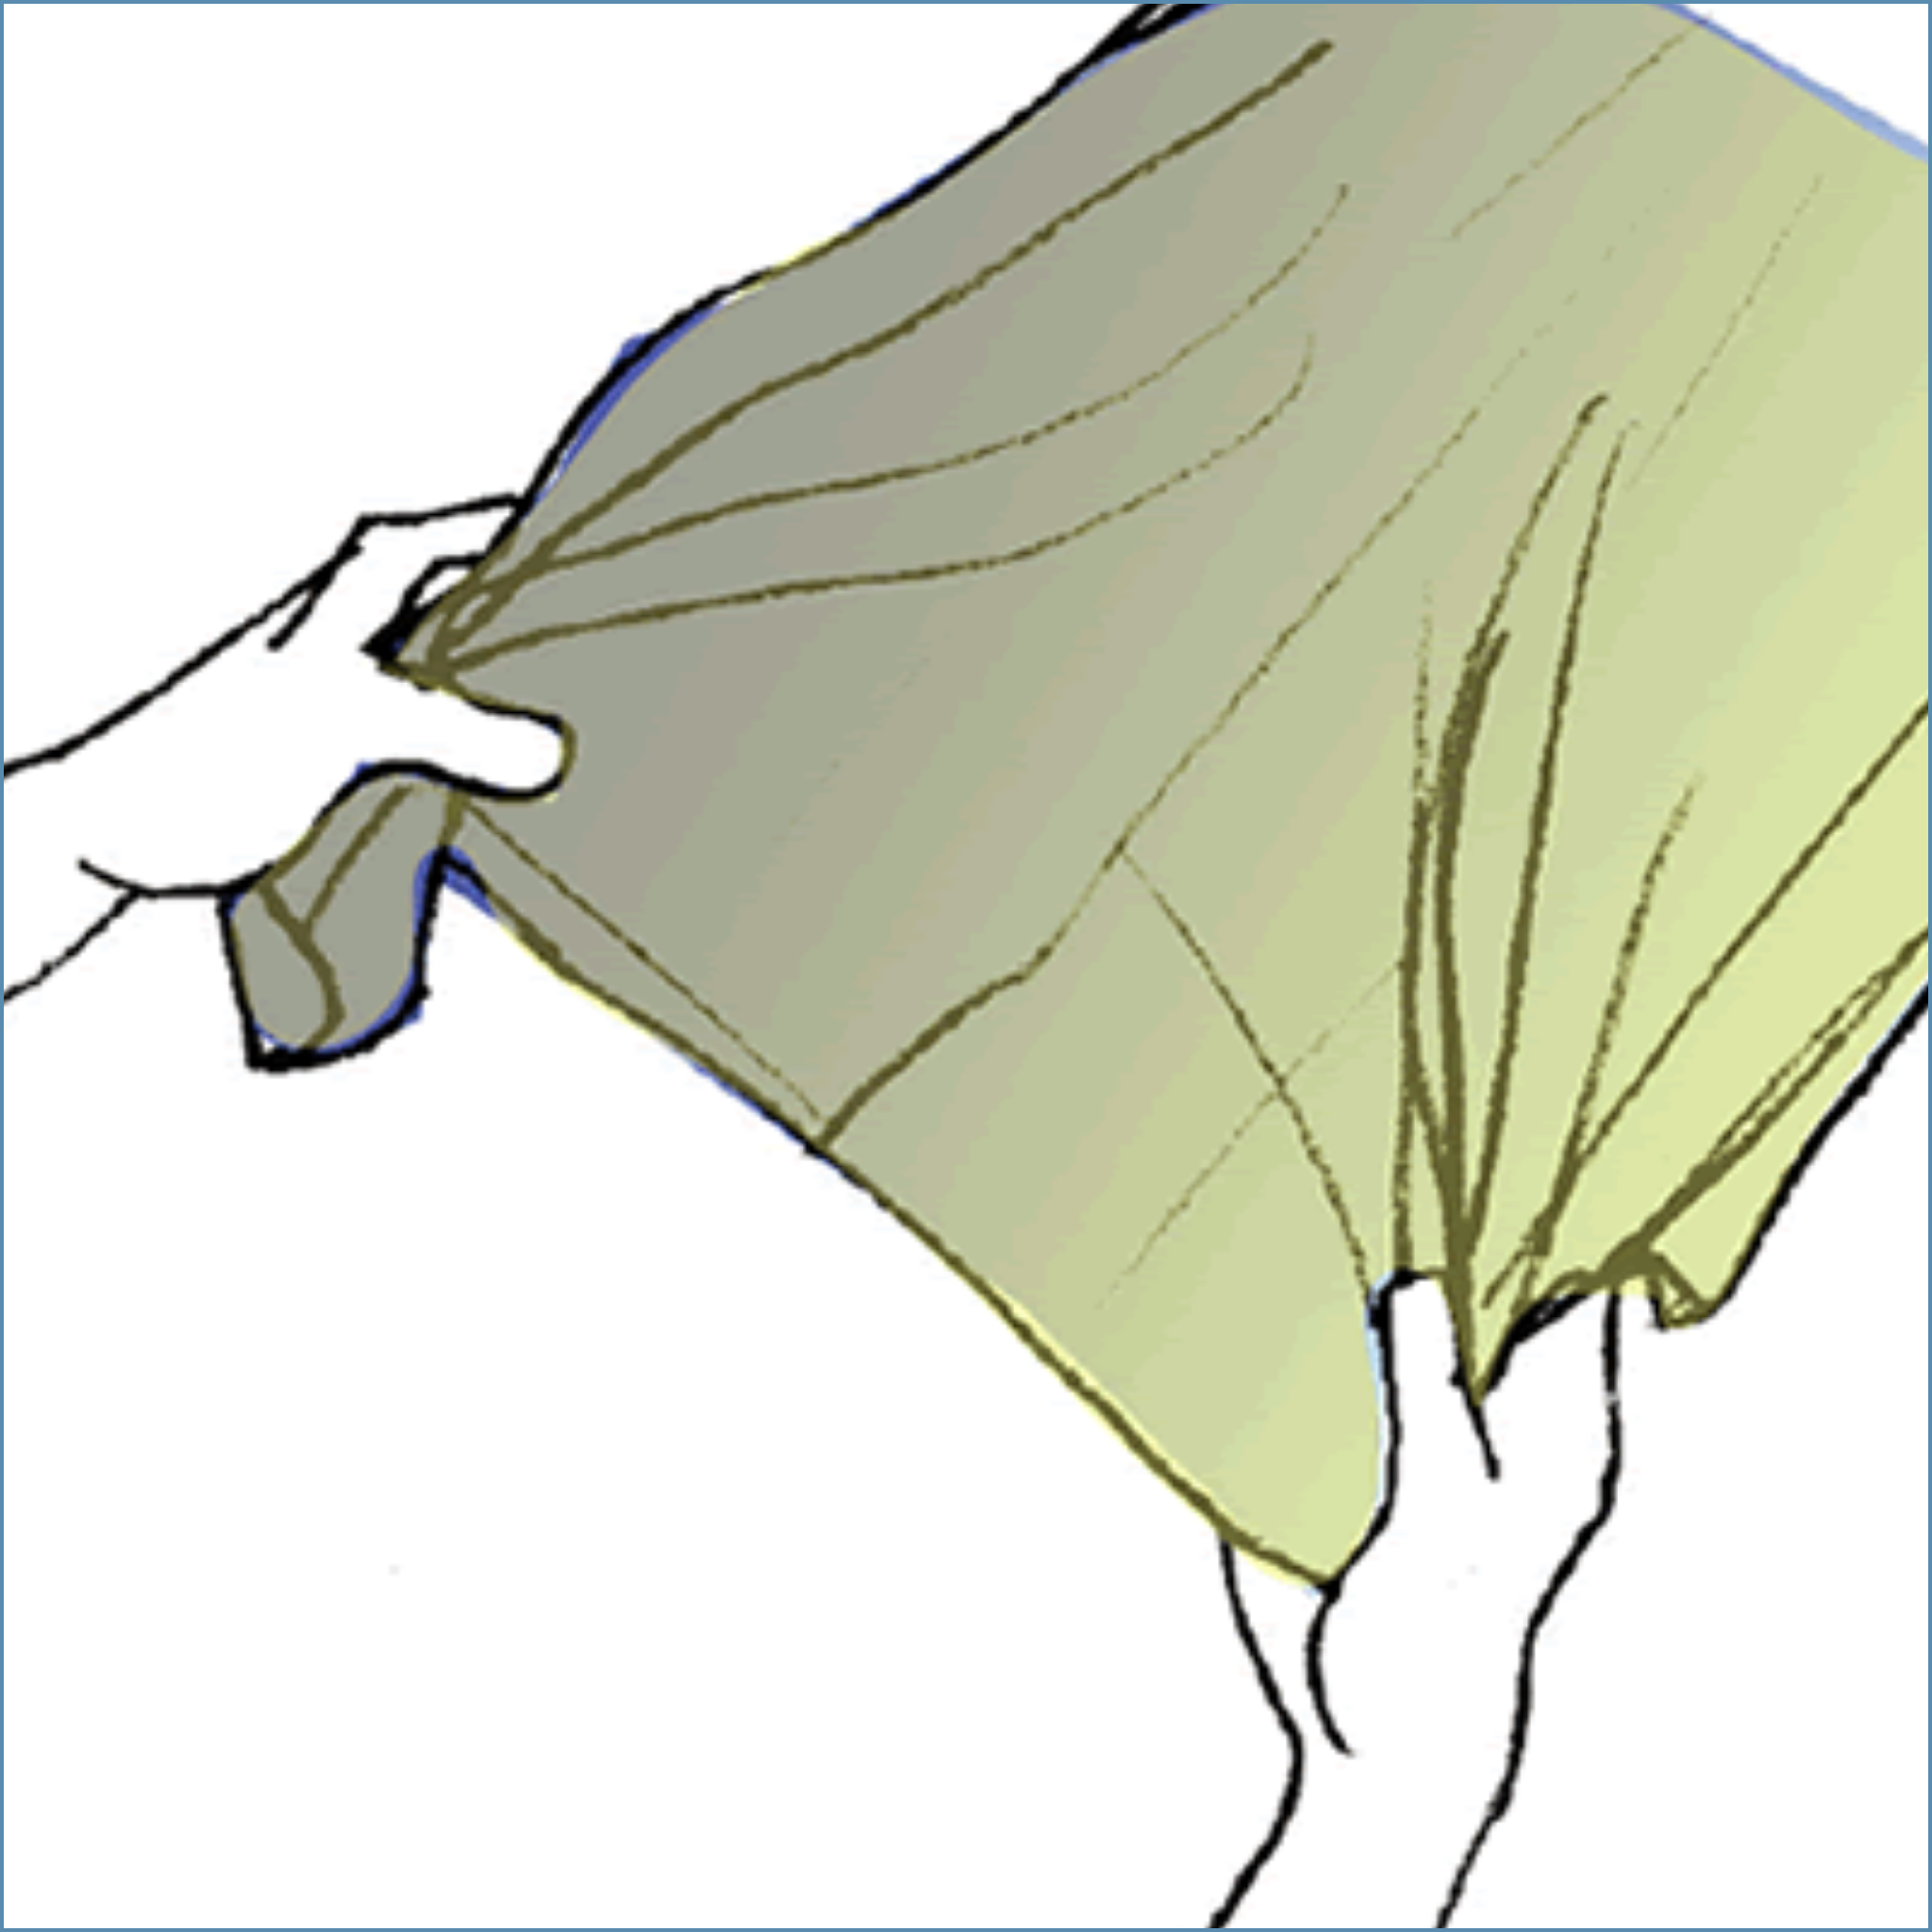
03 Gather the Fabric
Starting at the outer edges, gather the fabric slowly towards the centre, forming even folds in your hand.
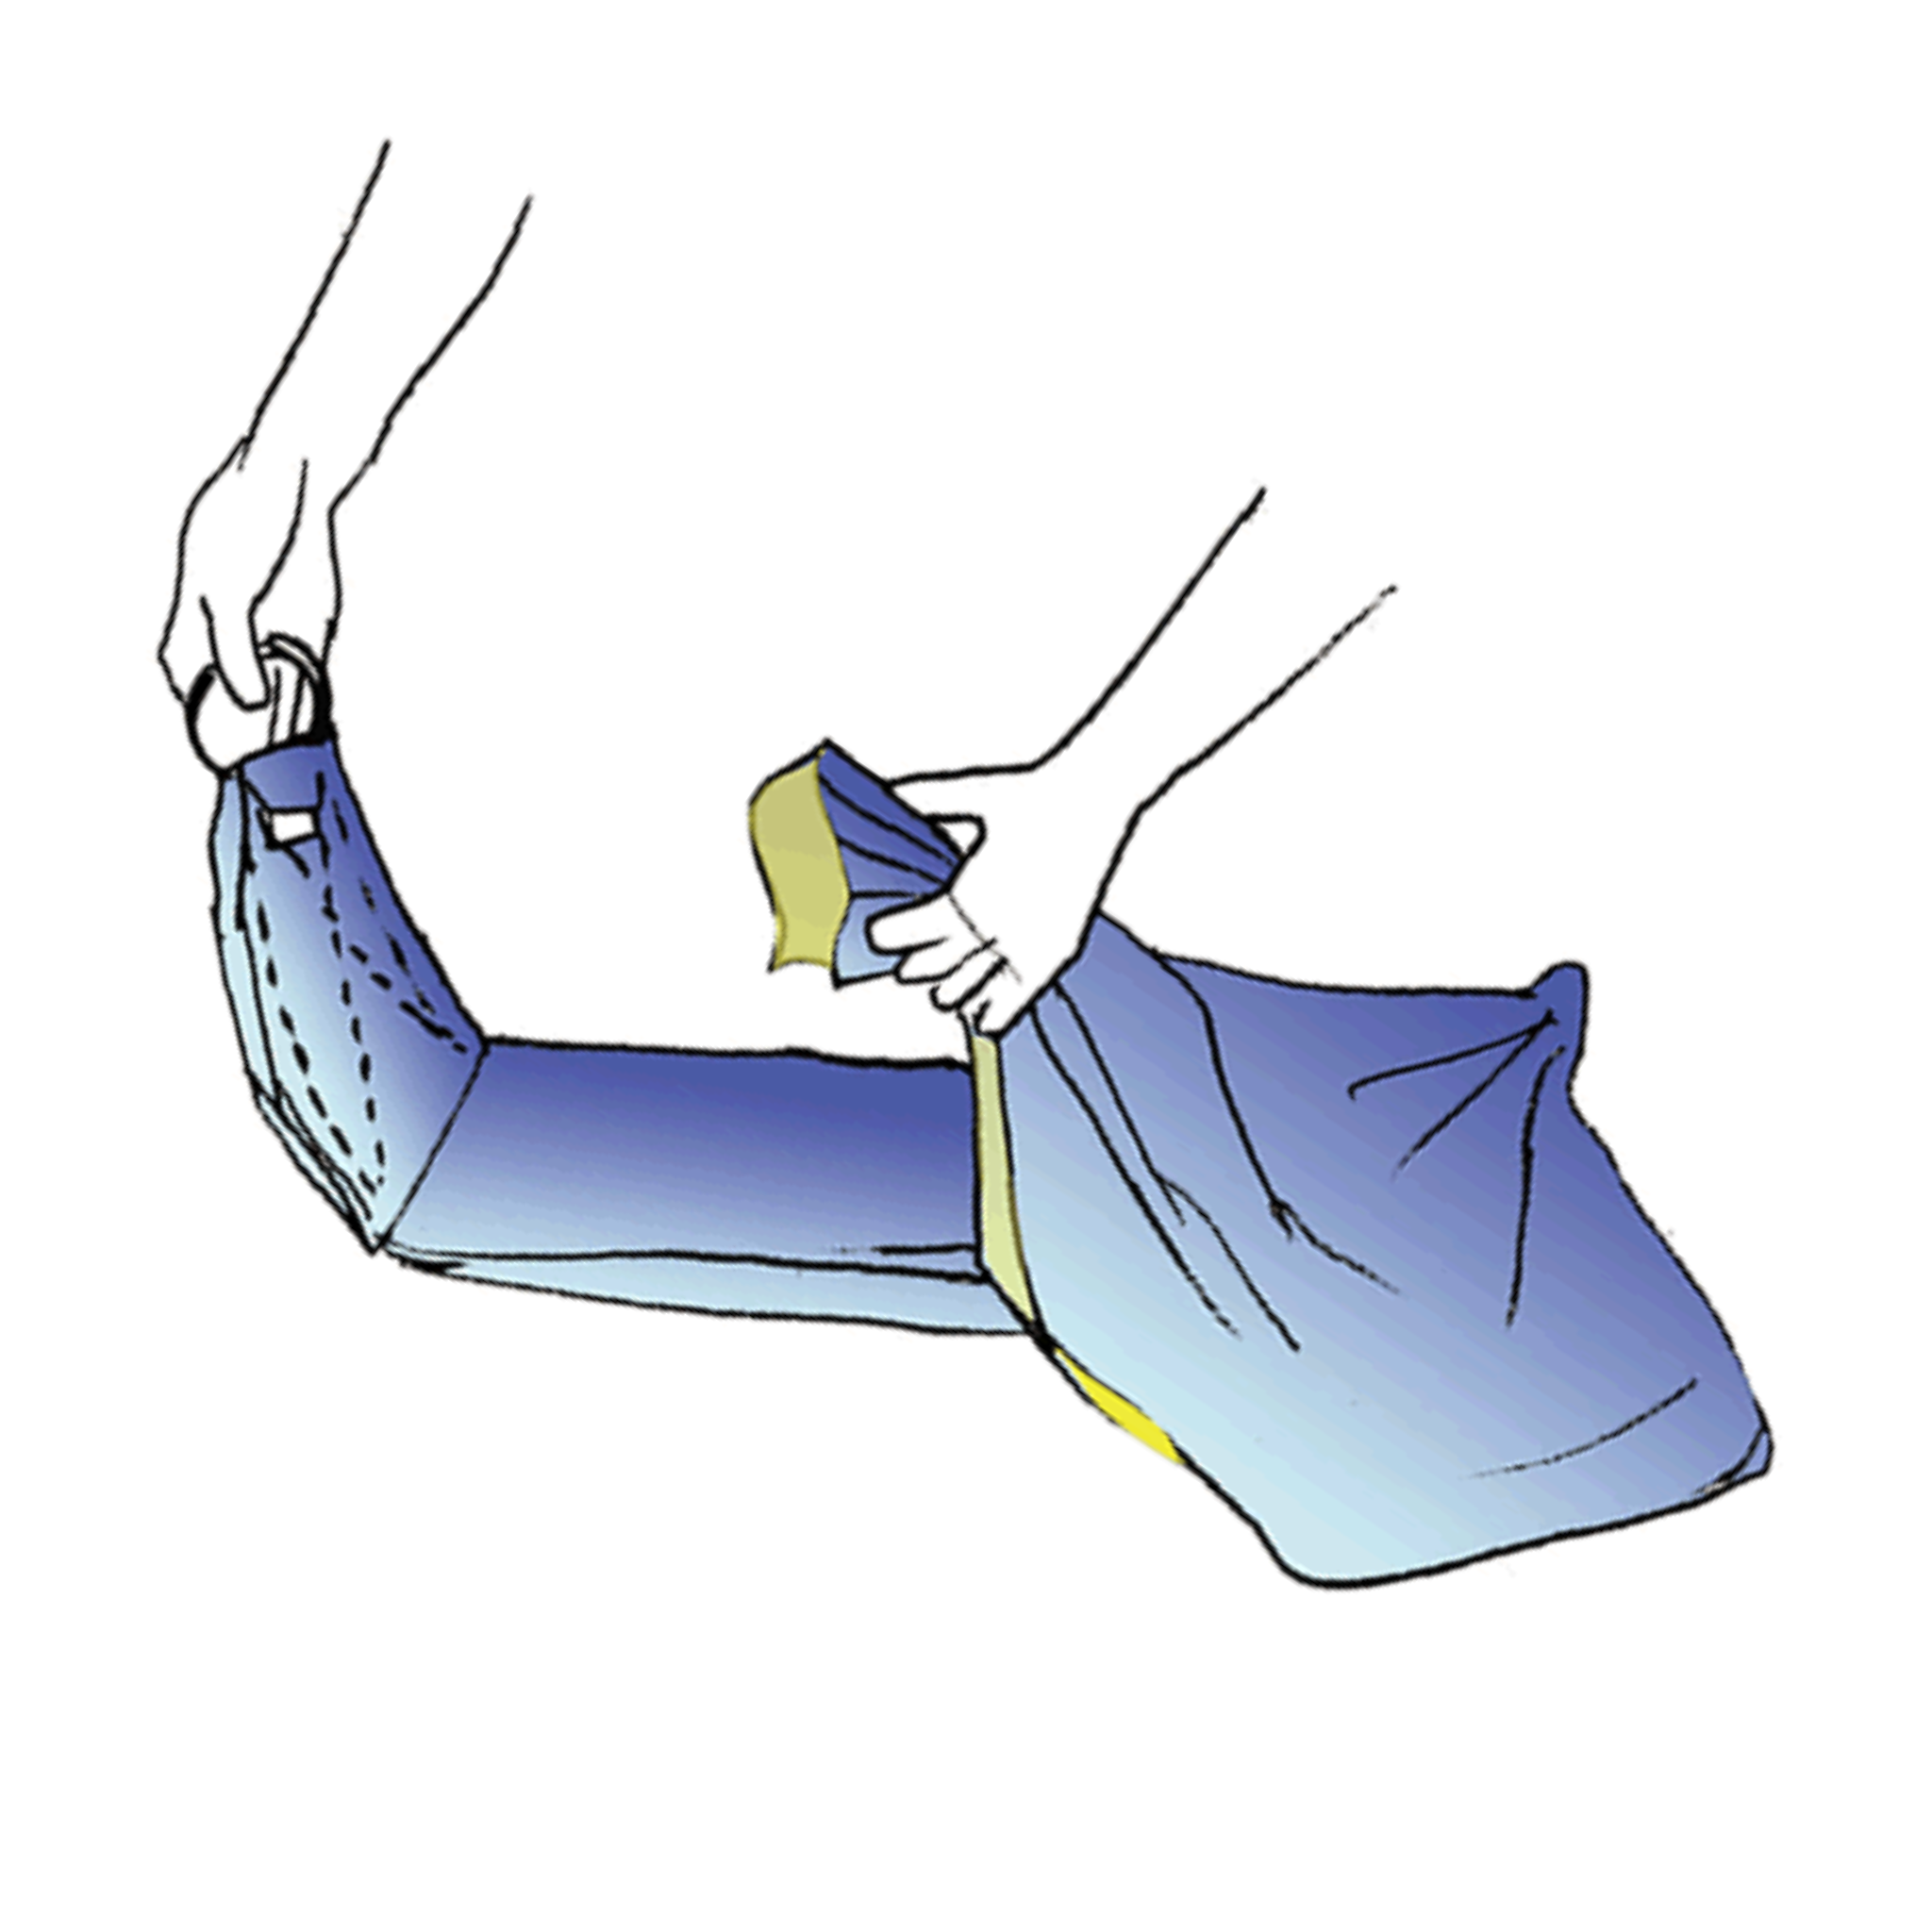
04 Pass Through Both Rings
Keep the gathered end flat and pass it through both rings together, taking care not to twist the fabric.
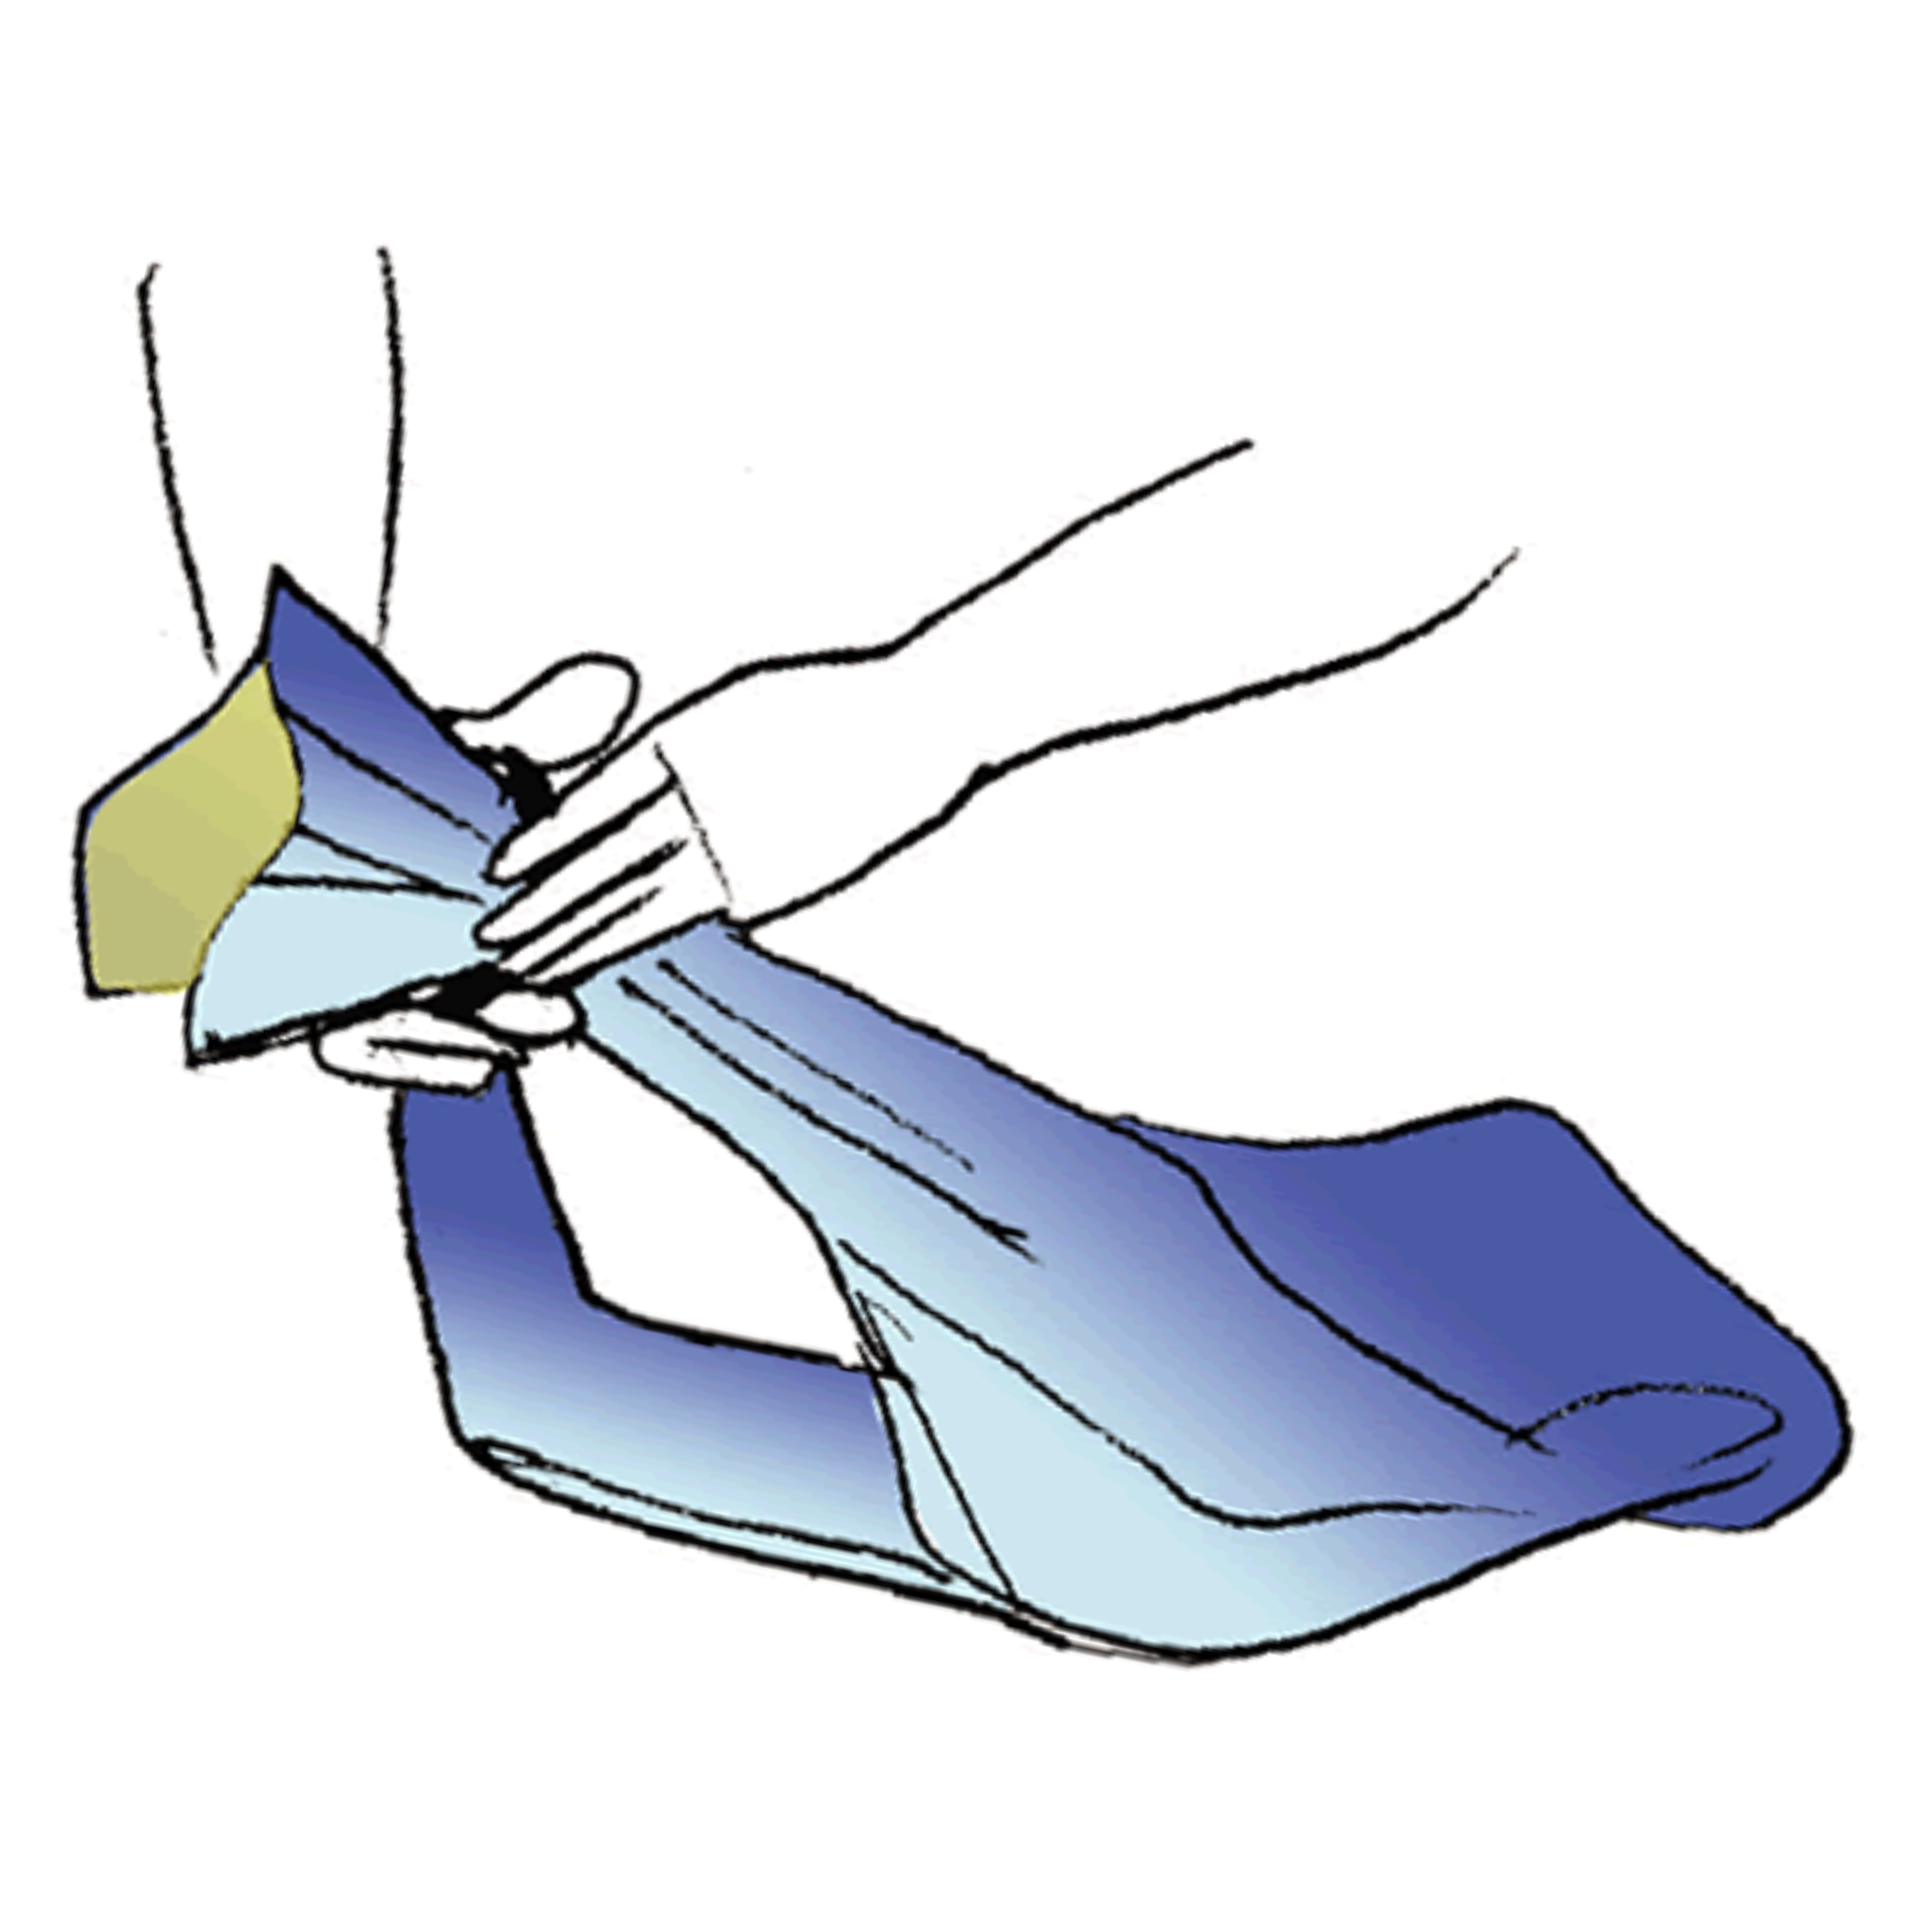
05 Check for Twists
Before continuing, make sure the fabric does not twist or overlap between the shoulder section and the rings.
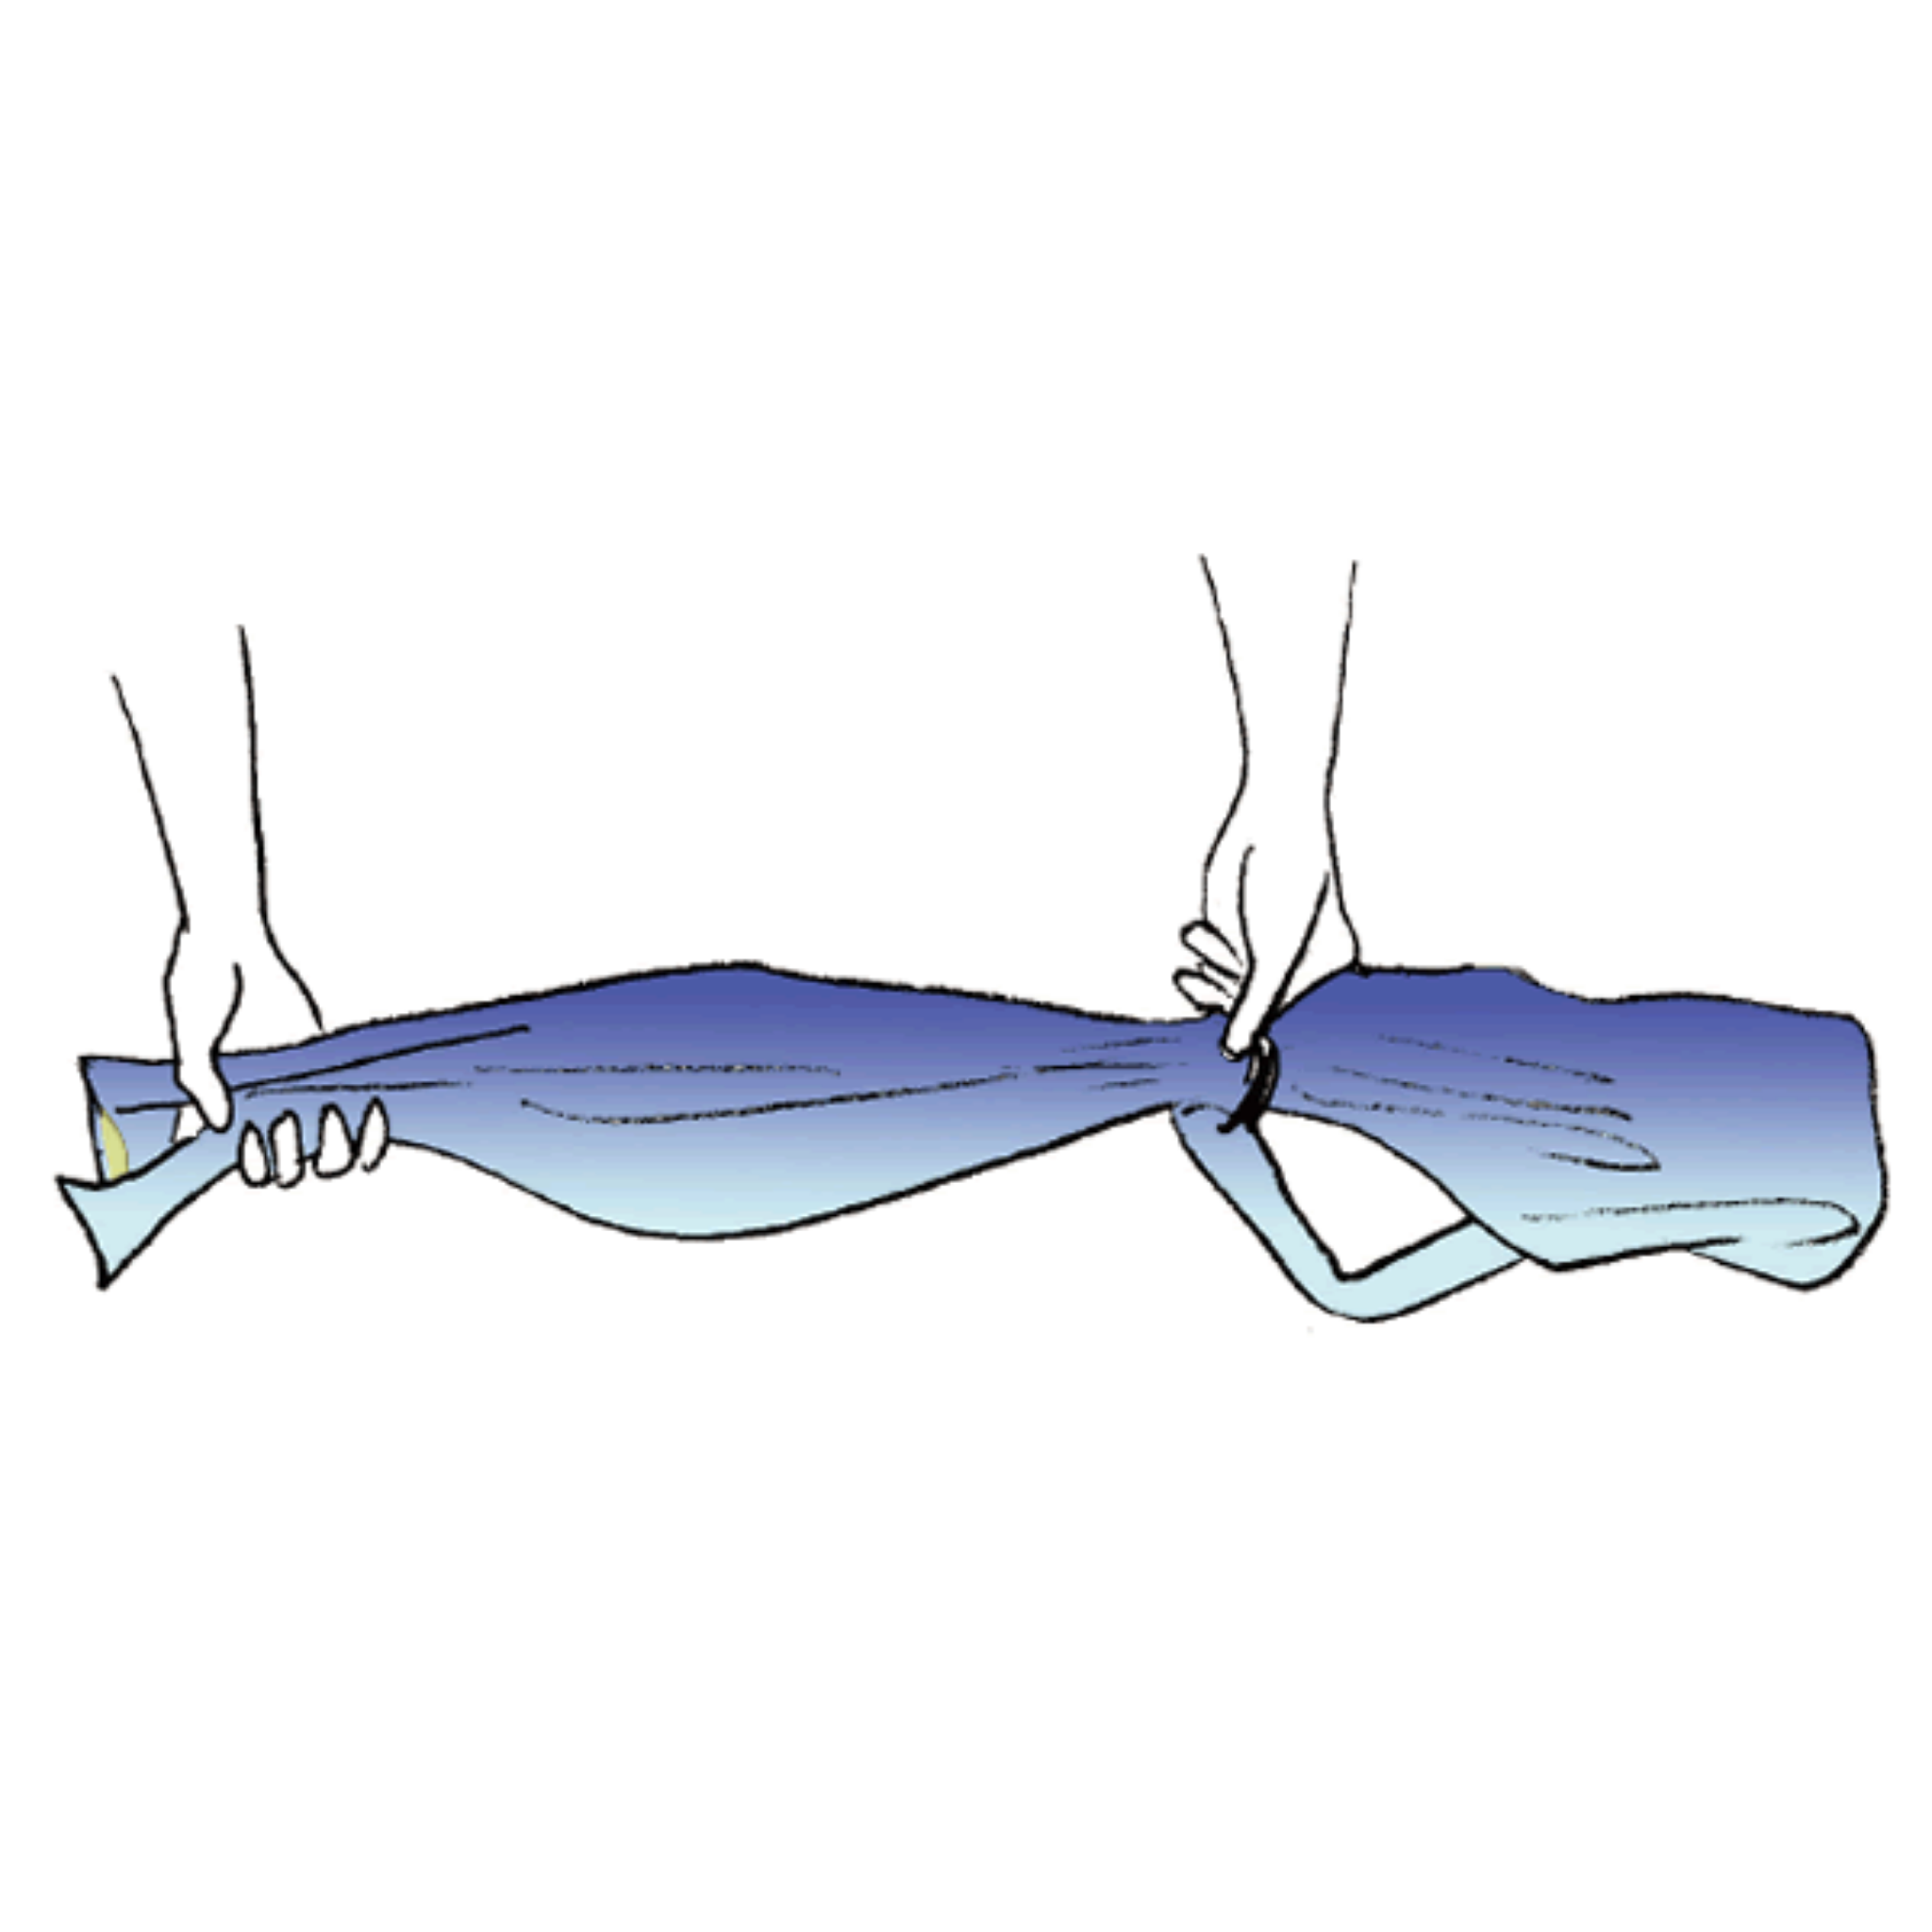
06 Set the Loop Size
Pull the threaded fabric forward gently and set the loop approximately for the wearer’s build and the baby’s size.
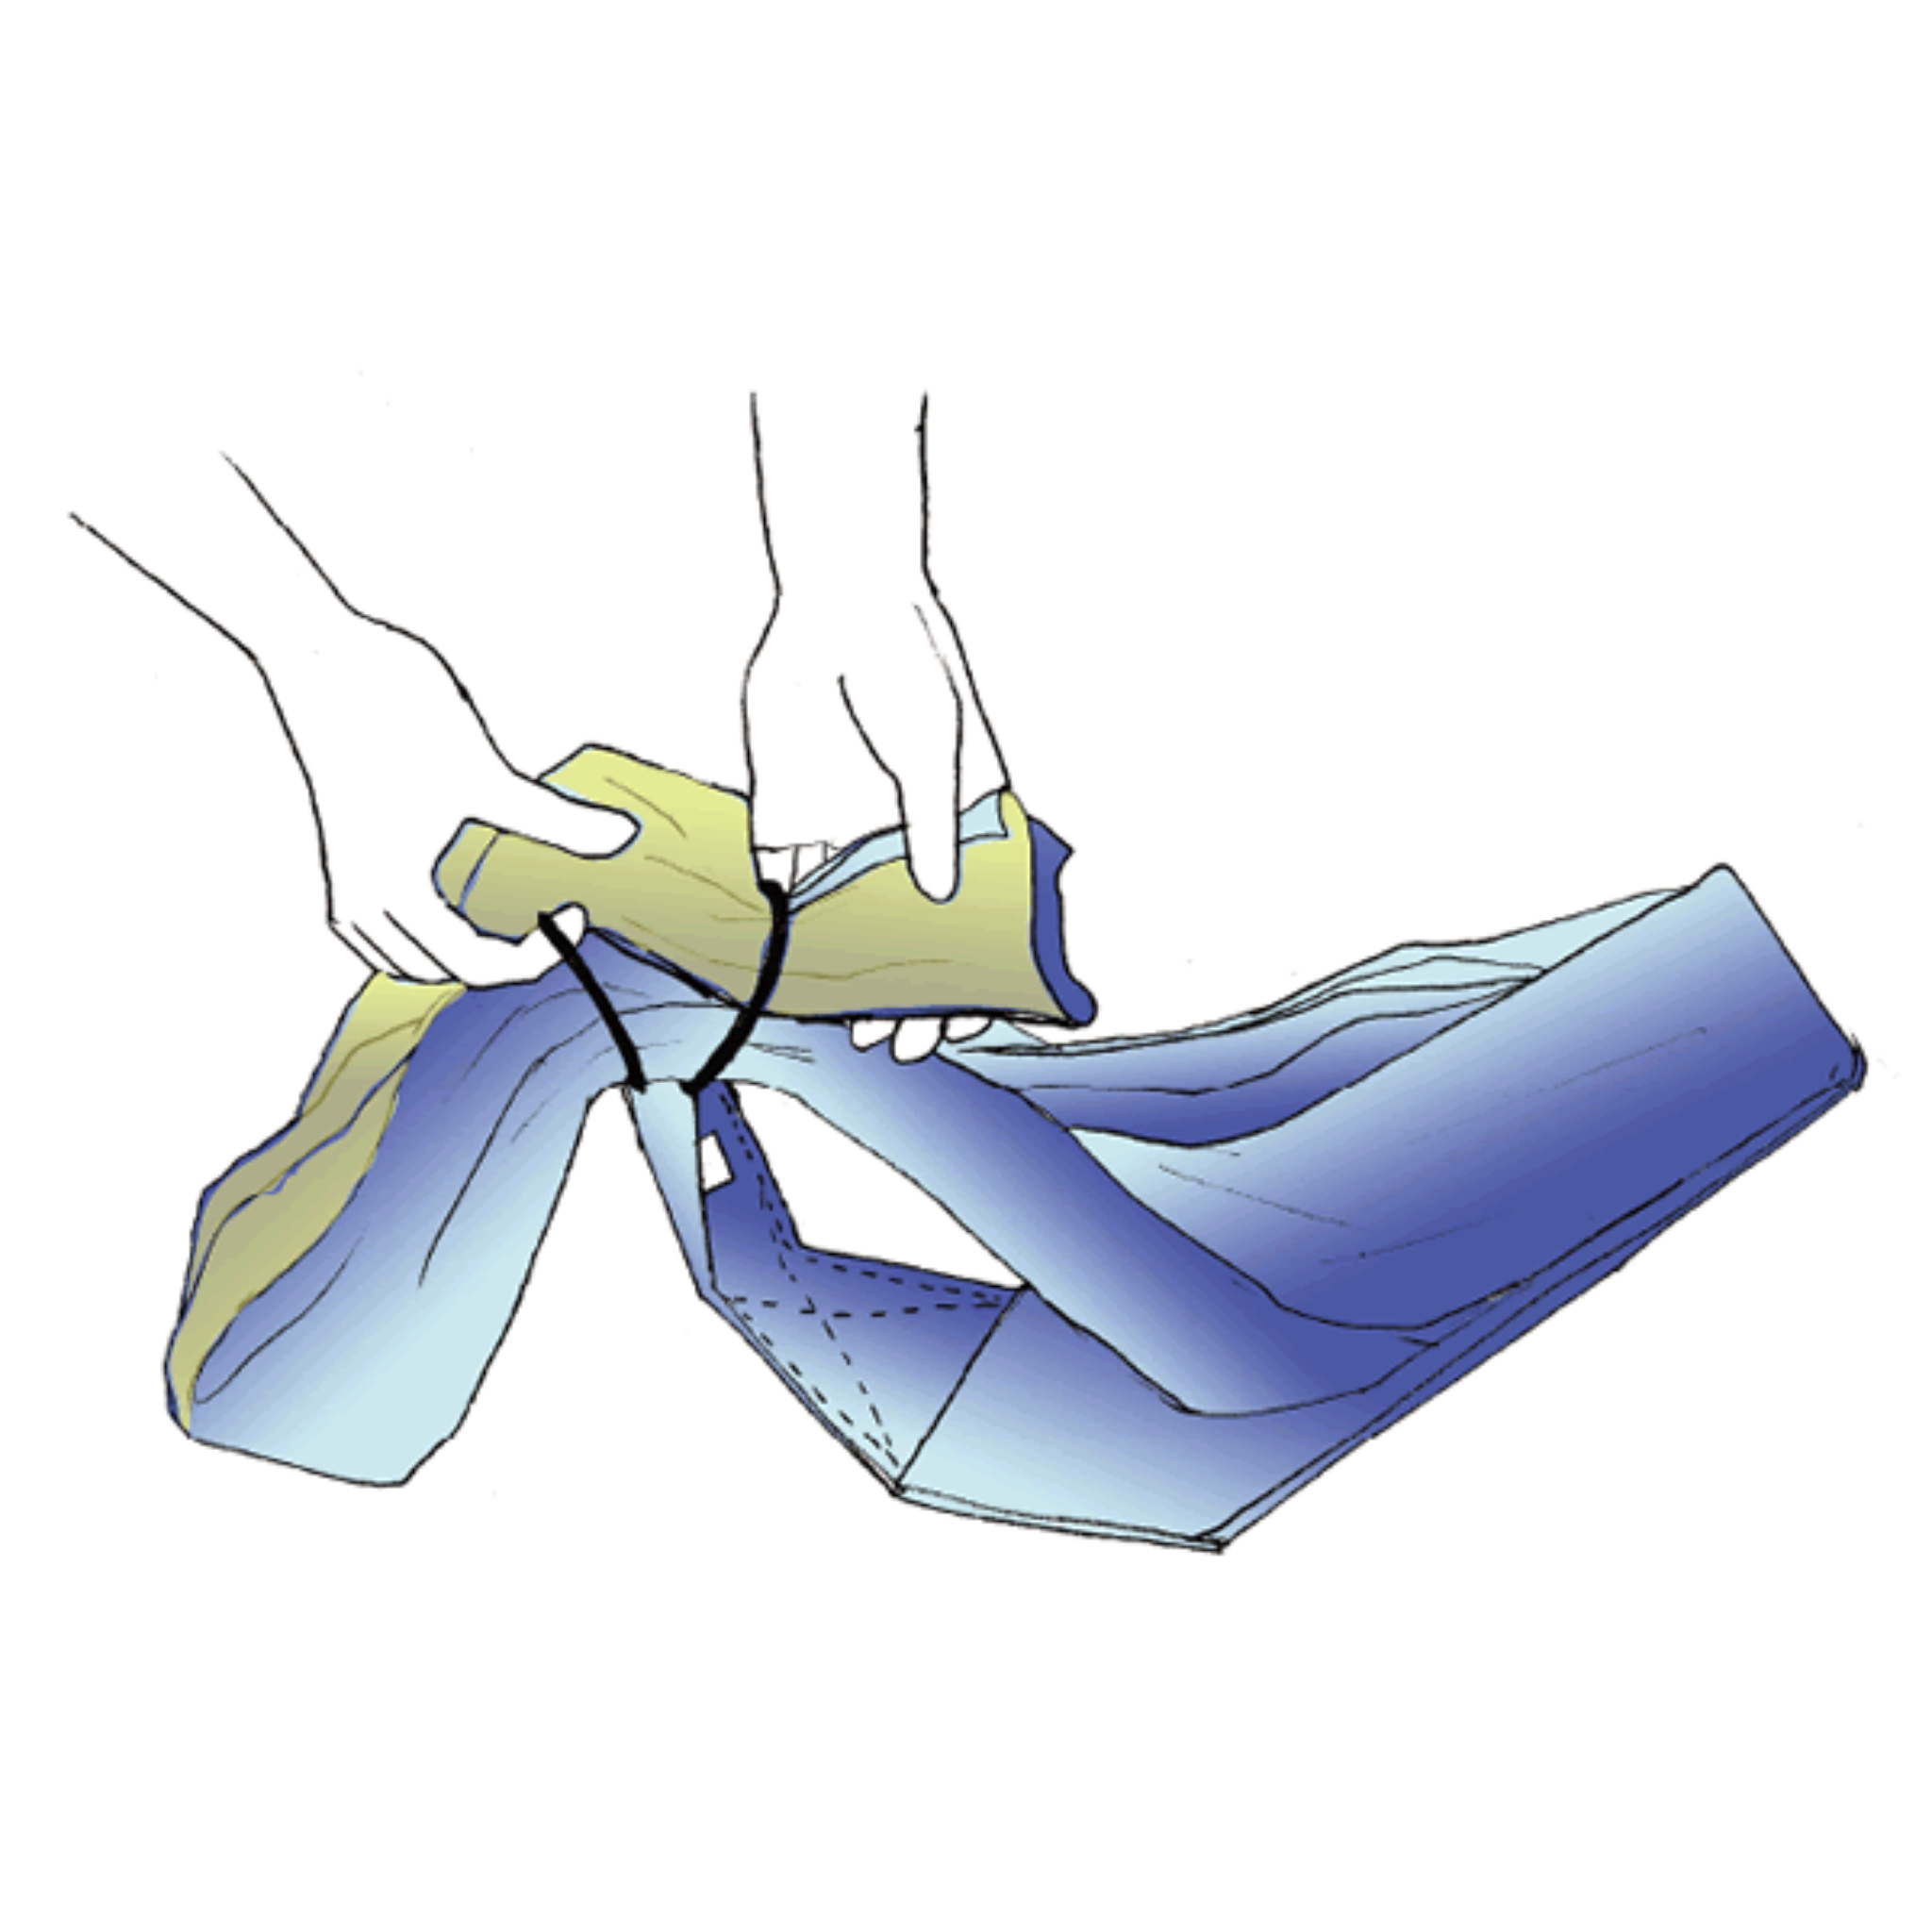
07 Thread Back Between the Rings
As with fastening a belt, fold the fabric back and pass it between the two rings towards you.
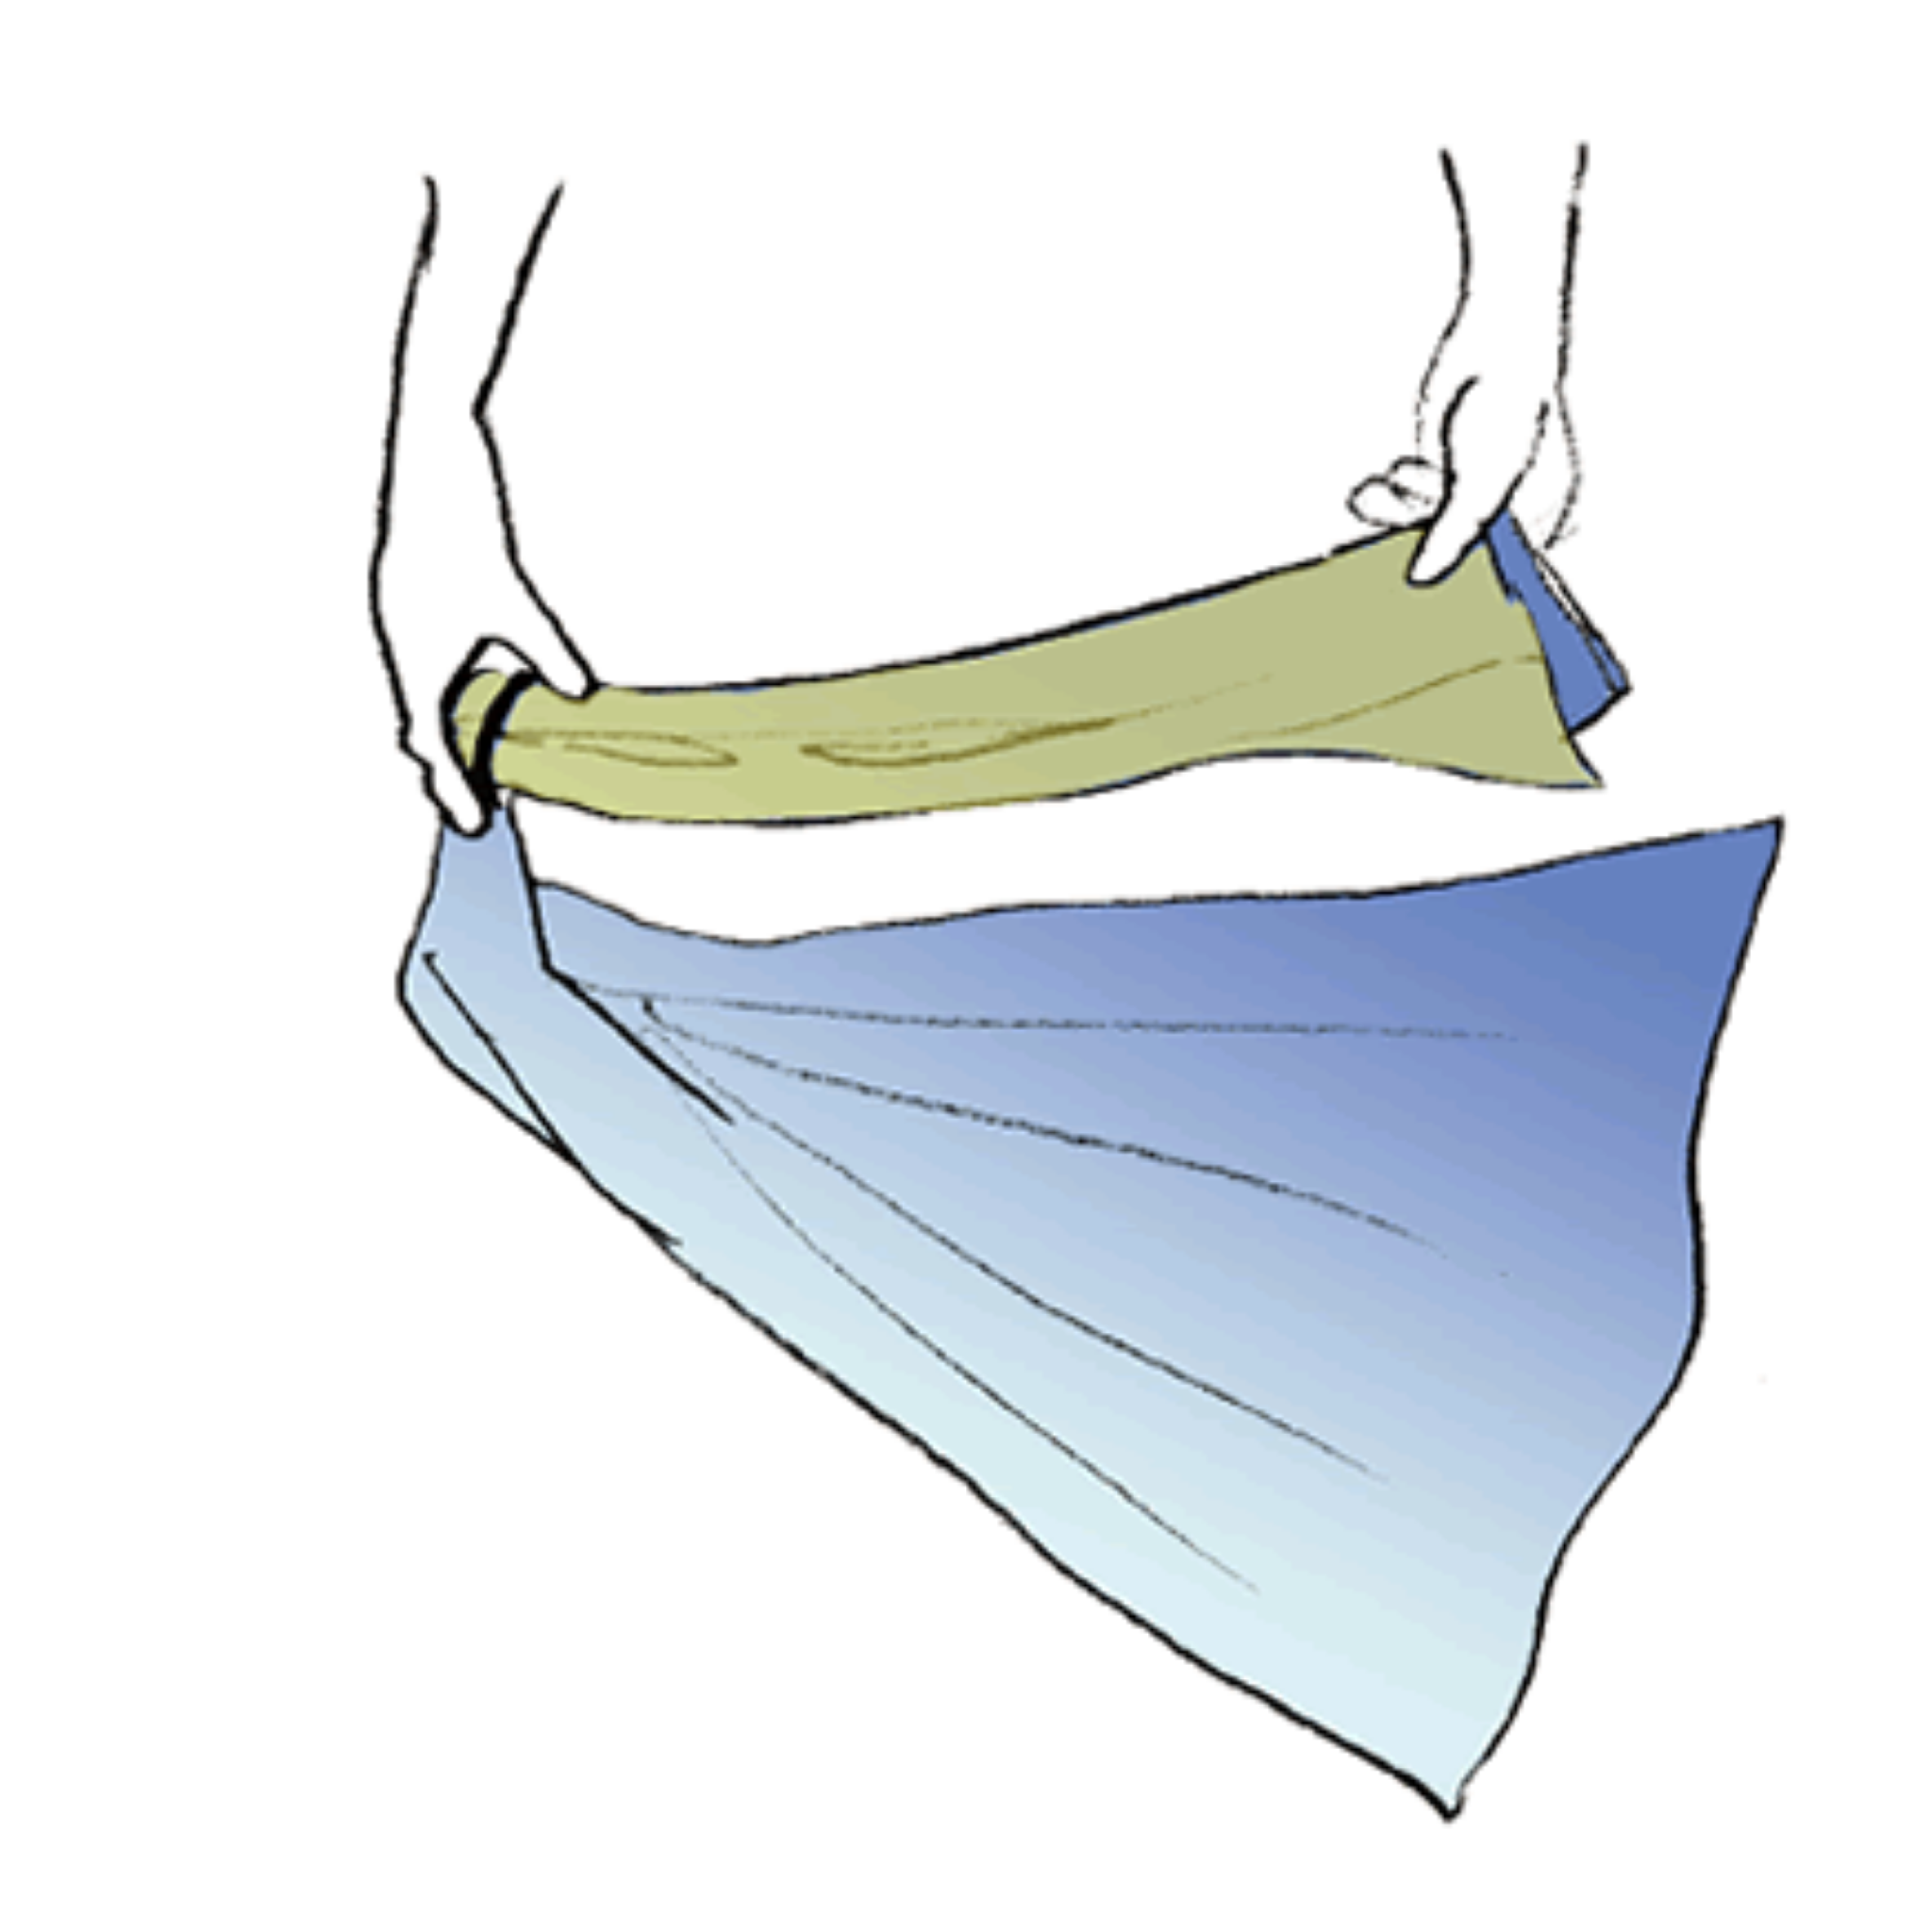
08 Check the Fabric Face
The reverse side of the tail should face up as it emerges from the rings. This arrangement allows smooth adjustment.
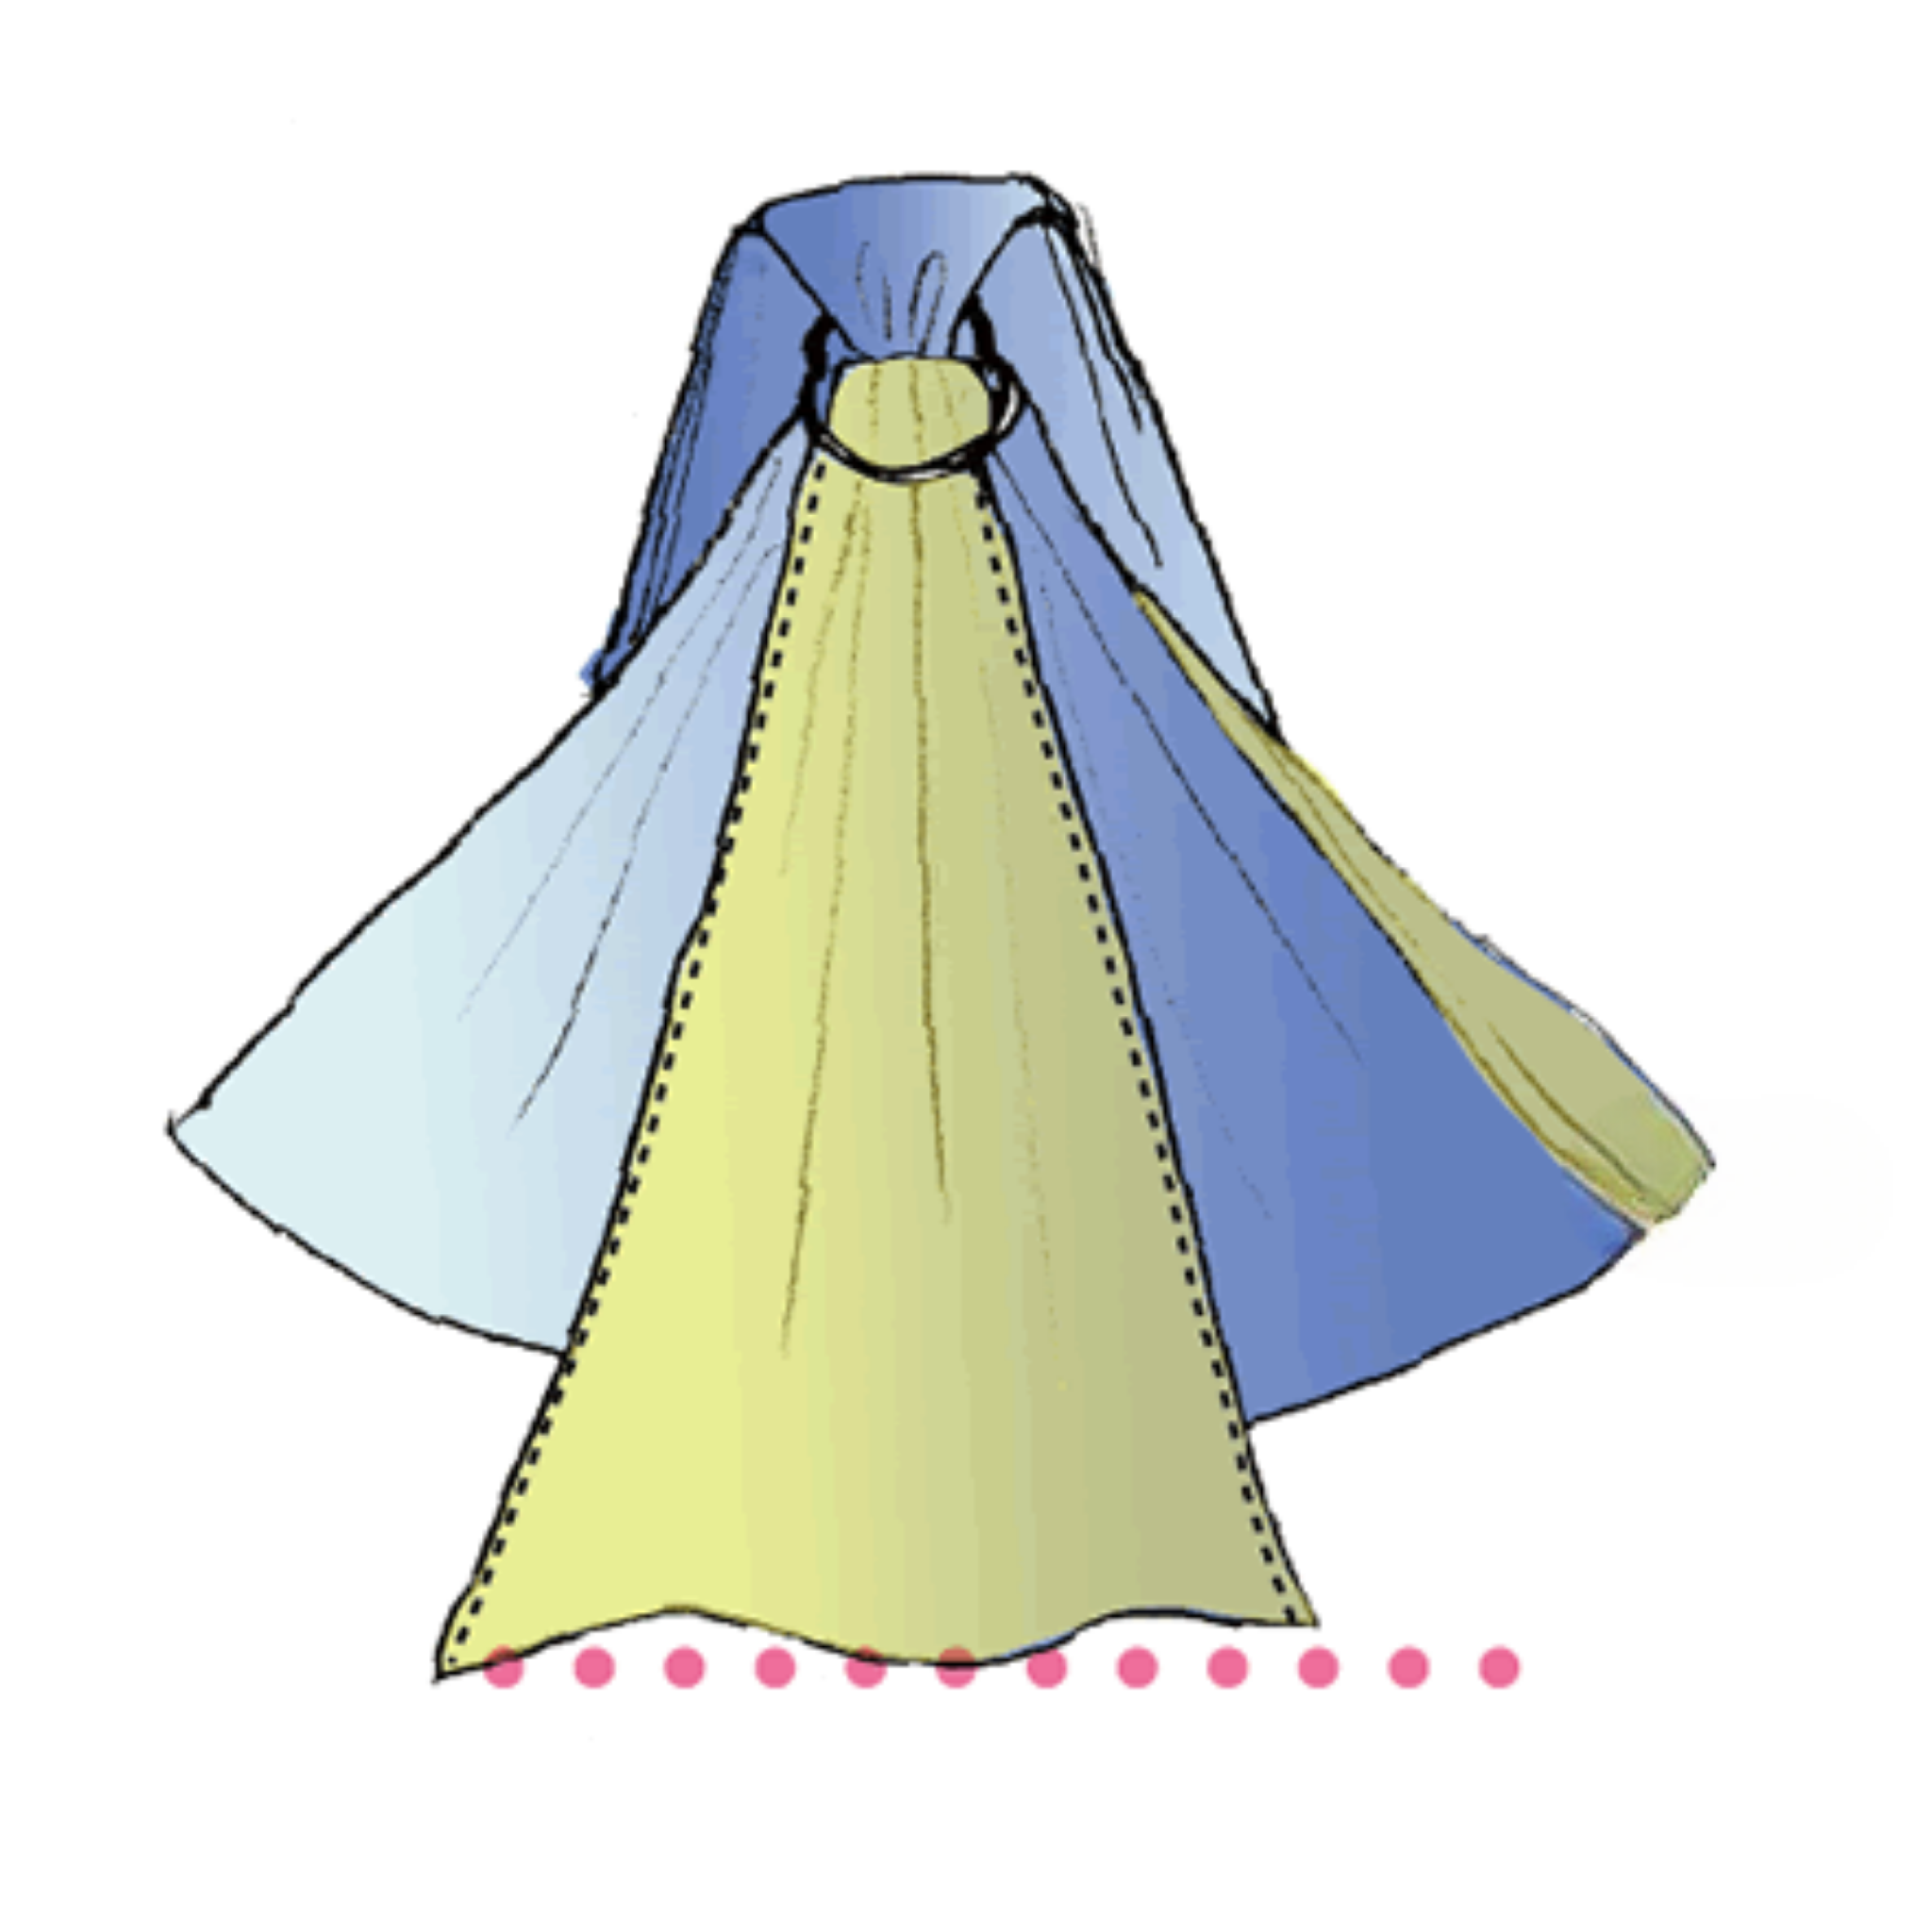
09 Check the Tail Edge
Finally, check that the lower edge of the hanging tail forms an even fan. The basic threading is now complete.
Step 02
Gathering the Fabric
Gathering the Fabric
Arrange the Gathers
Arrange the Gathers
Evenly arranged gathers at the rings are essential for a comfortable, well-balanced carry.
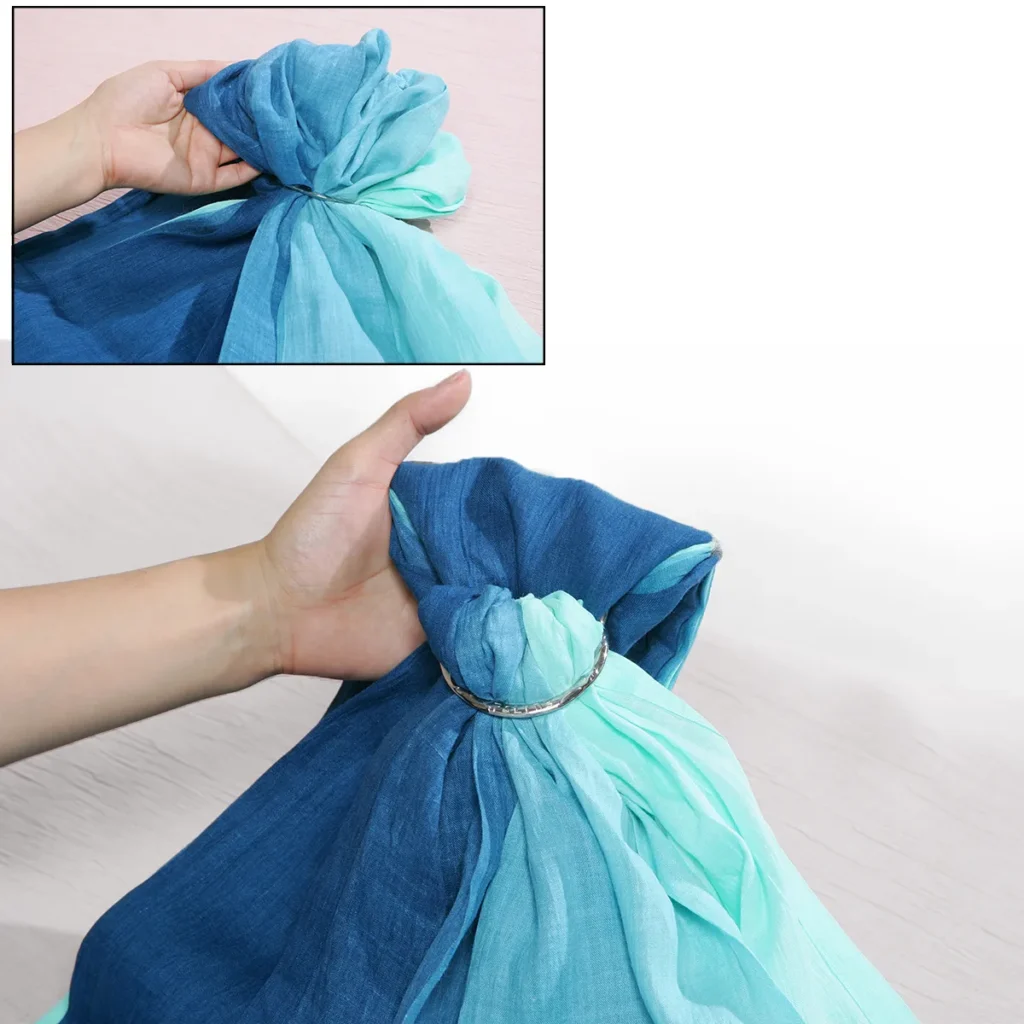
Arrange the fabric from edge to edge in individual accordion-like folds. The two sewn edges, or rails, should sit separately at the left and right sides of the rings. If the fabric will not spread evenly, loosen it and gently separate the folds.
Even gathers at the rings are essential for a comfortable carry.
Separate the two fabric edges at the sides of the rings and form accordion-like folds. If anything twists or overlaps, loosen and rearrange it.
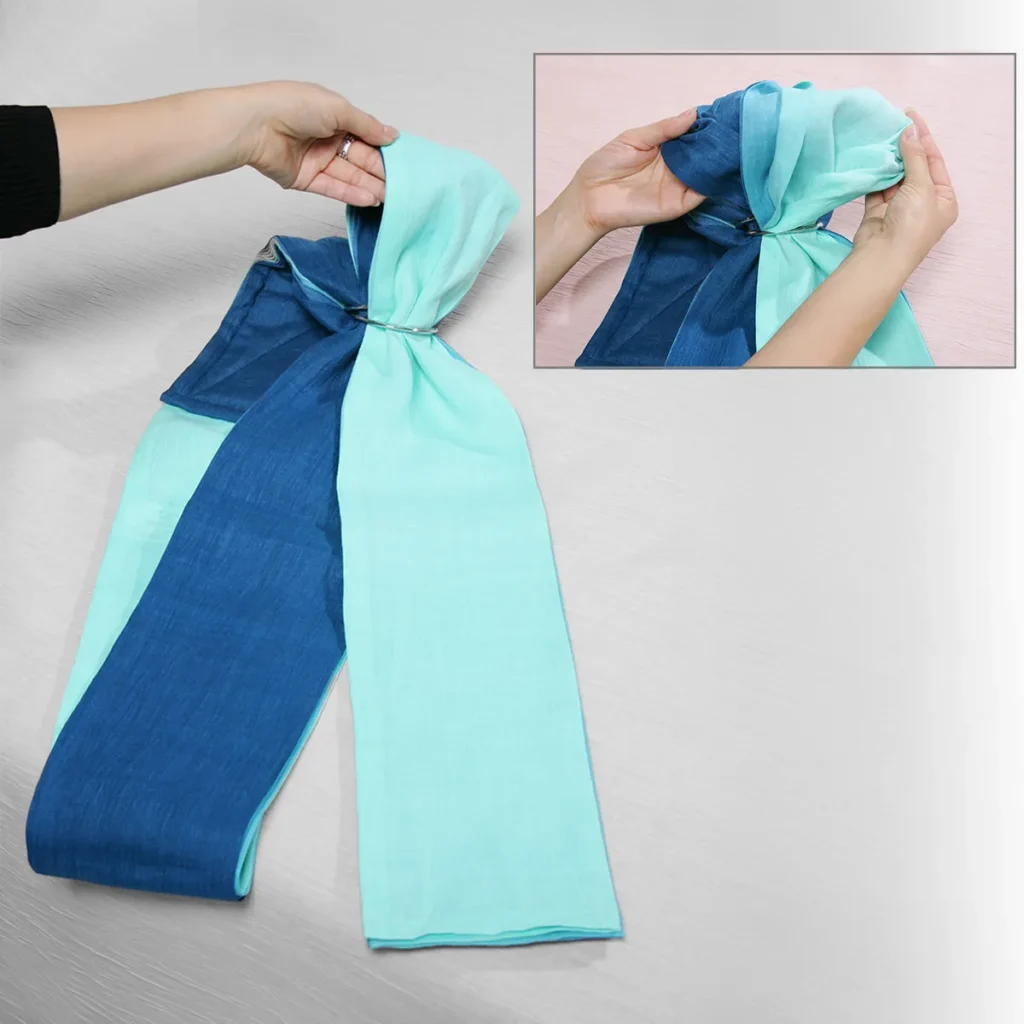
GATHER ADJUSTMENT
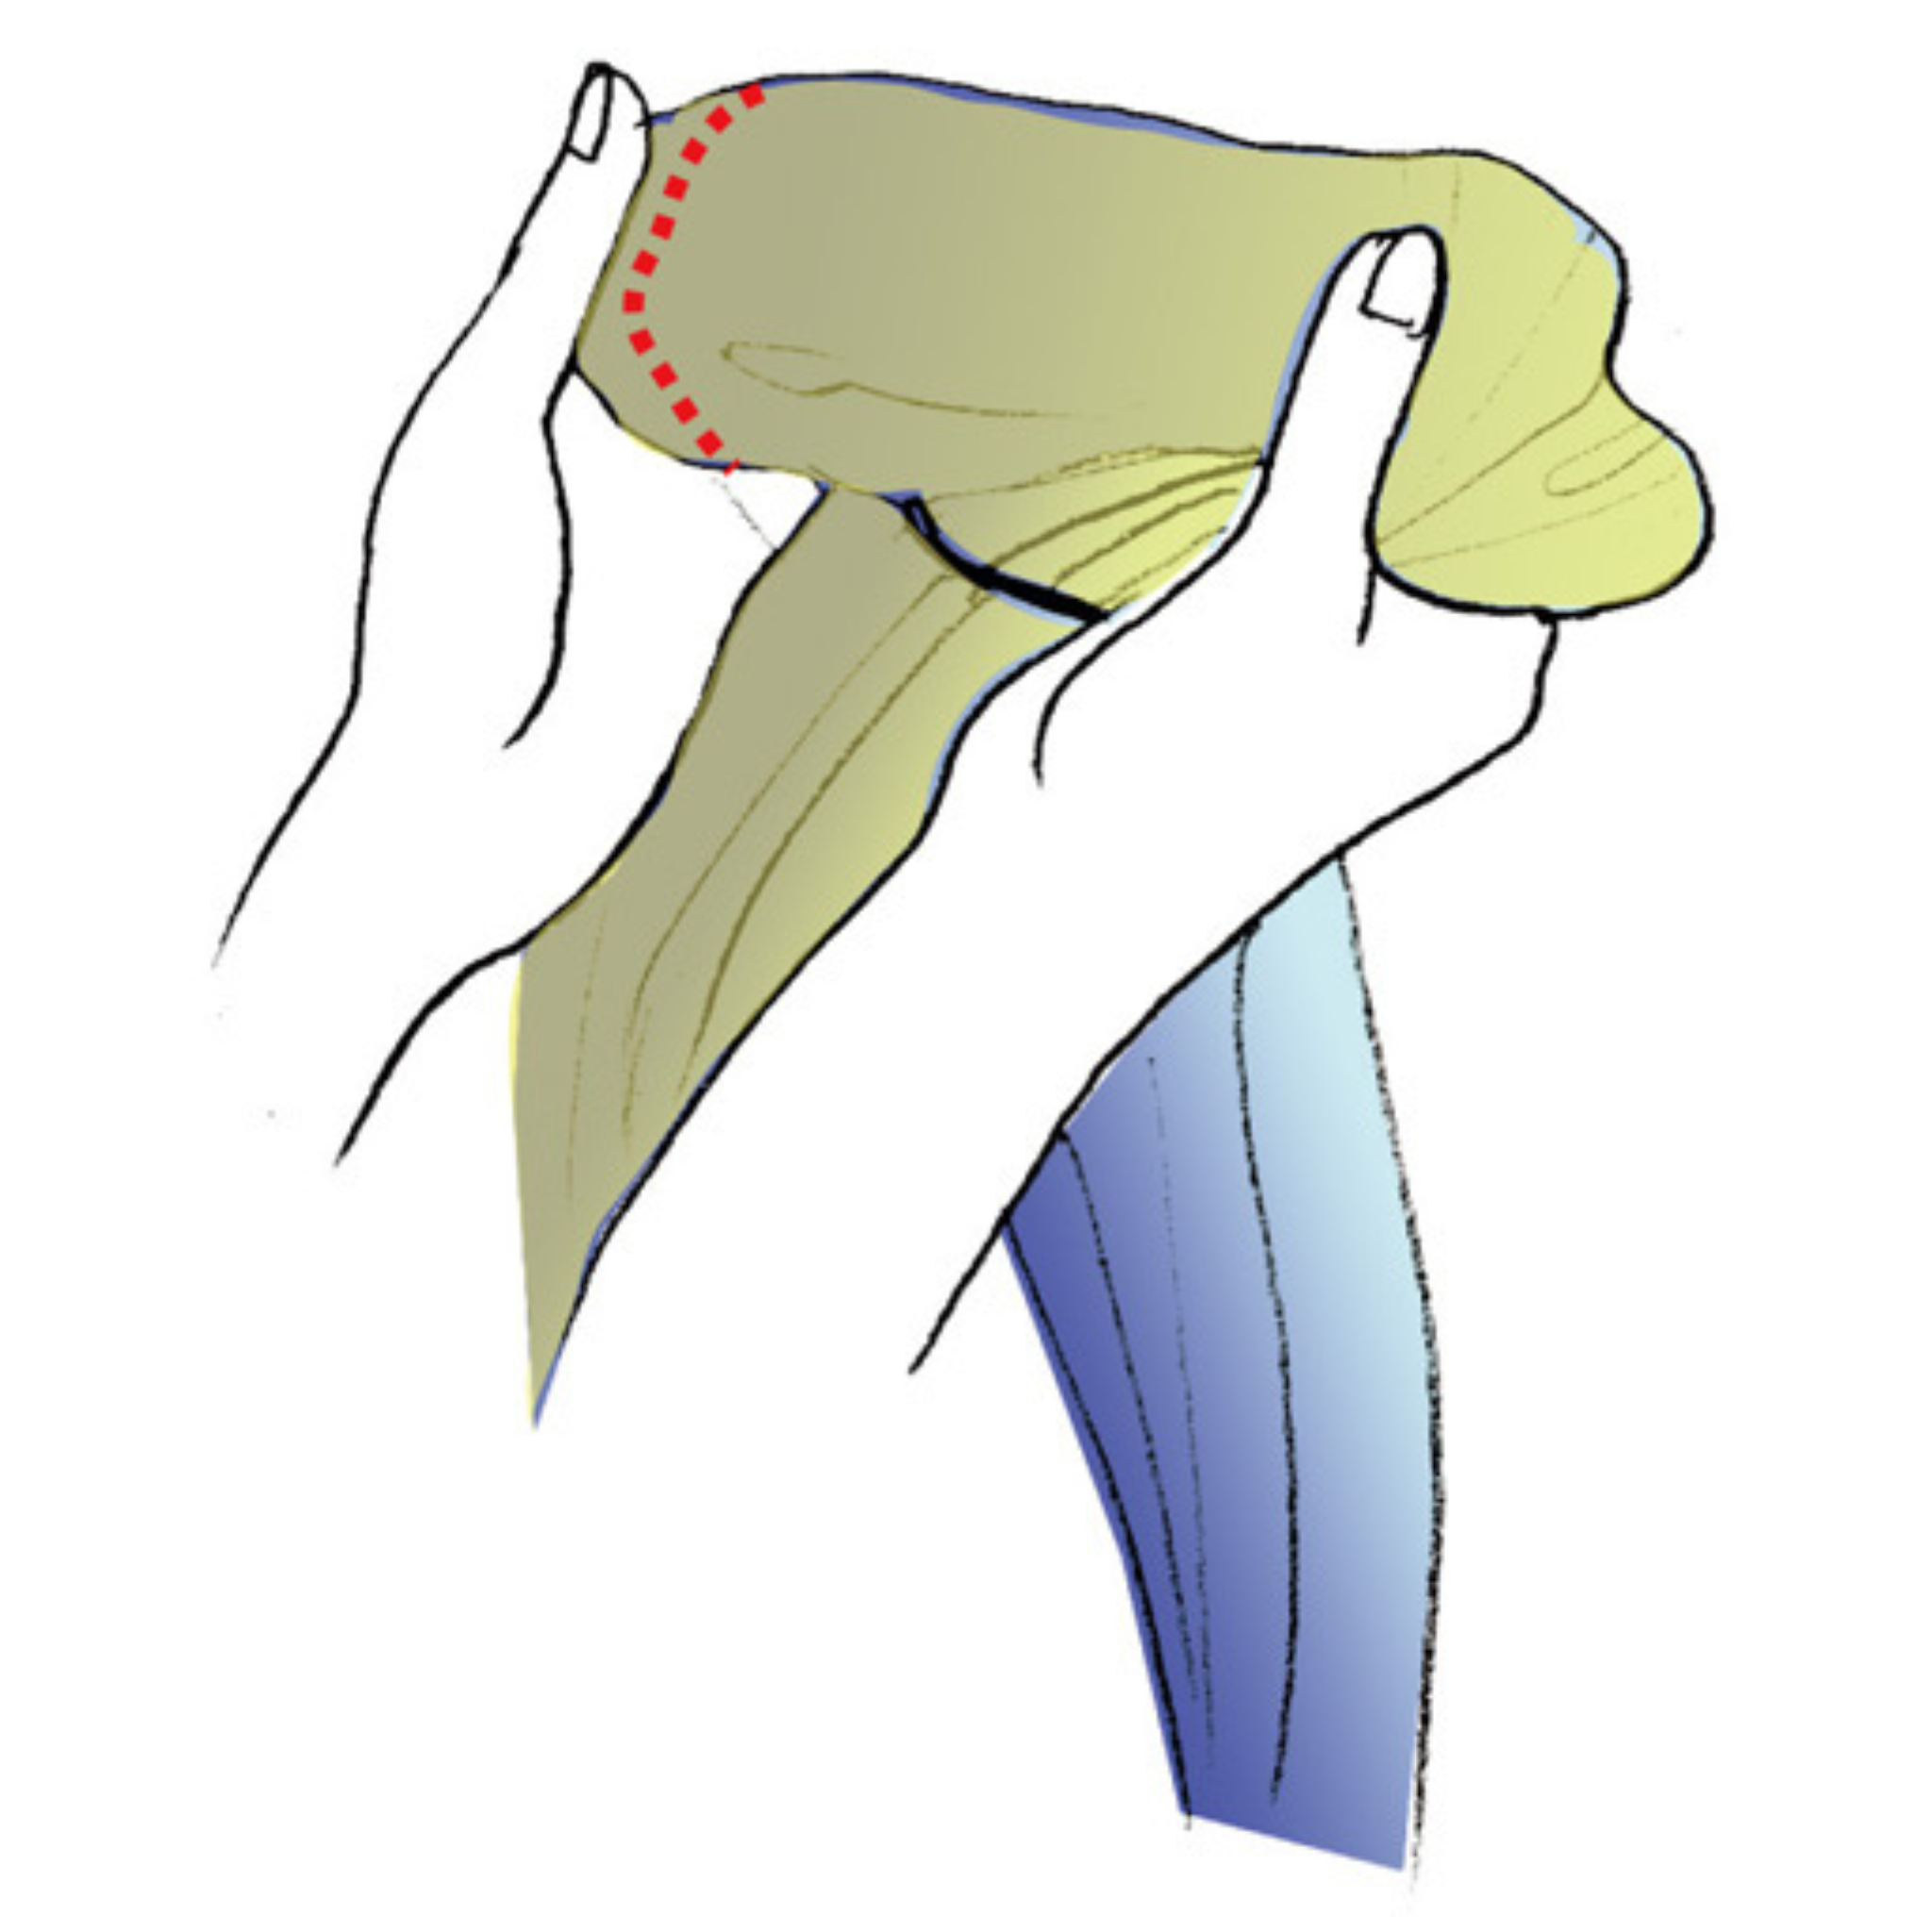
a. Loosen All the Fabric
If the fabric will not move smoothly, push the tightened tail back towards the rings and loosen the entire gathered section.
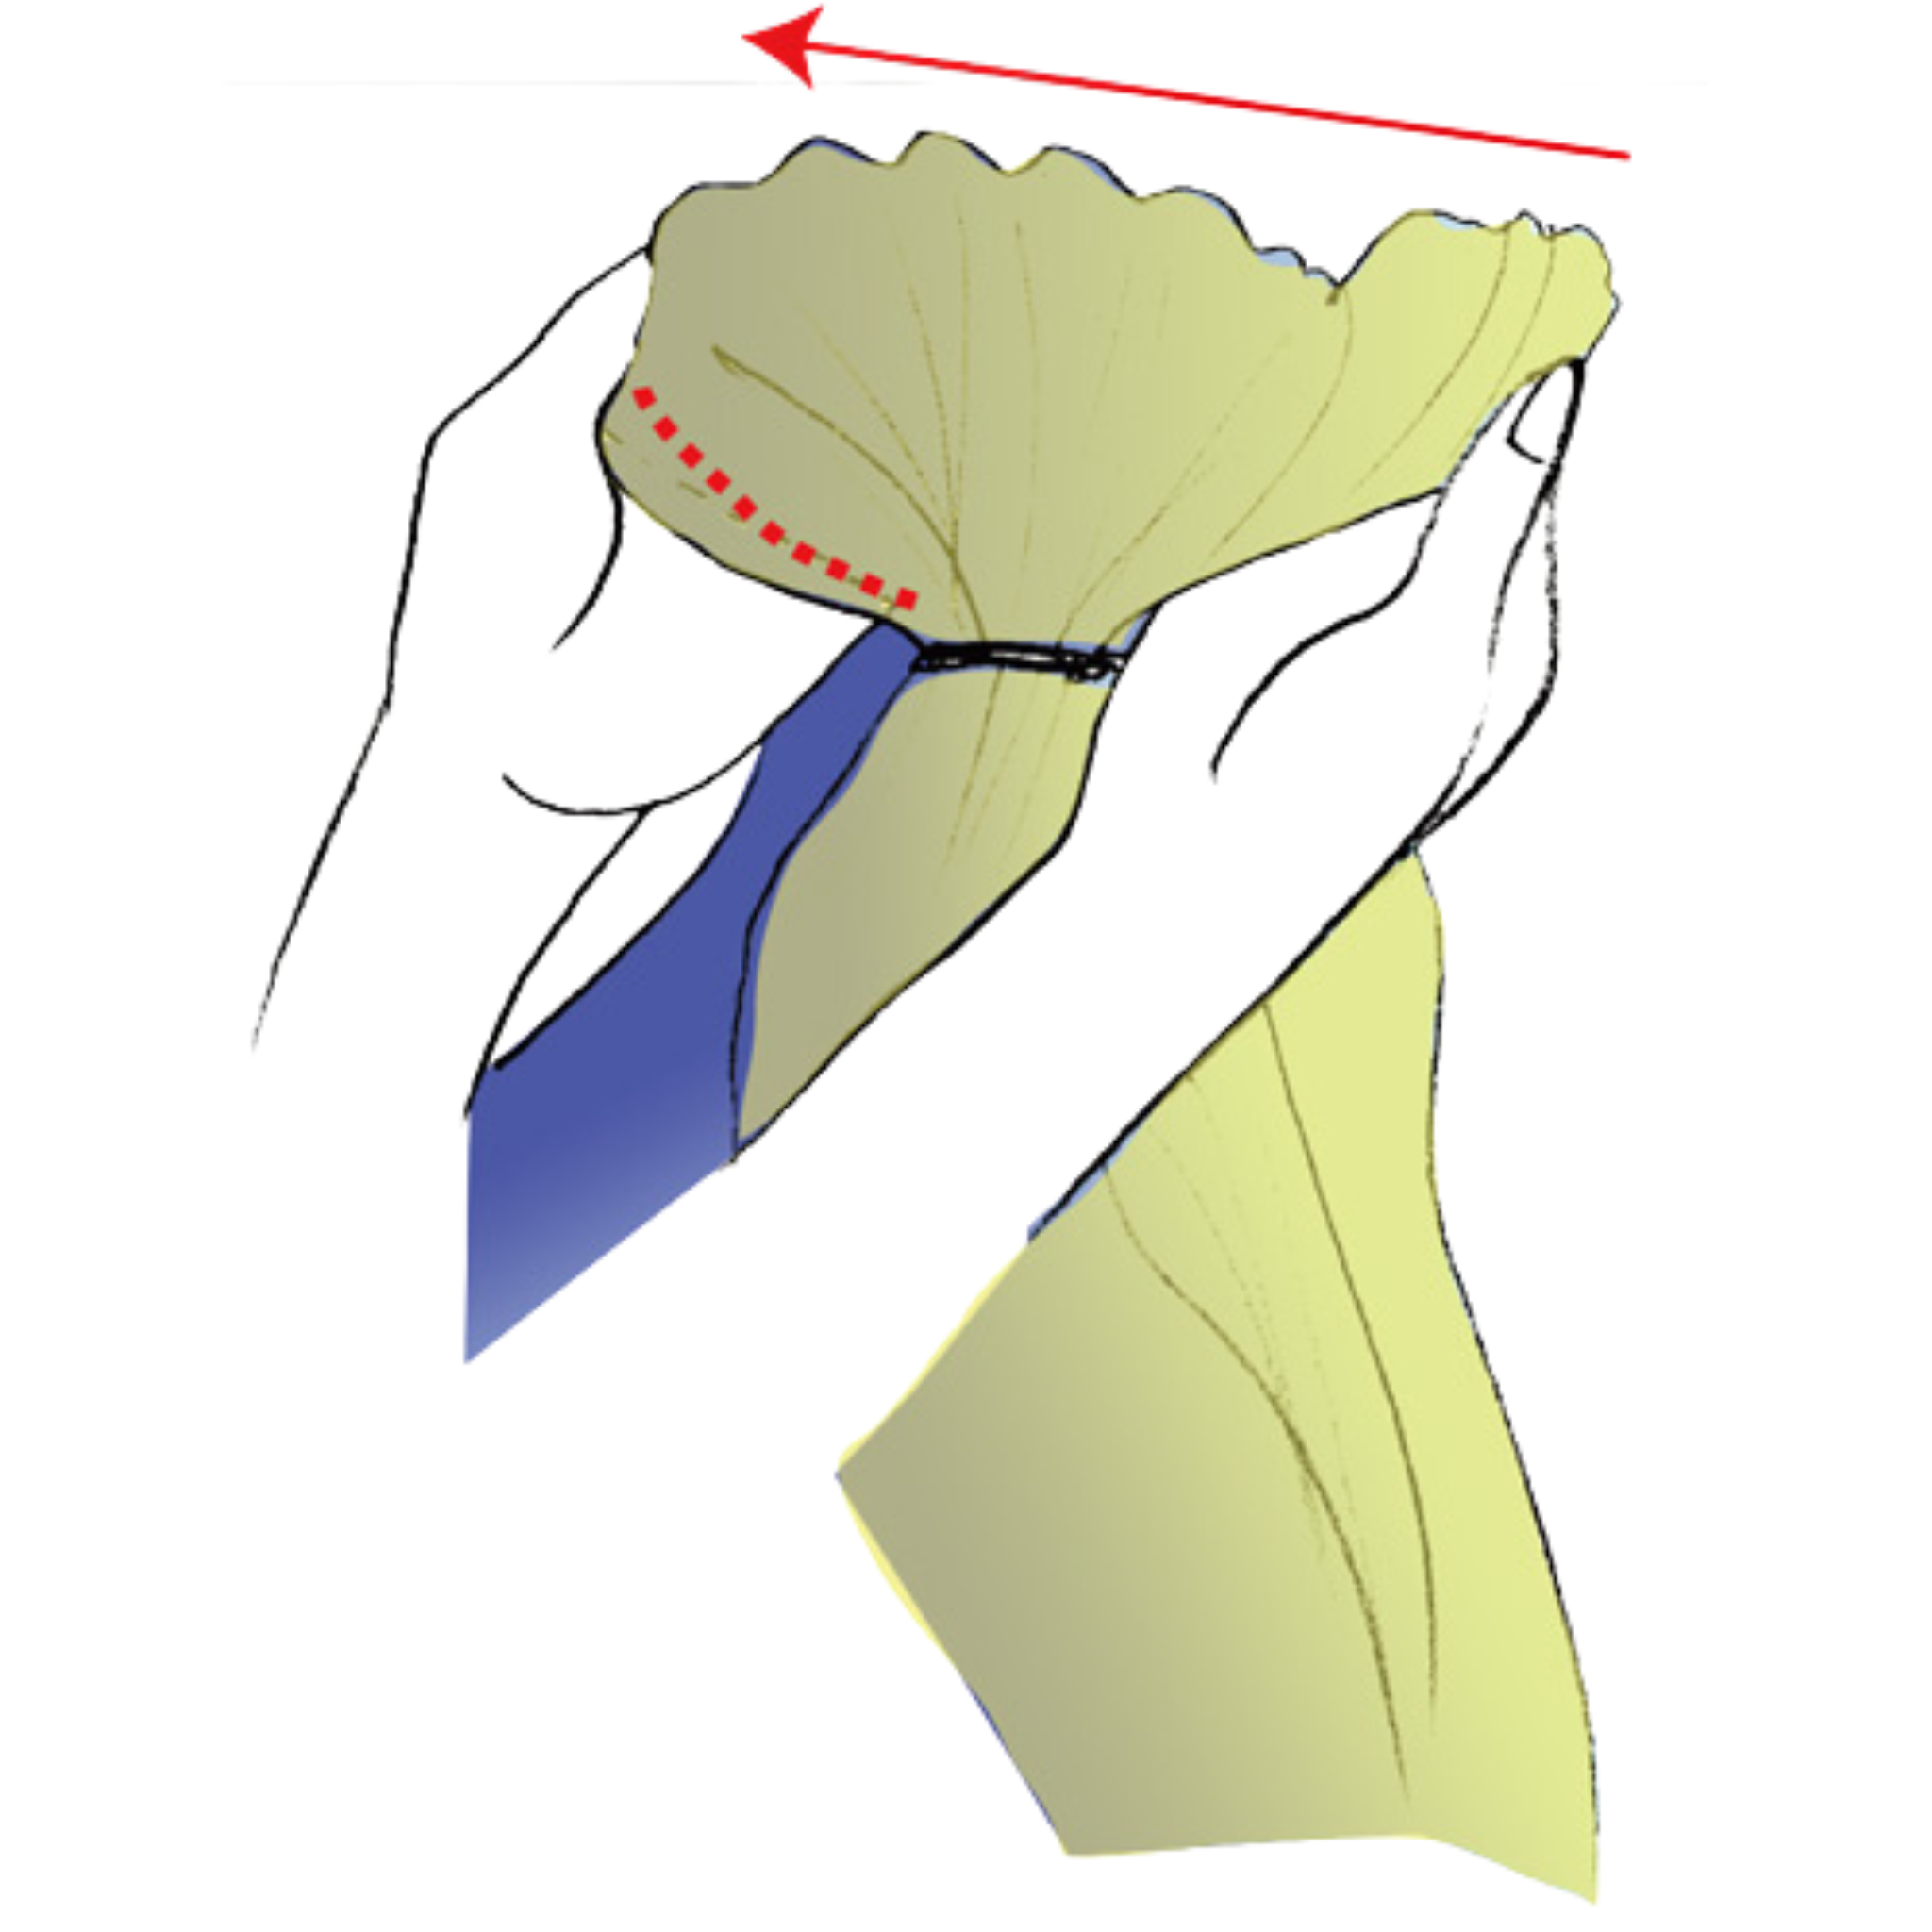
b. Separate the Rails
Find the sewn edge, or rail, on each side of the fabric and guide one to each side of the rings.
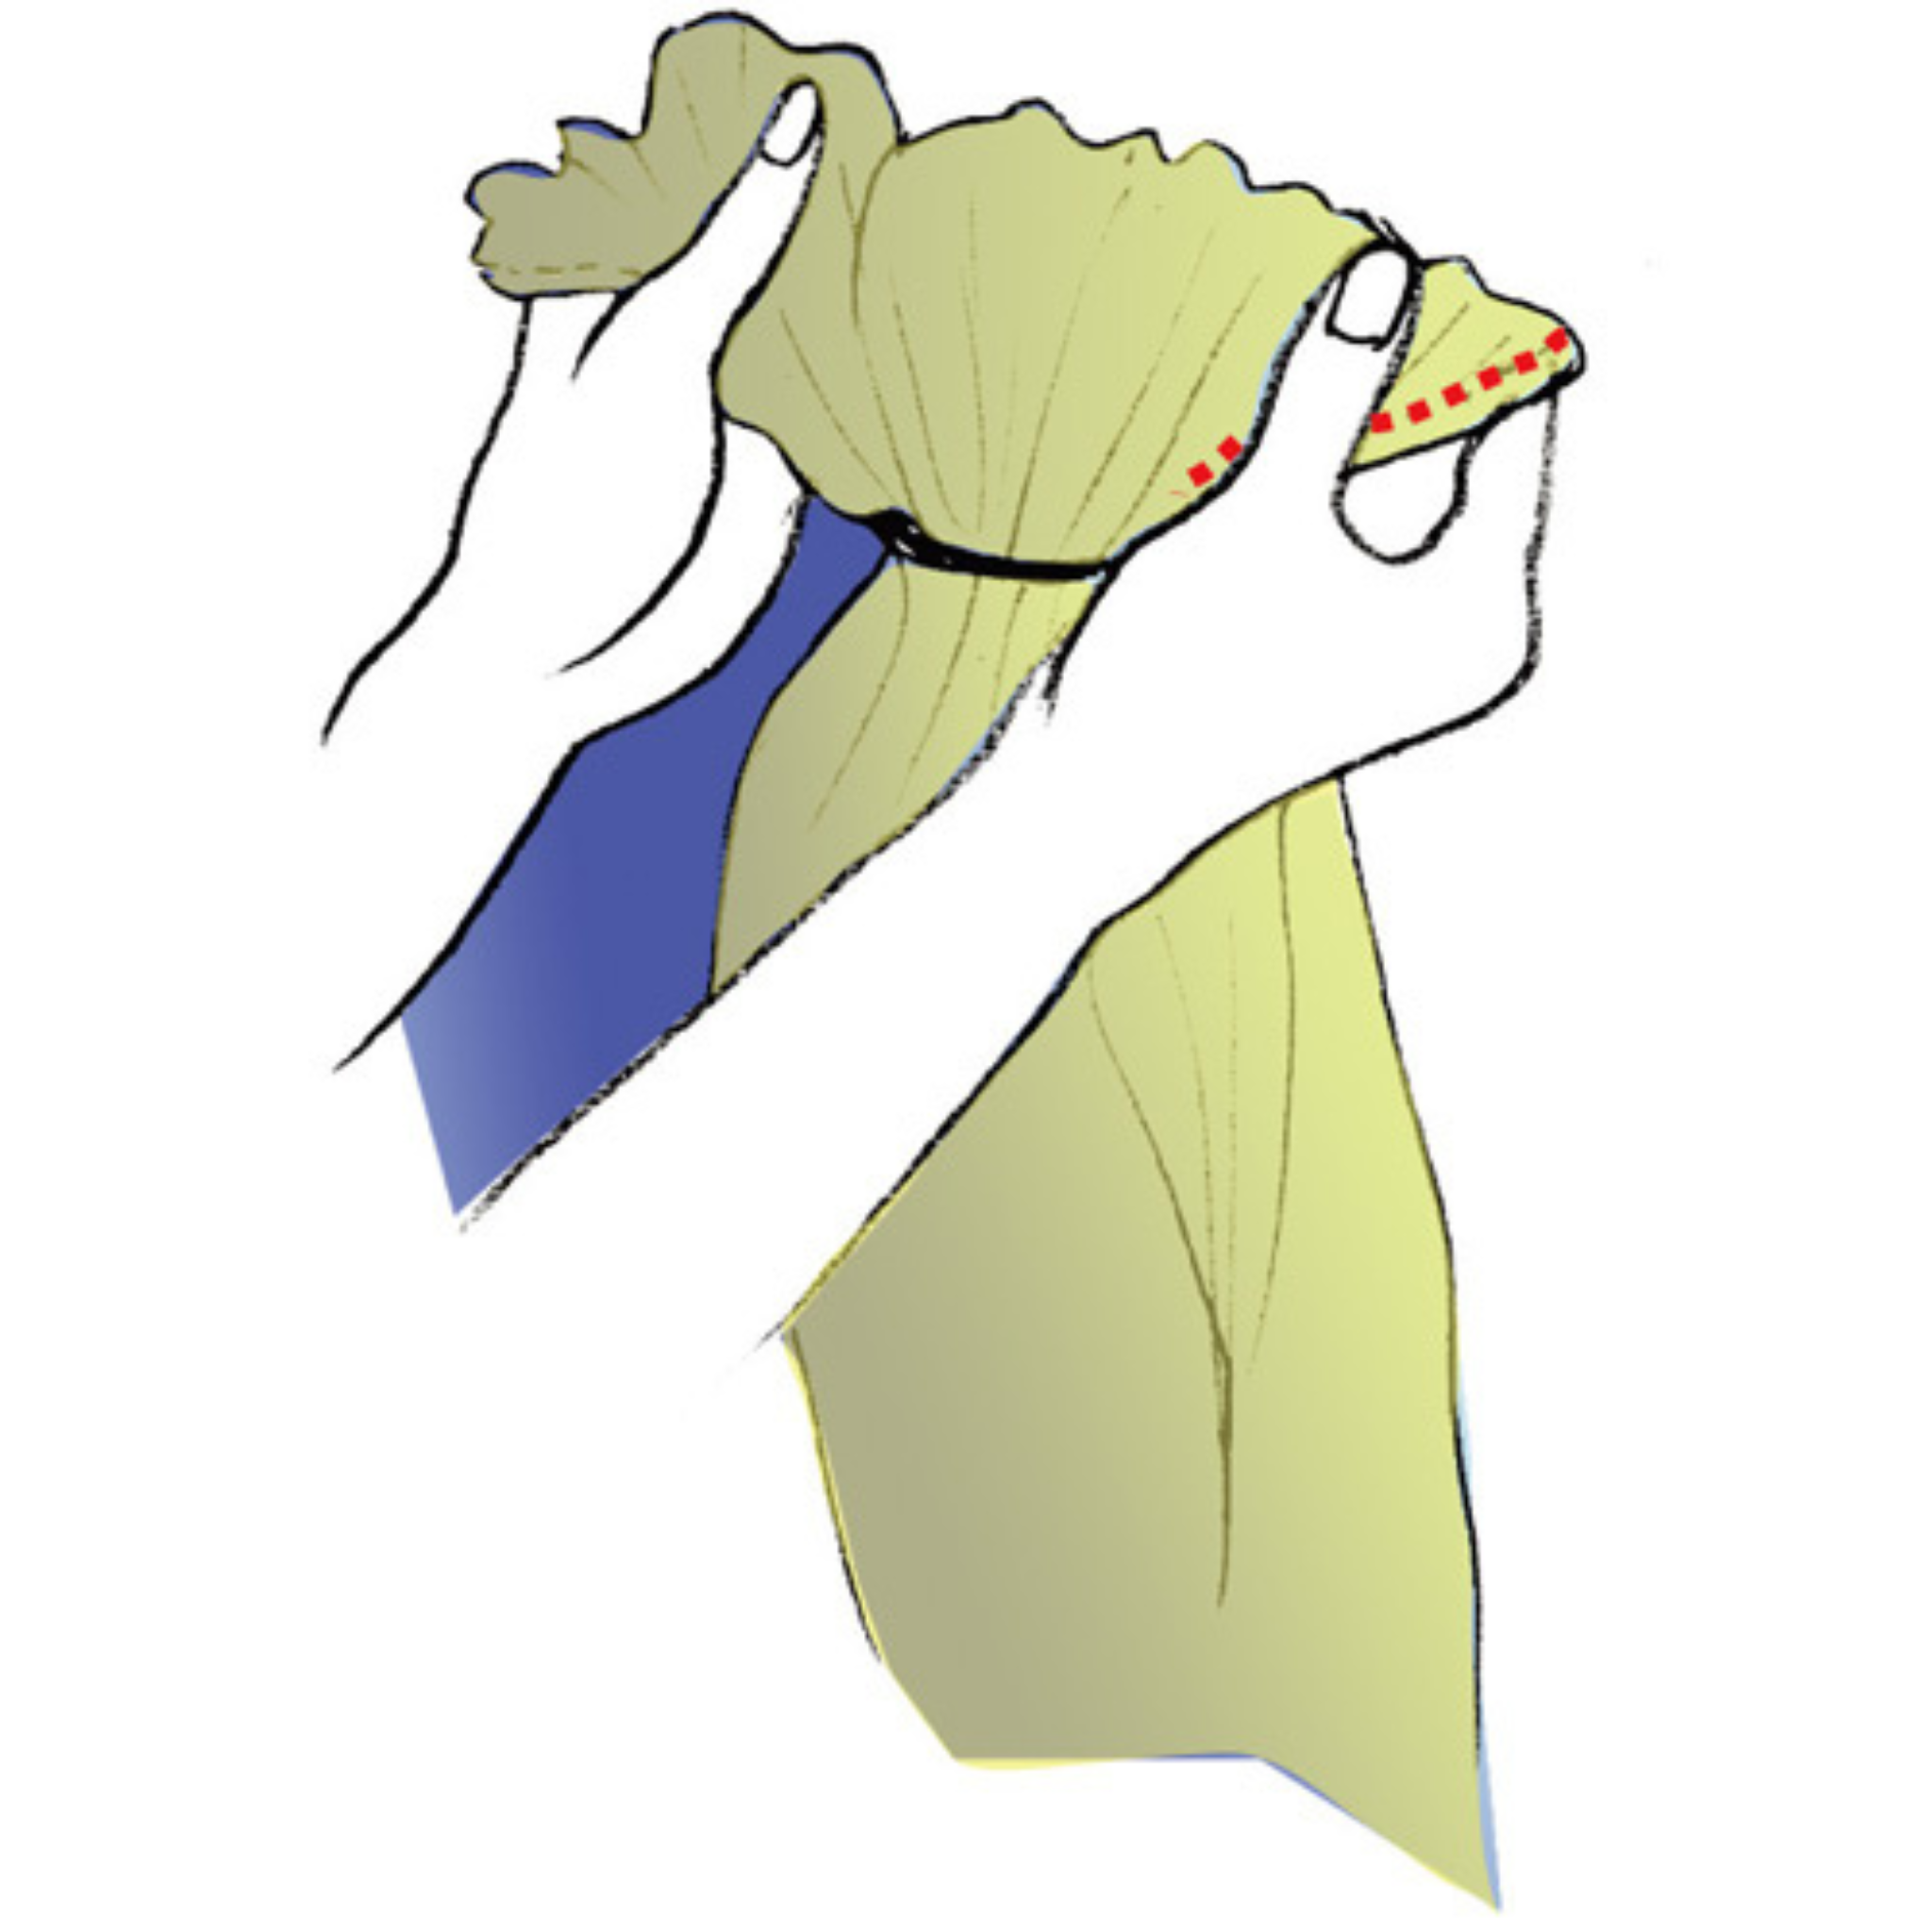
c. Separate the Centre Folds
Finally, separate the fabric between the two rails as if opening an accordion, restoring even gathers across the rings.
Step 03
The Finishing Touch
The Finishing Touch
Final Adjustment
Final Adjustment
Pull the tail gently down without disturbing the arranged gathers.
Pulling through an appropriate length of tail sets the carrying loop, or pouch, to a useful starting size. This preparation provides the basis for a stable, close fit.
Pull the tail gently down without disturbing the arranged gathers.
Set the carrying loop, or pouch, to an appropriate starting size for a stable, close fit.
Step 04
SAFE ADJUSTMENT
SAFE ADJUSTMENT
Check the Fan Shape
Check the Fan Shape
To complete the preparation, check that the tail opens into an even fan below the rings.
The fabric should form a smooth, untwisted drape from one edge to the other. This arrangement allows the fabric to adjust smoothly when you begin carrying.
Check that the tail opens into an even fan below the rings, with a smooth, untwisted drape from edge to edge.
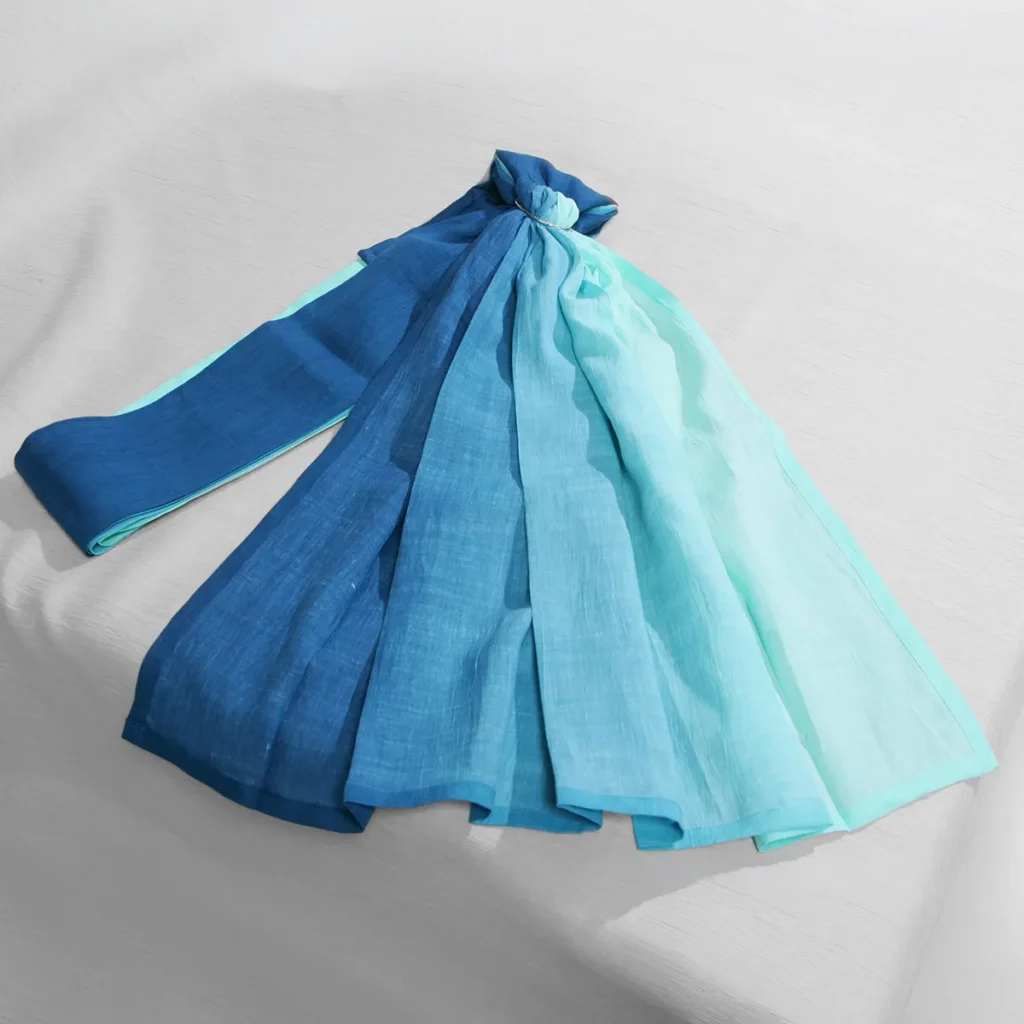

Basic Wearing
How to Wear
Wearing a PsLing is more than simply putting on a length of fabric. The shoulder section follows your natural line while the fabric lies smoothly across your body, allowing the rings and pouch to work as one supportive system.
These steps explain the shoulder construction and the basic wearing sequence.
A PsLing follows the shoulder and body rather than simply hanging as fabric. These steps explain its construction and basic wearing sequence.
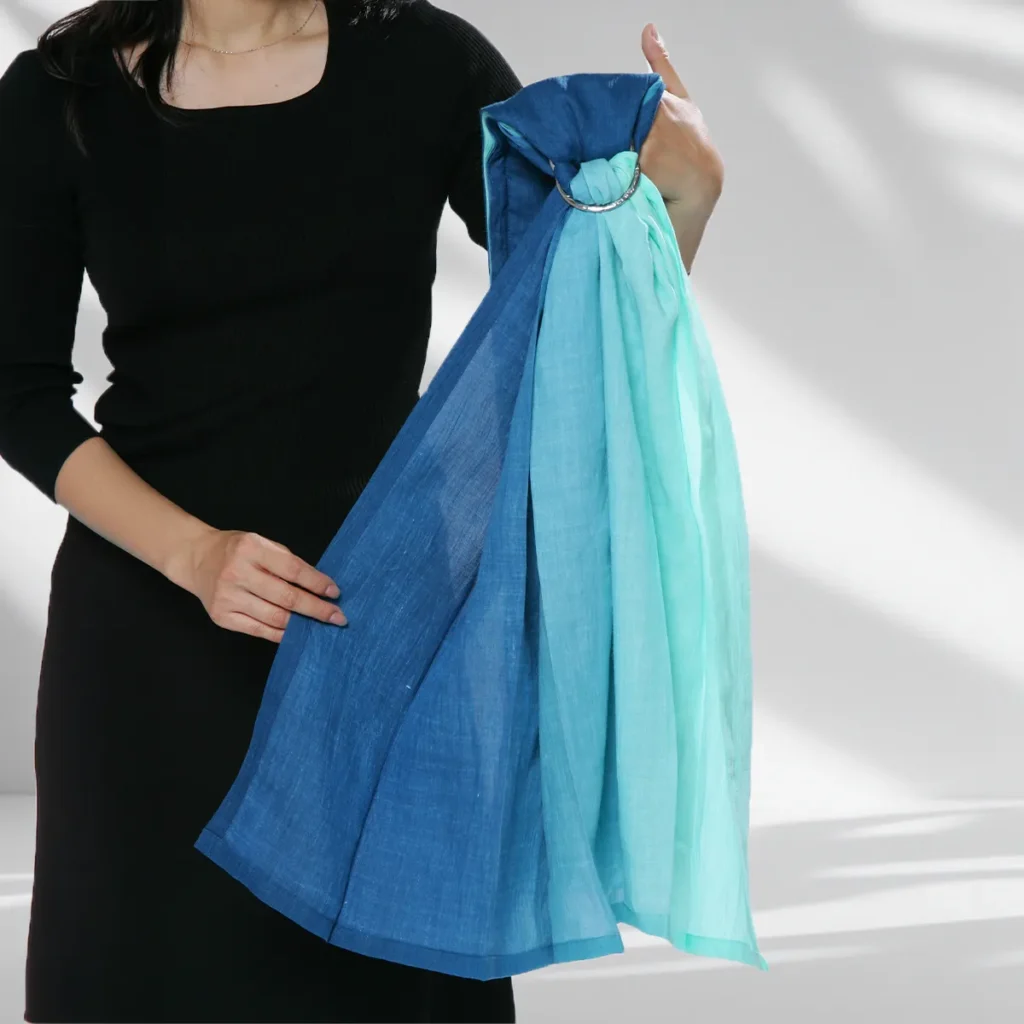
Step 05
Aligning the Rings
Aligning the Rings
Align the Rings
Align the Rings
Lift the sling gently with both hands and align the two rings so they face straight forwards.
Correct alignment is the first step towards wearing the sling without twists.
Lift the sling and align both rings so they face forwards. This helps prevent twists as you put it on.
Step 06
Passing Through the Loop
Through the Loop
Place It on Your Shoulder
Place It on Your Shoulder
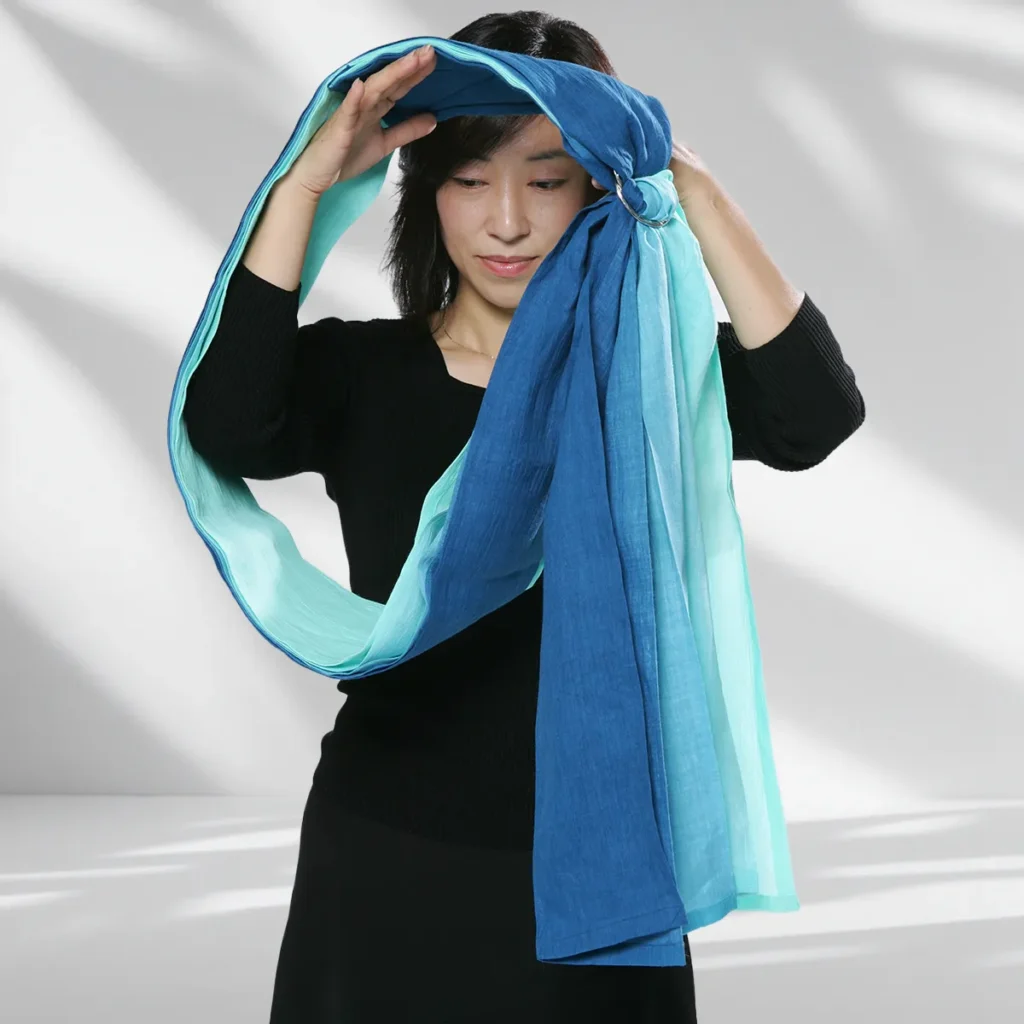
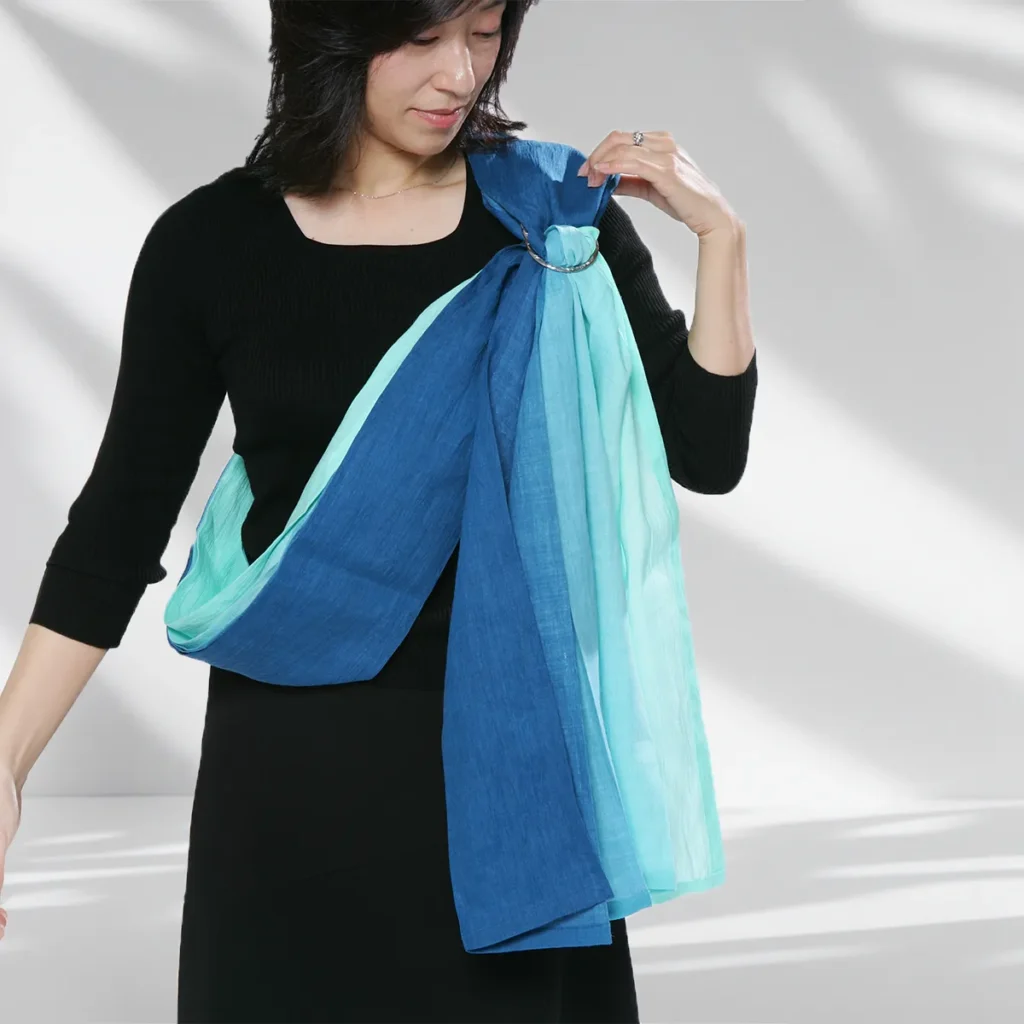
Keep the rings facing forwards as you pass your right arm and head through the loop.
Set the shoulder section on your left shoulder, slide the rings just below your collarbone and spread the fabric broadly and flat across your back.
This guide demonstrates a left-shoulder PsLing. For right-shoulder use, reverse the left and right directions and check the fabric and ring position carefully. Gradation fabrics will display their tail colours differently on the opposite shoulder.
Keep the rings facing forwards as you pass your right arm and head through the loop. Set it on your left shoulder, place the rings below your collarbone and spread the back fabric flat.
For right-shoulder use, reverse the directions and check carefully for twists and correct ring placement.
Step 07
Positioning the Rings
Ring Position
Set the Ring Position
Set the Ring Position
Use a mirror to check that the rings sit immediately below your collarbone.
The rings will move slightly lower when the baby’s weight is added, so begin with them a little higher to reduce strain.
Check in a mirror that the rings sit immediately below your collarbone. Start slightly high because they will move lower when the baby’s weight is added.
Shoulder Specification
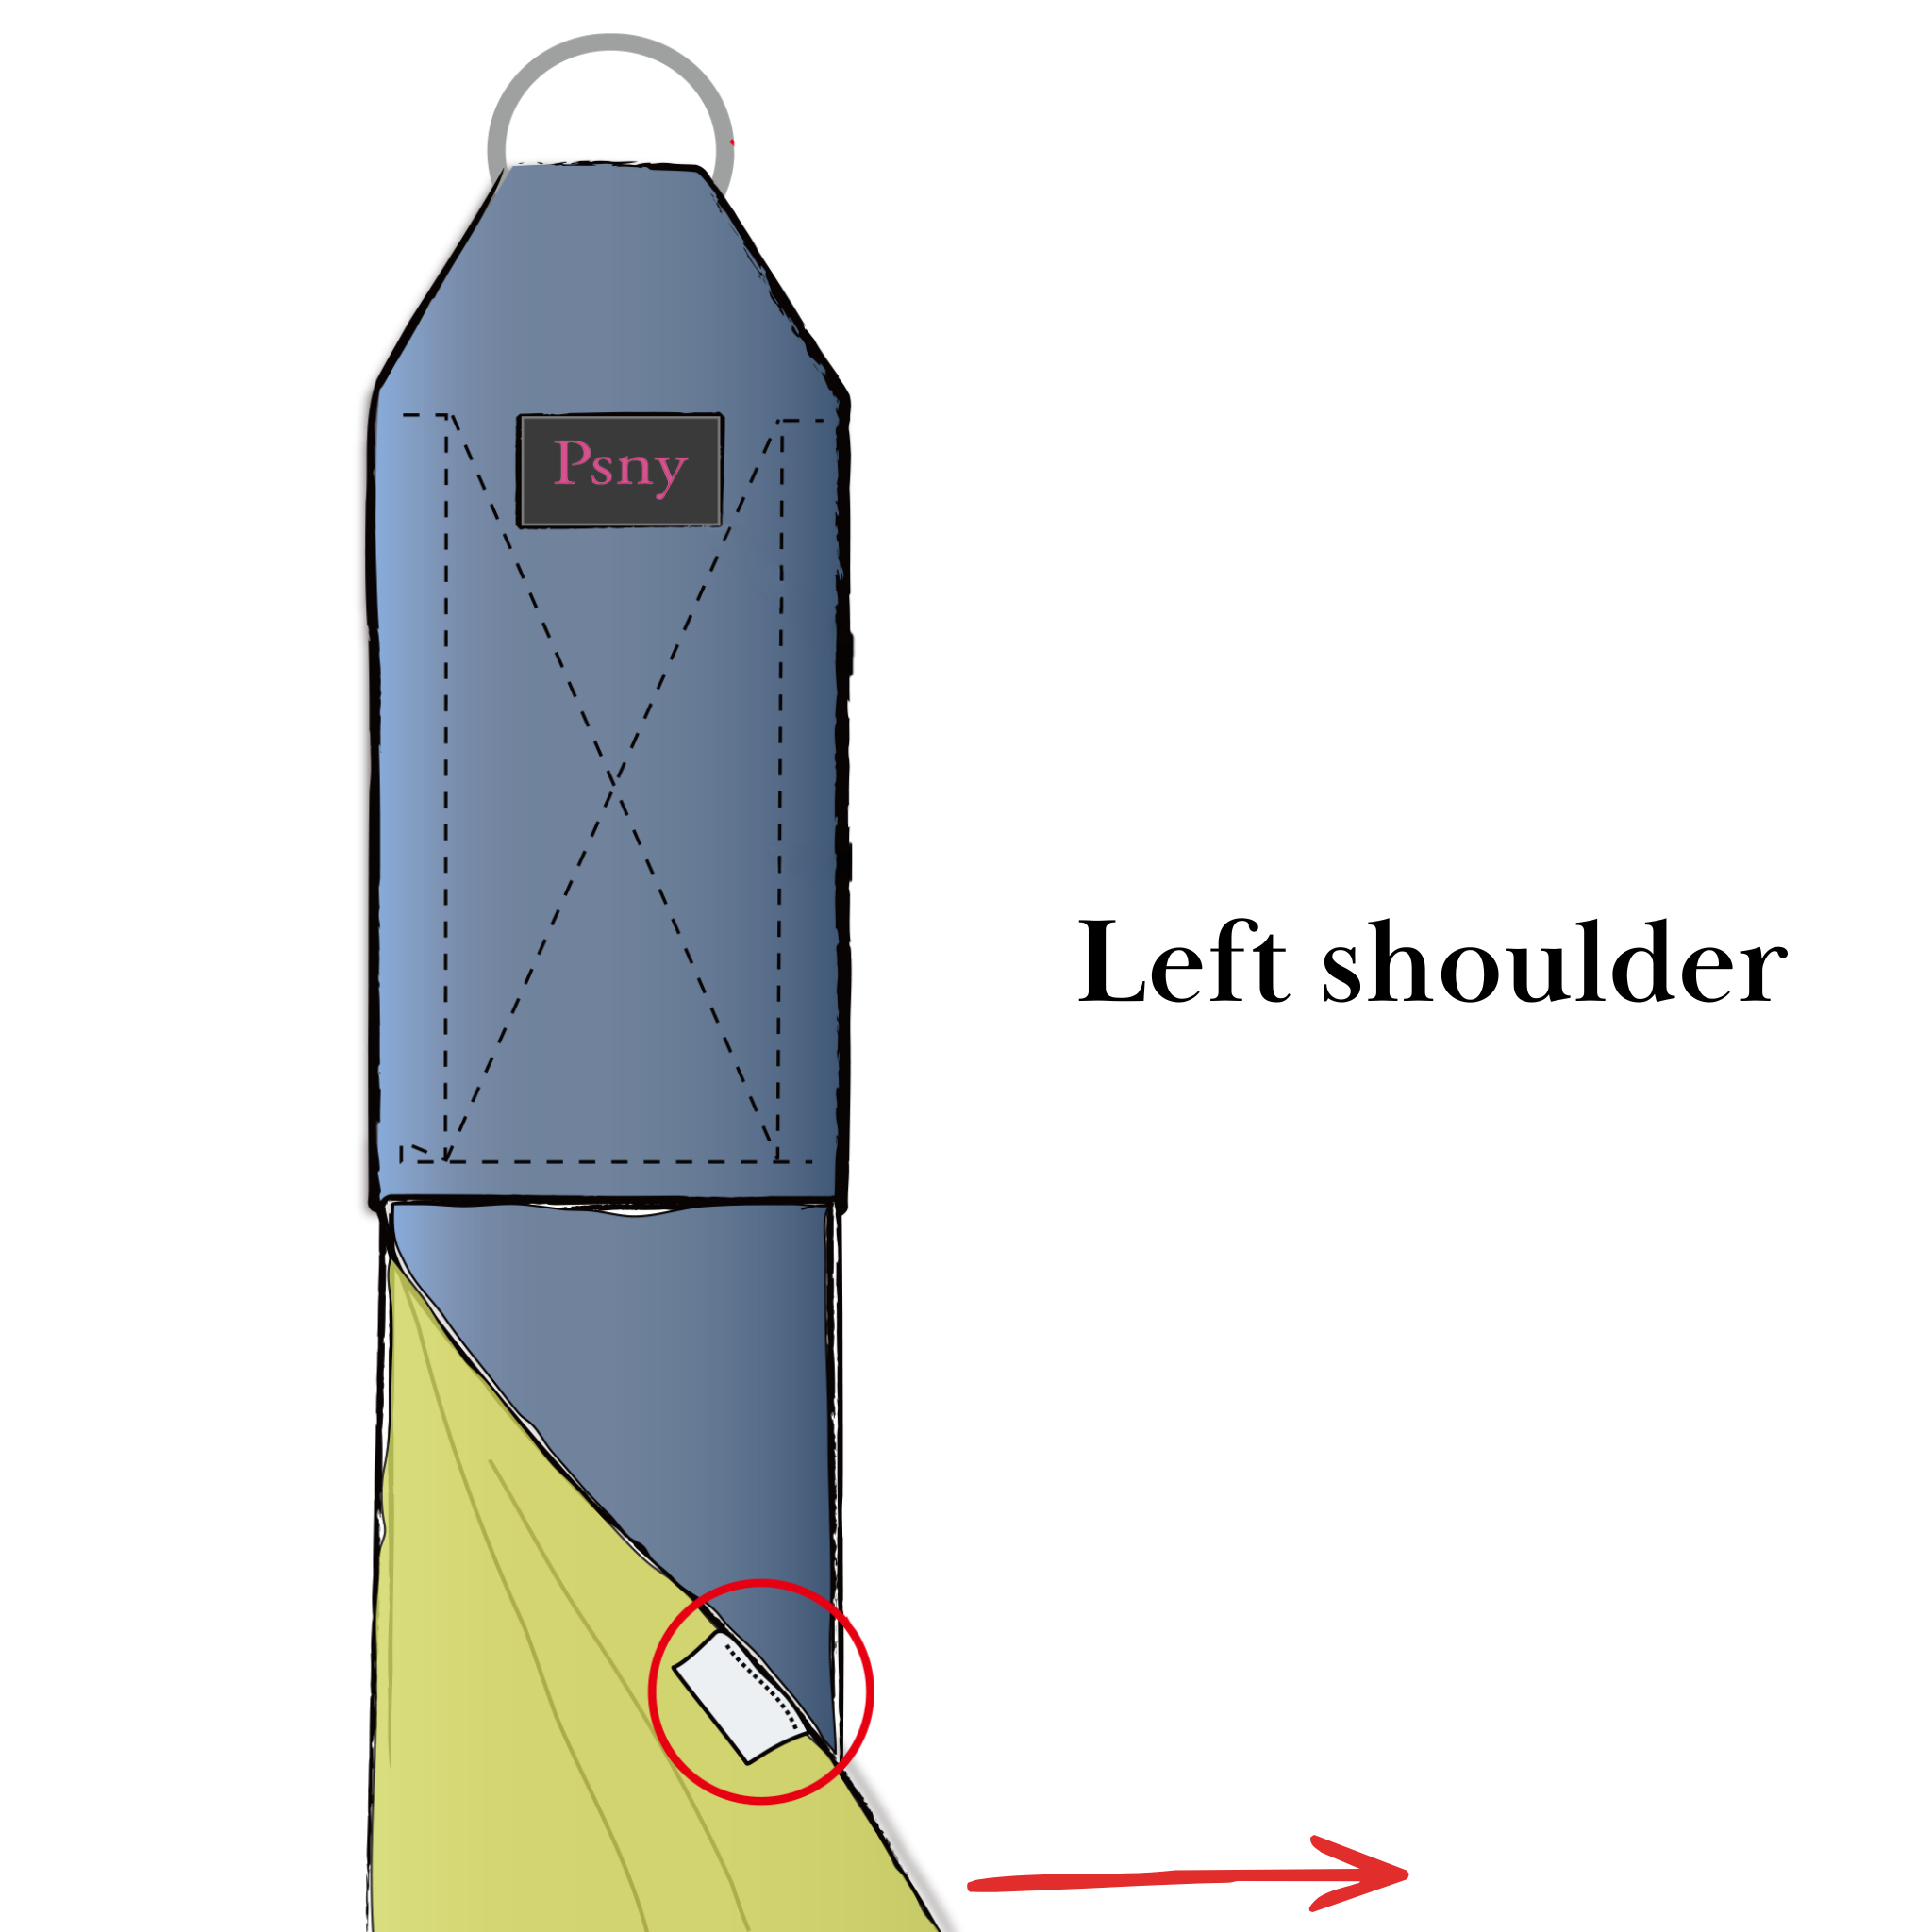
Check the Specification
Hold the rings at the top with the brand label facing you, then spread the tail. The care-label position identifies the shoulder specification.
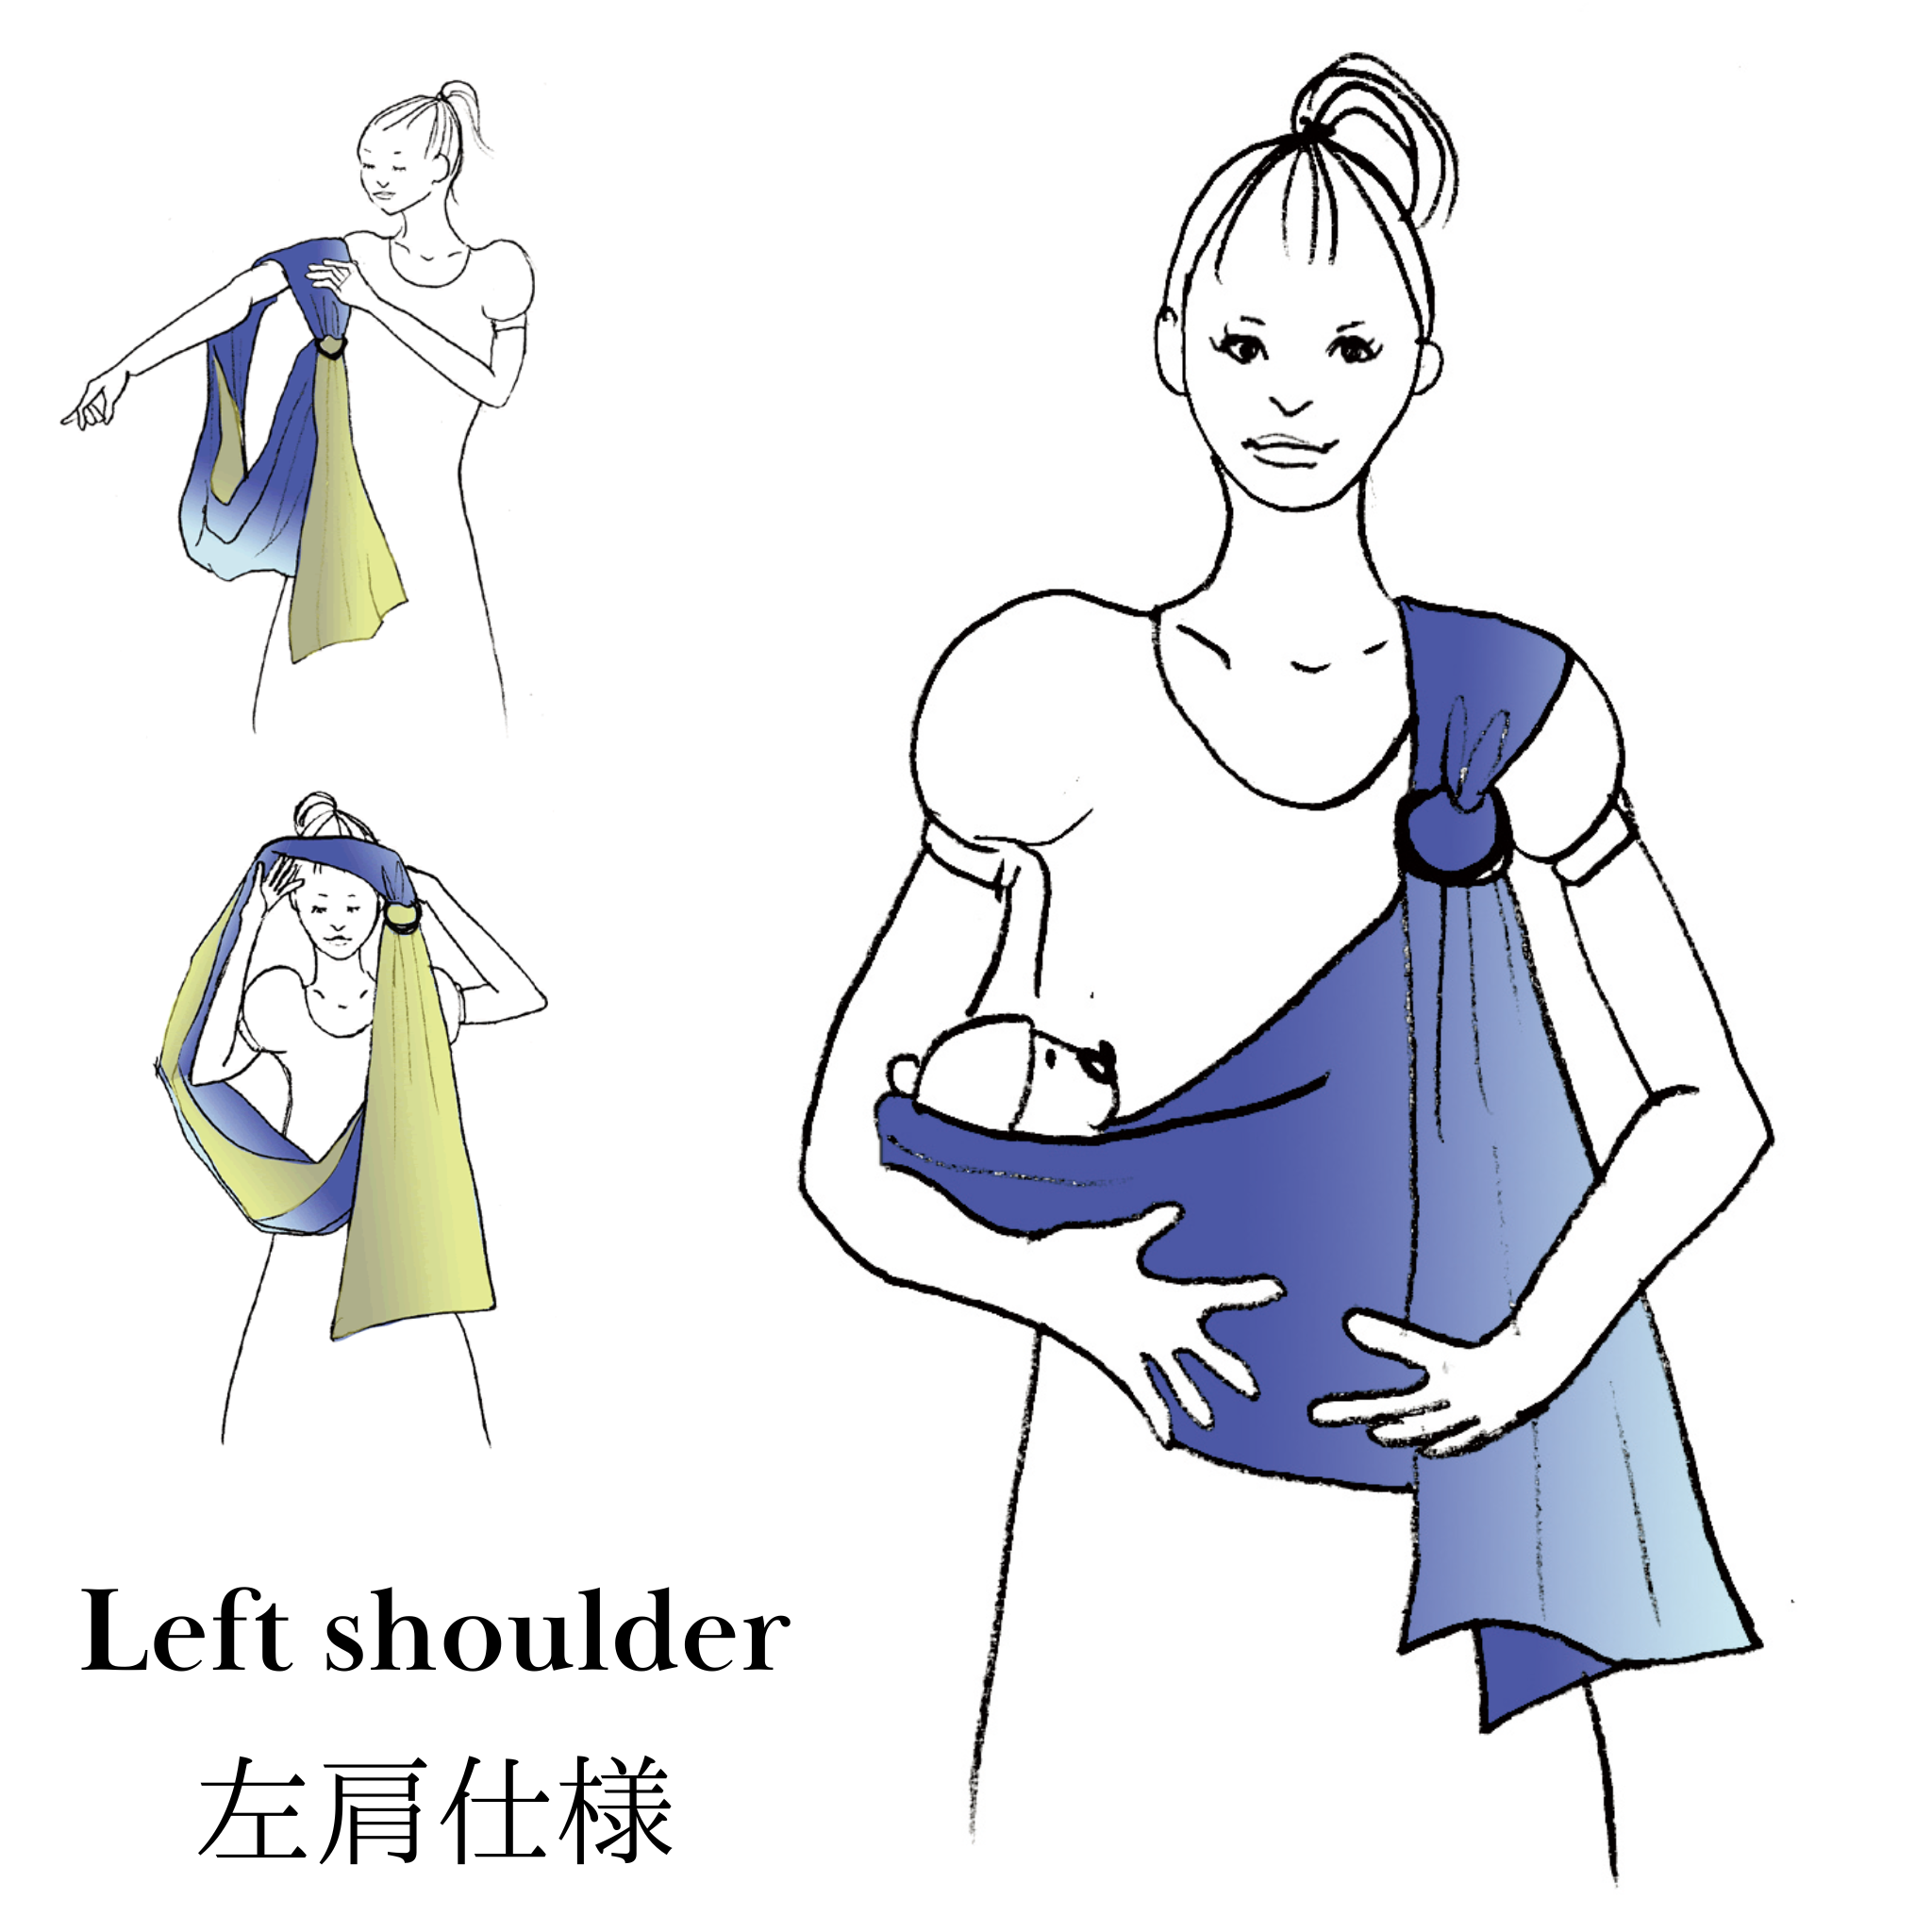
Left-Shoulder Specification
Tailored for wearing on the left shoulder, with the Gradation colours and woven tail designed to drape in their intended direction.
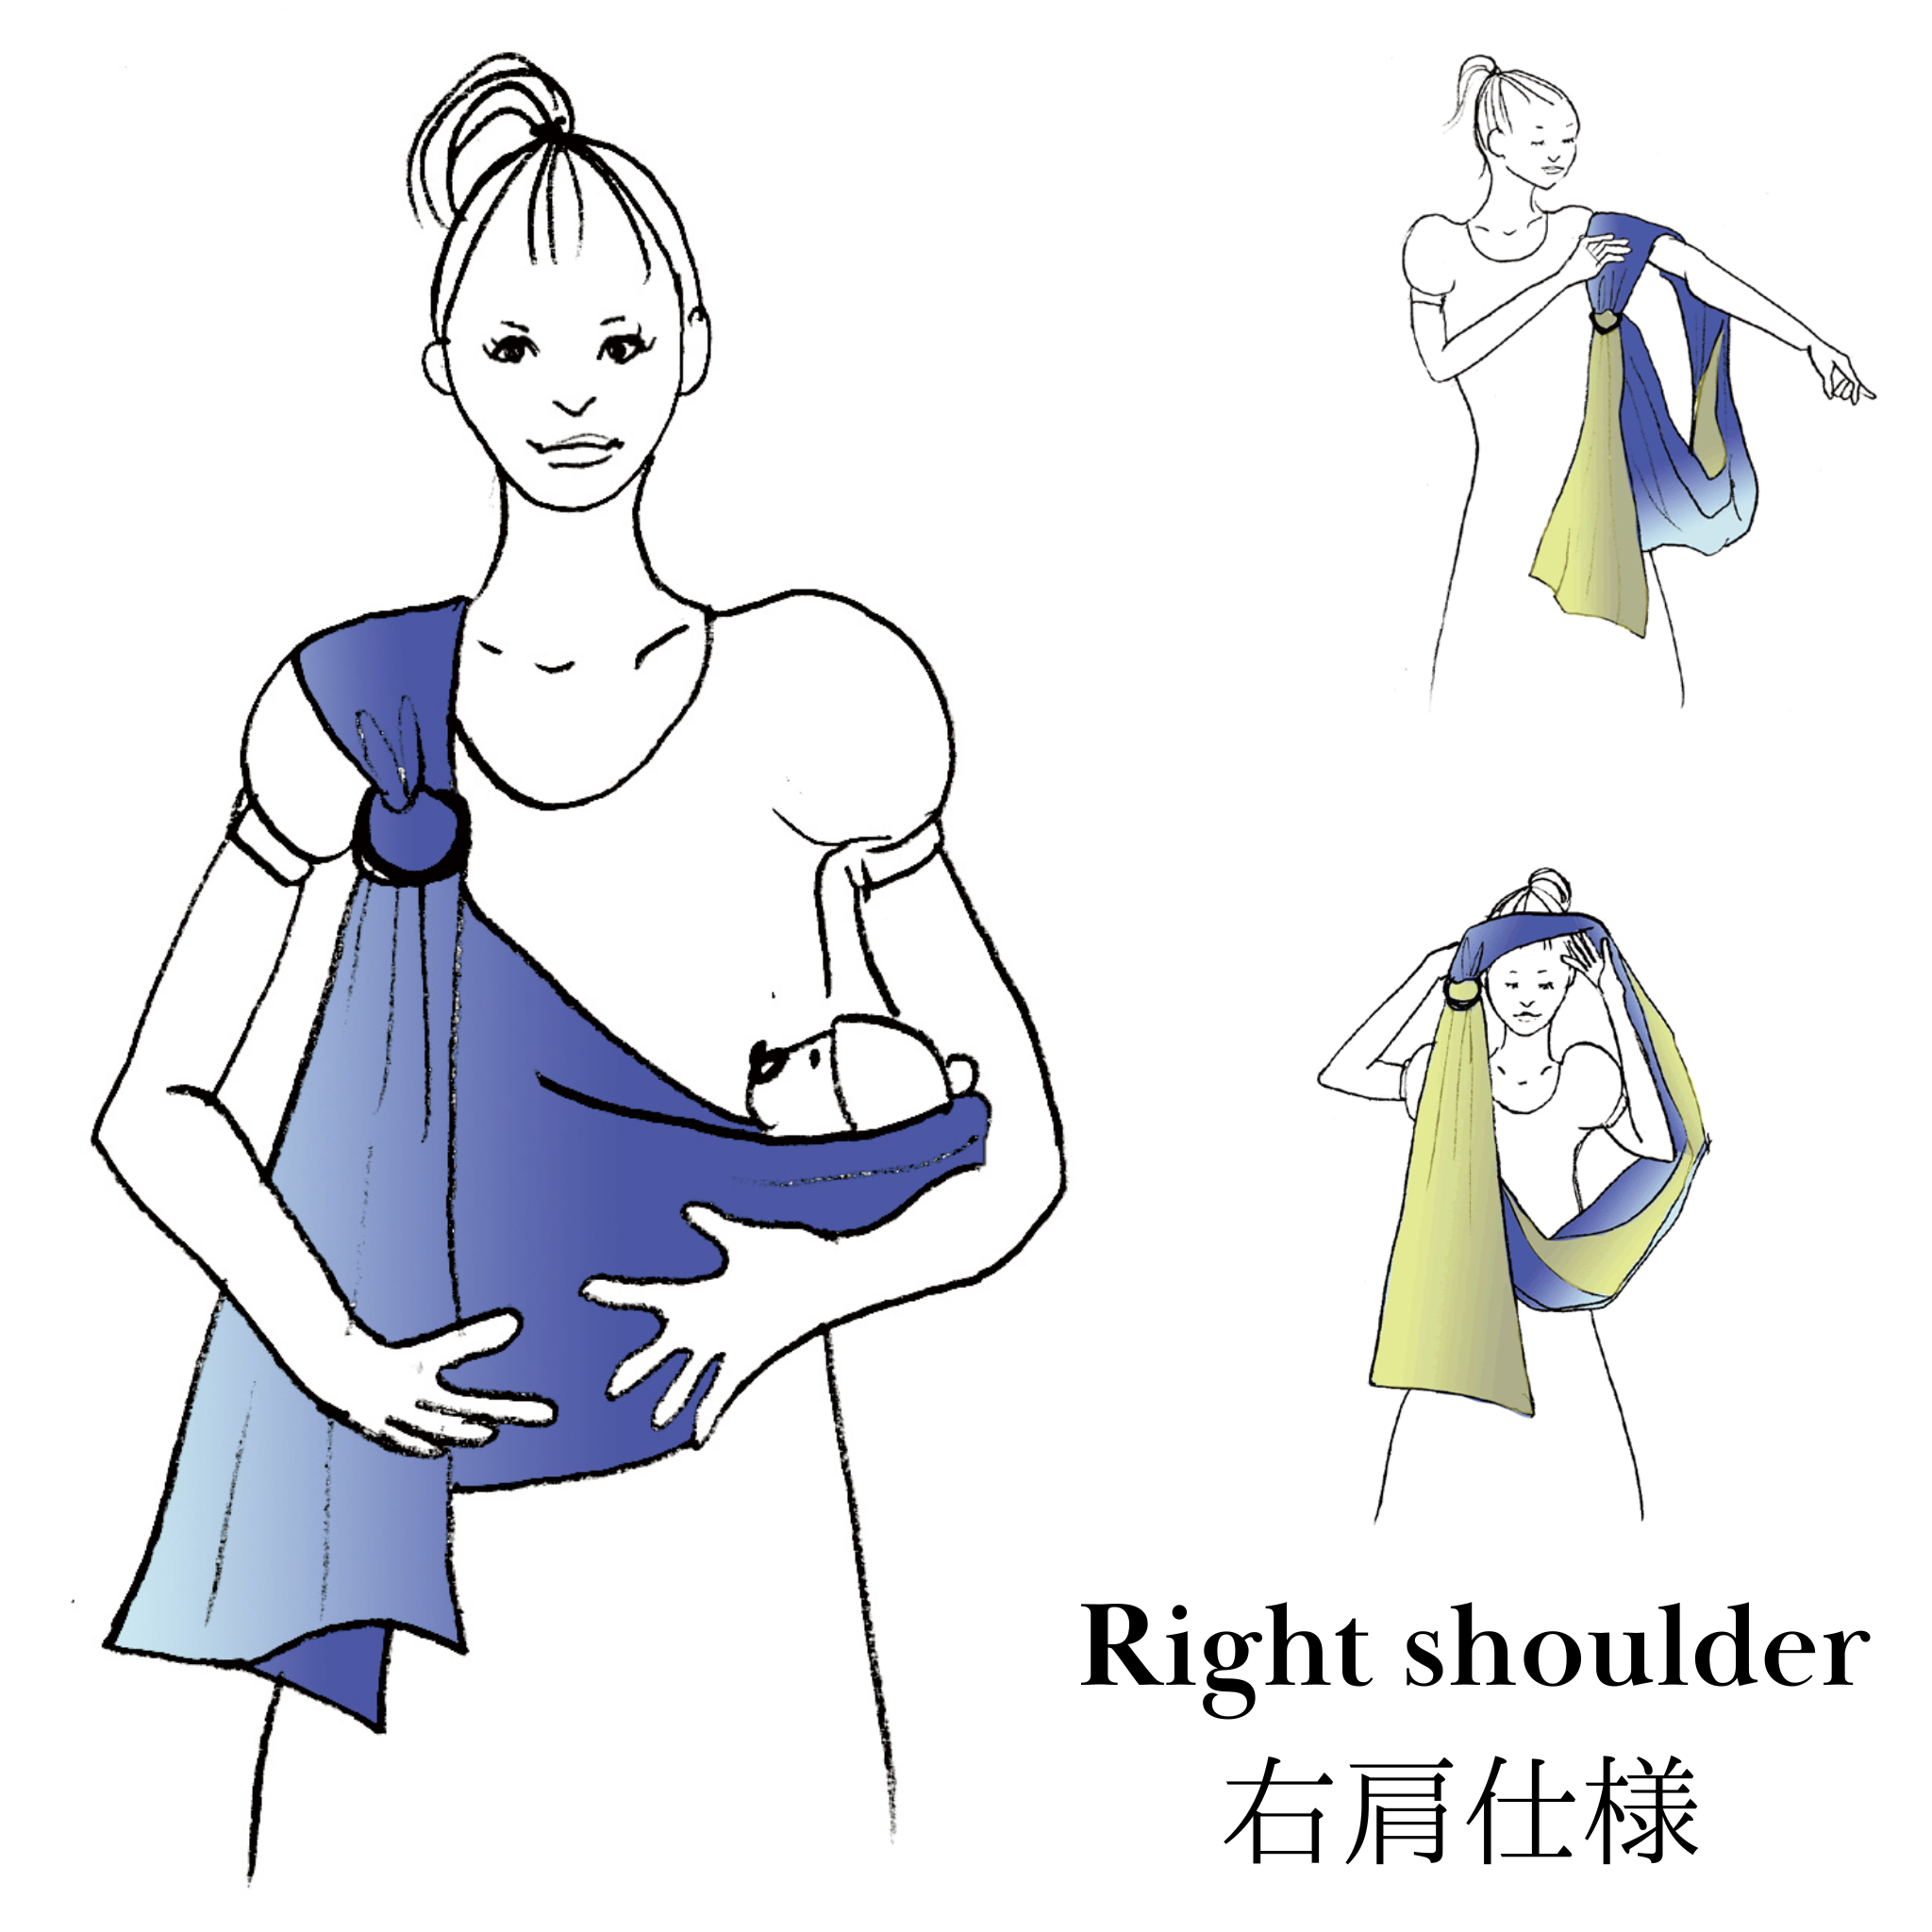
Right-Shoulder Specification
Tailored for wearing on the right shoulder so the fabric remains untwisted and the tail’s drape and colours appear as intended.
PsLing is made to the shoulder specification selected when ordering. It can be worn on the opposite shoulder, but check carefully for fabric twists and correct ring placement and follow this guide. Gradation tail colours will appear in a different arrangement on the opposite shoulder.
Step 08
Forming the Pocket
Forming Pocket
Shape the Pouch
Shape the Pouch
Place one hand inside the sling and form a rounded pouch in front of your chest.
Use your forearm and hand to spread the fabric outwards, creating sufficient depth for the baby’s bottom.
Place one hand inside and form a rounded pouch in front of your chest. Spread the fabric with your forearm and hand to create enough depth for the baby’s bottom.
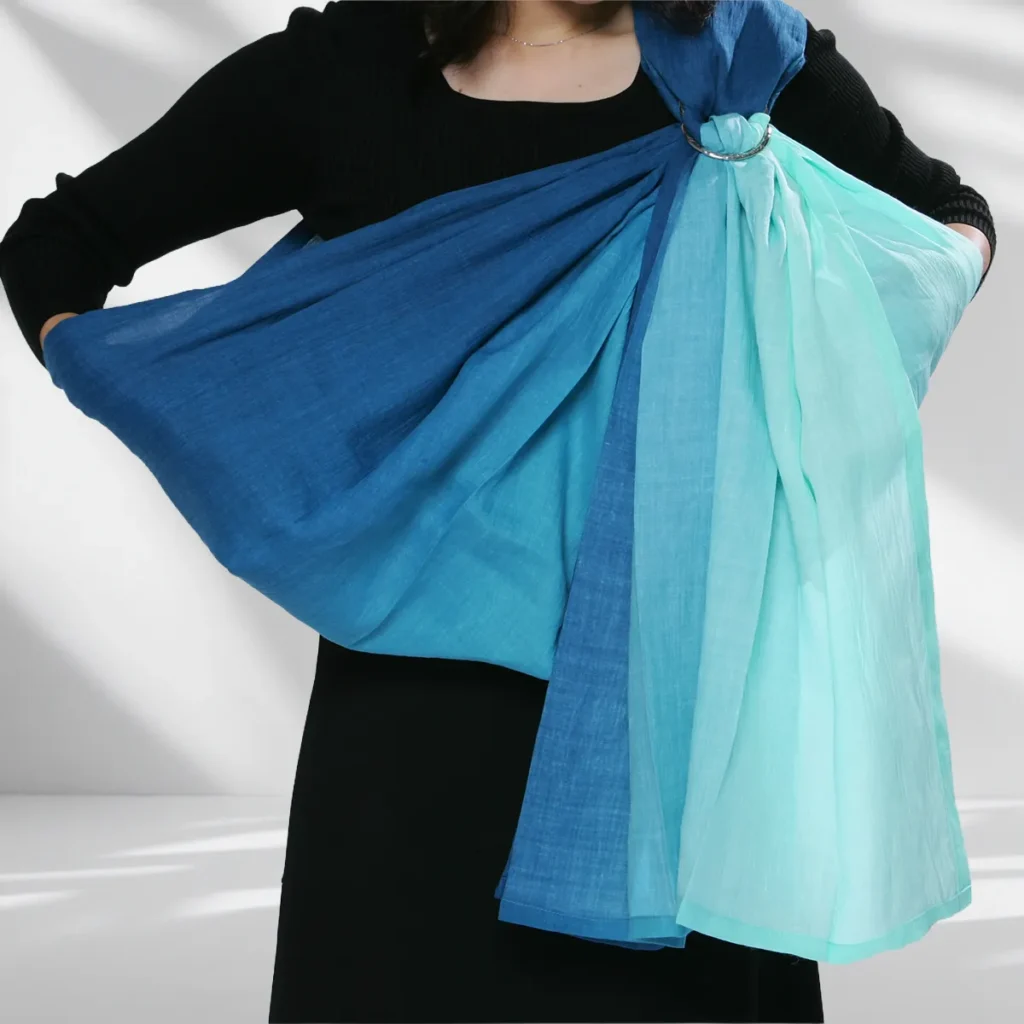
Cradle Carry
Cradle Carry
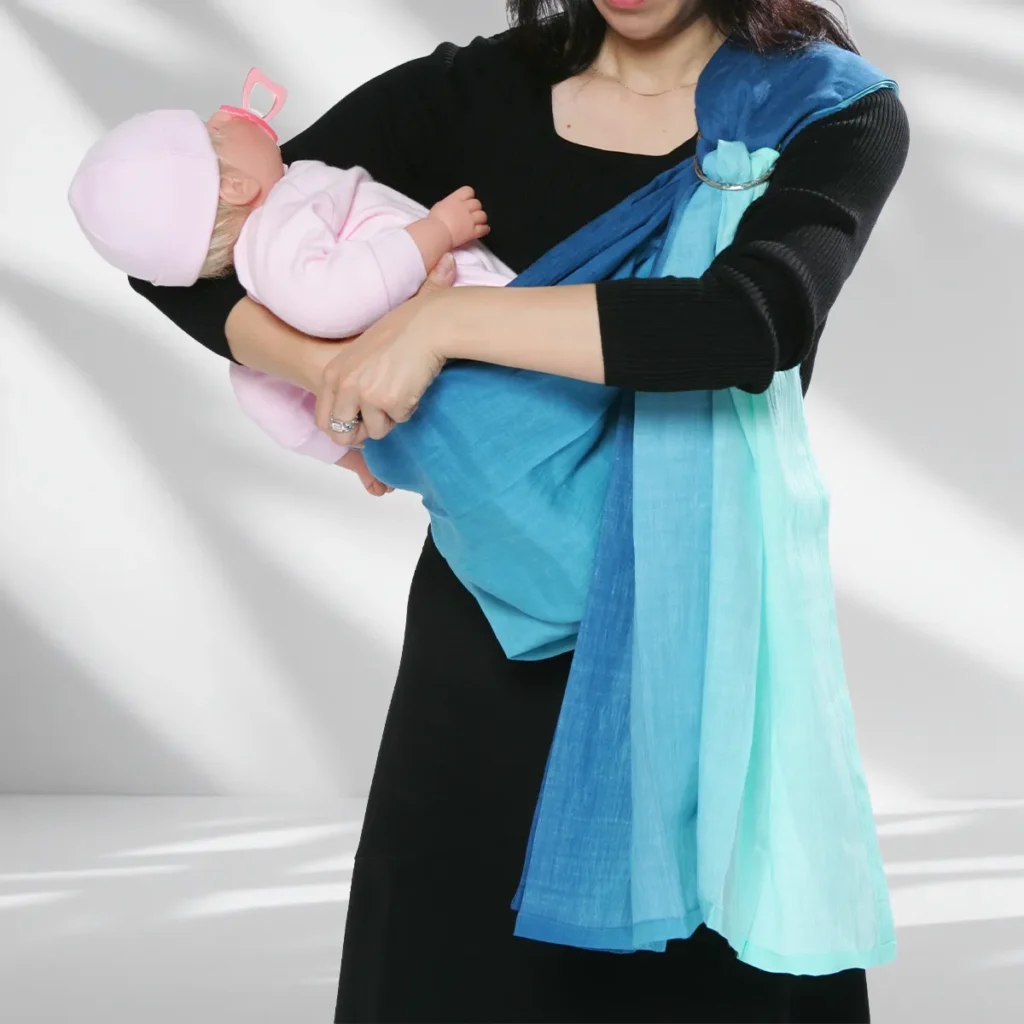
When carrying a baby who does not yet have full head control, your first priority is a position in which you can continuously see the face and monitor the airway. This section explains cradle carry using the PsLing method. Throughout use, keep the baby’s entire face visible, make sure neither fabric nor the wearer’s body covers the nose or mouth, and check frequently that the chin is not pressed down onto the chest.
Before full head control, always use a position that lets you see the baby’s face and monitor the airway. Keep the entire face visible and check frequently that neither fabric nor your body covers the nose or mouth.
Step 09
Welcoming Your Baby
Welcome Baby
Bring the Baby into the Pouch
Bring the Baby into the Pouch
Hold the baby gently and high on the shoulder opposite the sling, speaking calmly as you move.
Reach your other hand up through the pouch to receive both legs, then guide the baby slowly into the deepest part of the pouch, bottom first. Begin with the baby’s abdomen resting comfortably against yours.
Hold the baby high on the shoulder opposite the sling. Reach through the pouch to receive both legs, then guide the baby into its deepest part, bottom first, with the baby’s abdomen resting comfortably against yours.
Step 10
The Perfect Profile
Perfect Profile
Check the Feet from the Side
Check the Feet from the Side
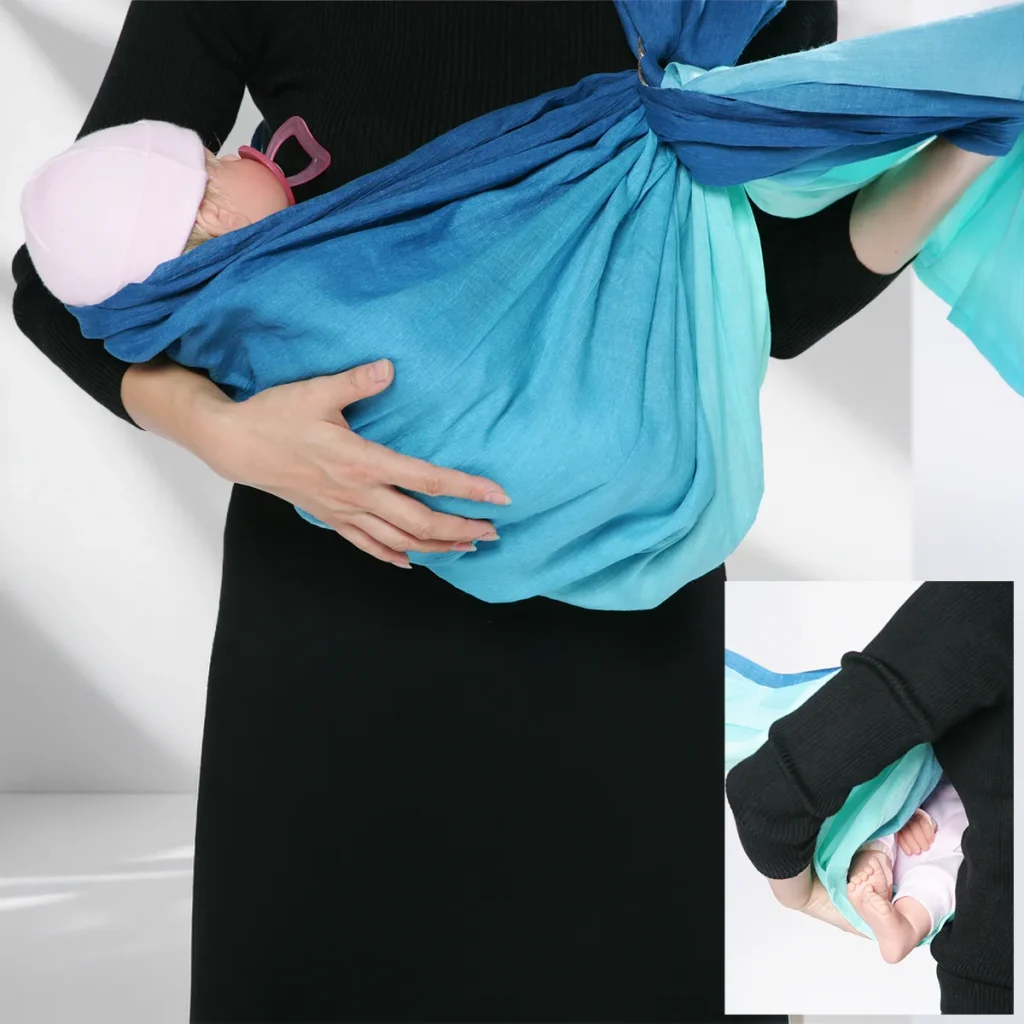
Once the baby is in the cradle position, use a mirror to check the feet from the side.
The feet should remain visible just beyond the pouch edge. This indicates that the bottom is settled in the deepest part of the pouch with the hips open. Do not overtighten the tail.
Use a mirror to check the feet from the side. They should remain visible just beyond the pouch edge, indicating that the bottom is settled deeply with the hips open.
Step 11
The Perfect Cradle Check
Cradle Check
Check the Complete Position
Check the Complete Position
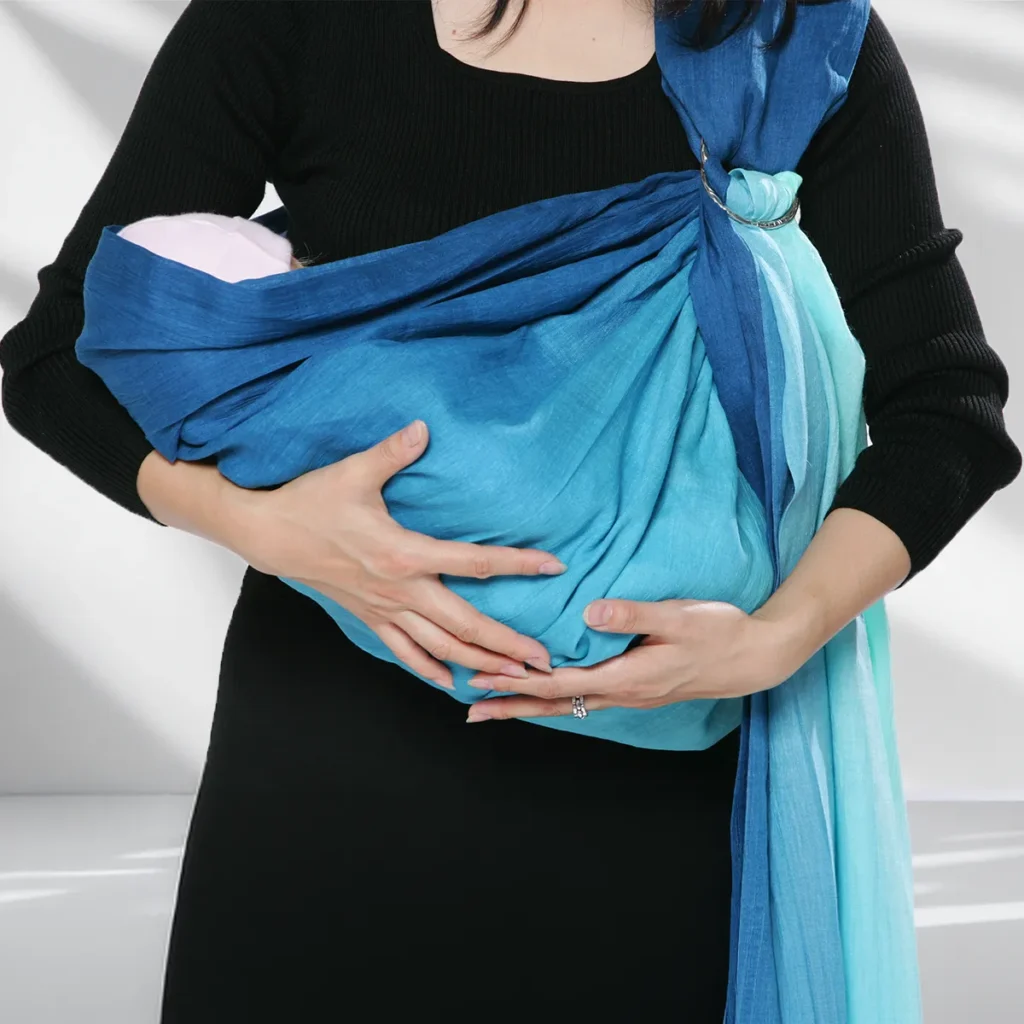
Check the overall balance and confirm that the baby is comfortably supported.
Use a mirror to review each position marker below, paying particular attention to the face, airway, neck, back, hips and pouch depth.
Check the overall balance in a mirror, paying particular attention to the face, airway, neck, back, hips and pouch depth.
Step 12
The Perfect Draped Fan
Draped Fan
Finish the Fan-Shaped Drape
Finish the Fan-Shaped Drape
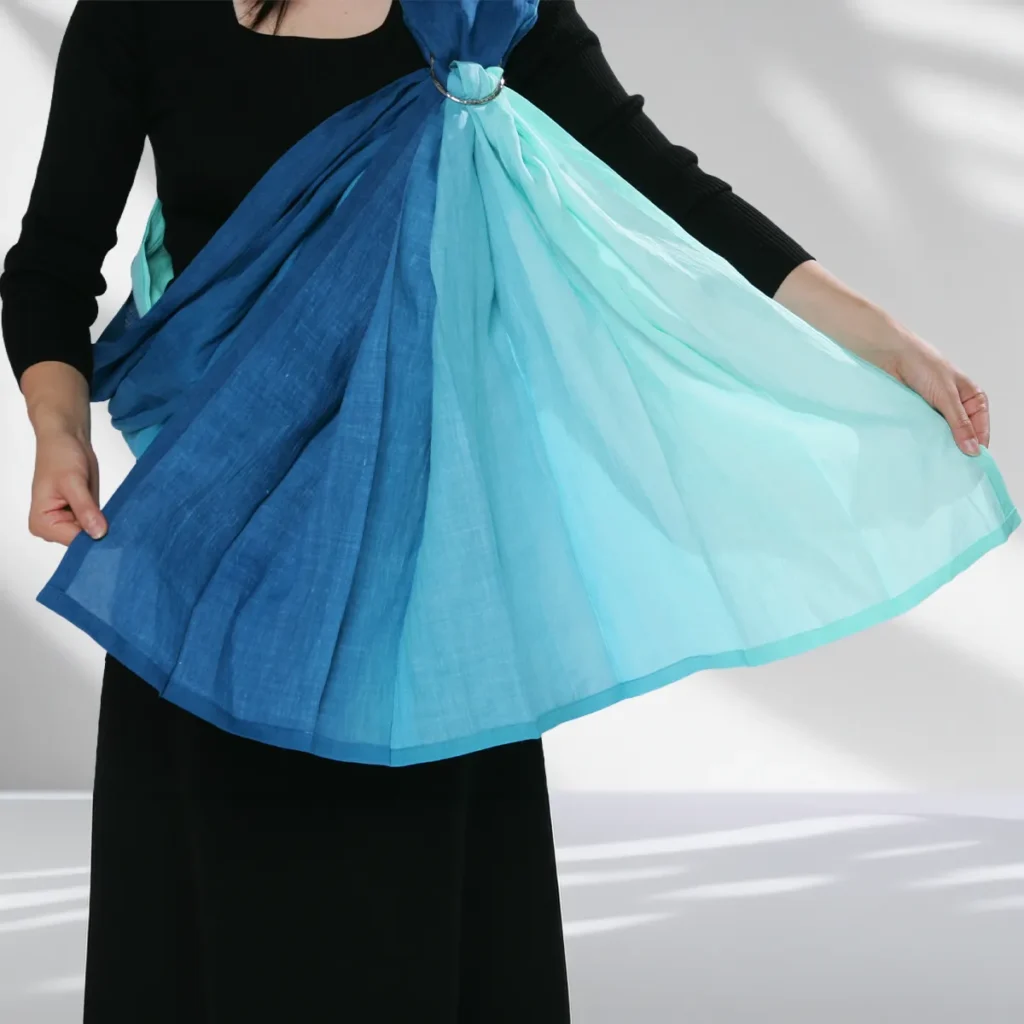
Only after completing every safety check, hold both outer edges of the tail below the rings and spread them gently.
The cradle carry is complete when the fabric opens into an even fan-shaped drape.
After completing every safety check, hold both tail edges and spread them gently into an even fan-shaped drape.
The Art of Welcoming
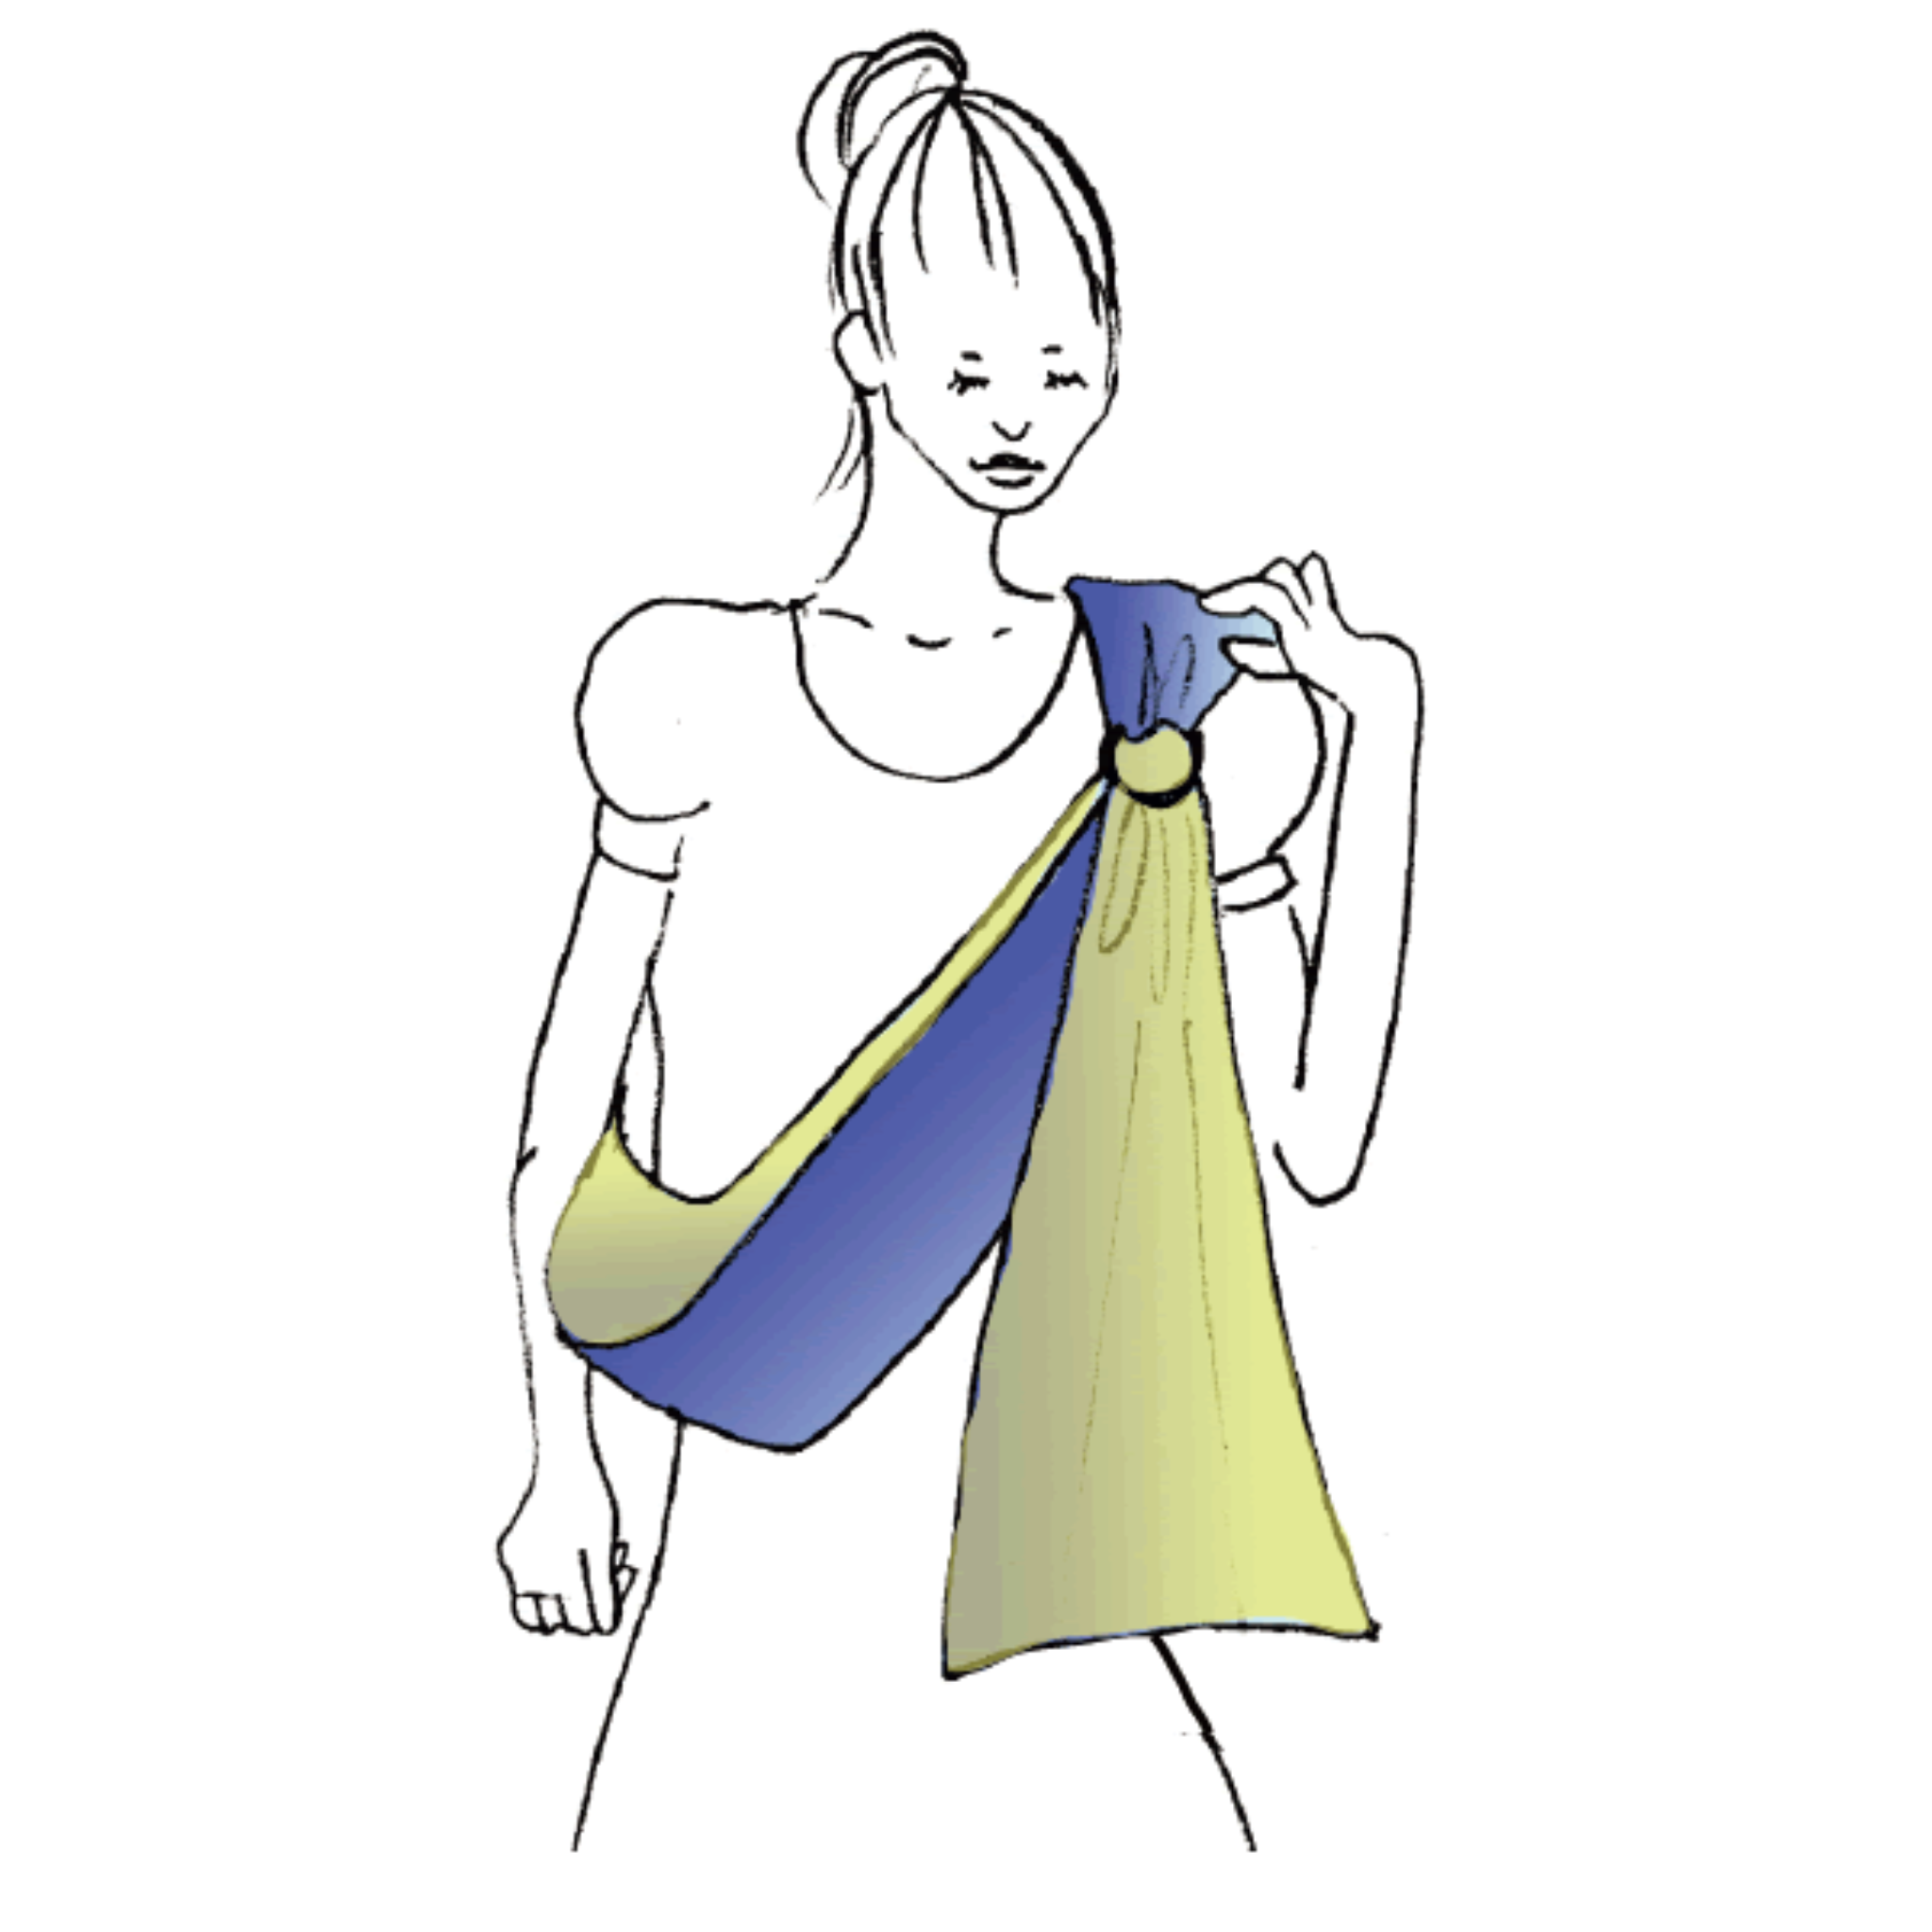
01 Check the Rings
Before bringing the baby into the sling, use a mirror for a final check that both rings sit immediately below your collarbone.
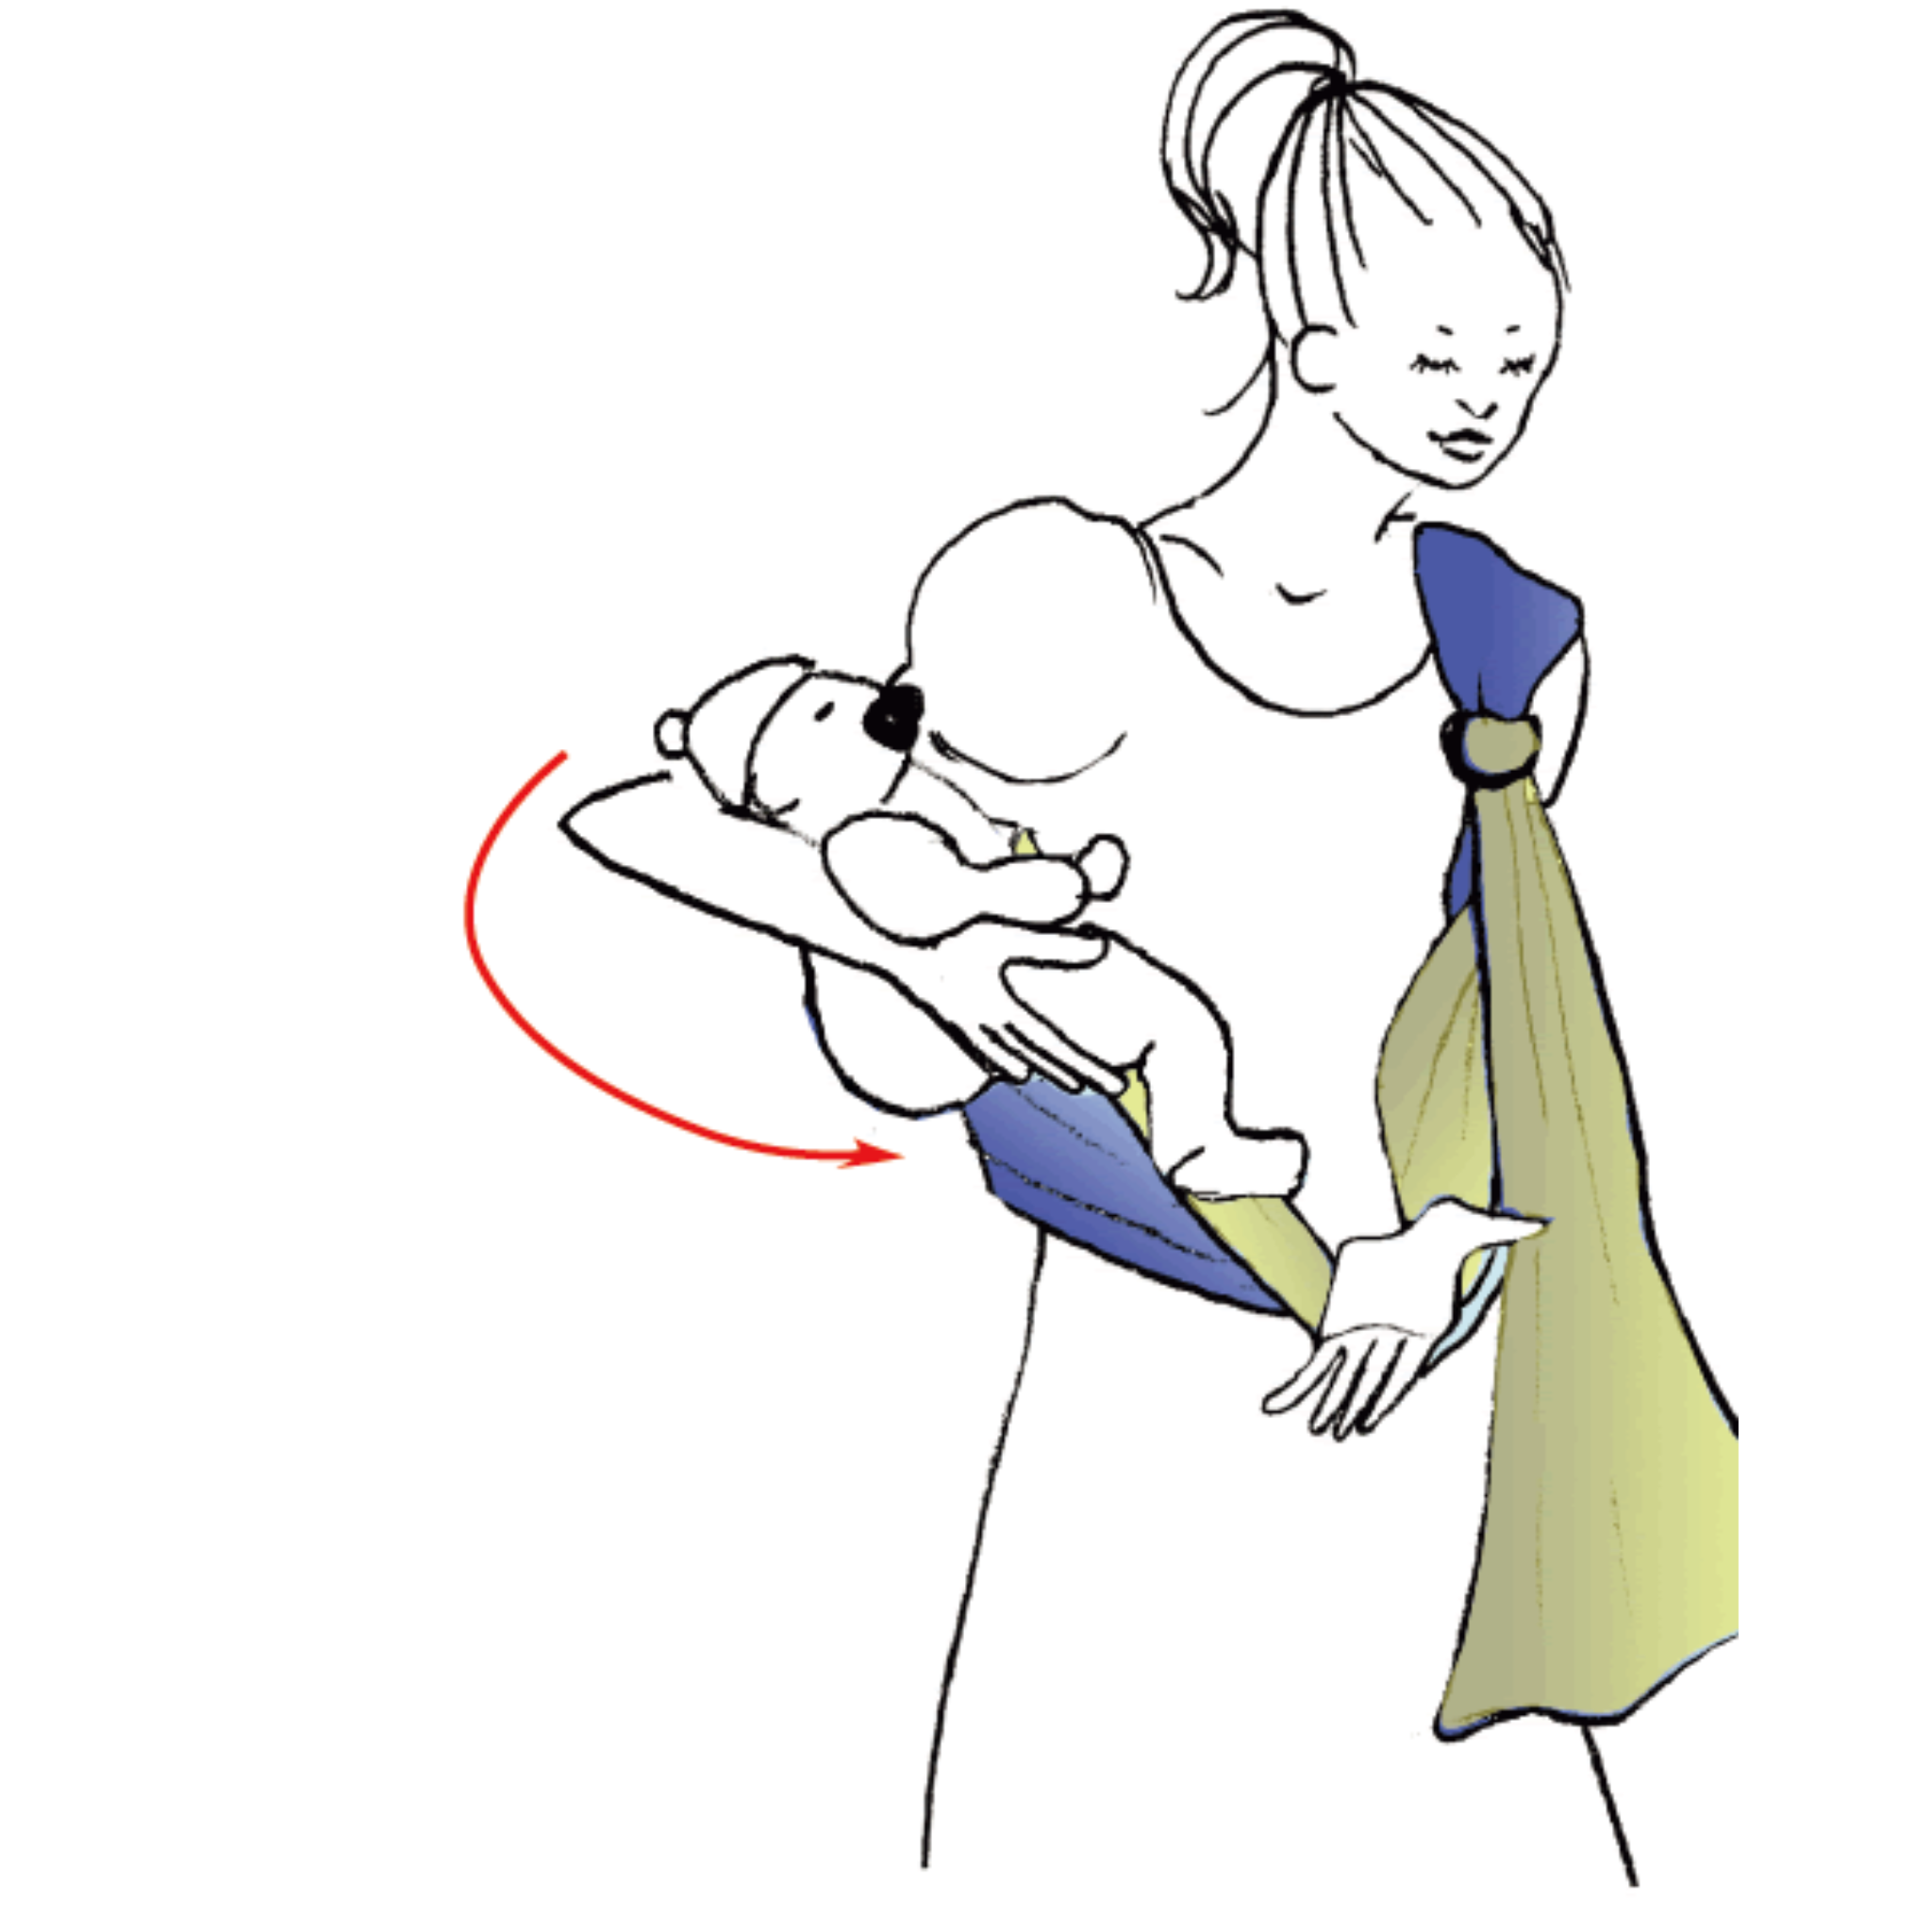
02 Support the Baby
While holding the baby securely with your right arm, reach your left arm up through the pouch and support the baby from below.
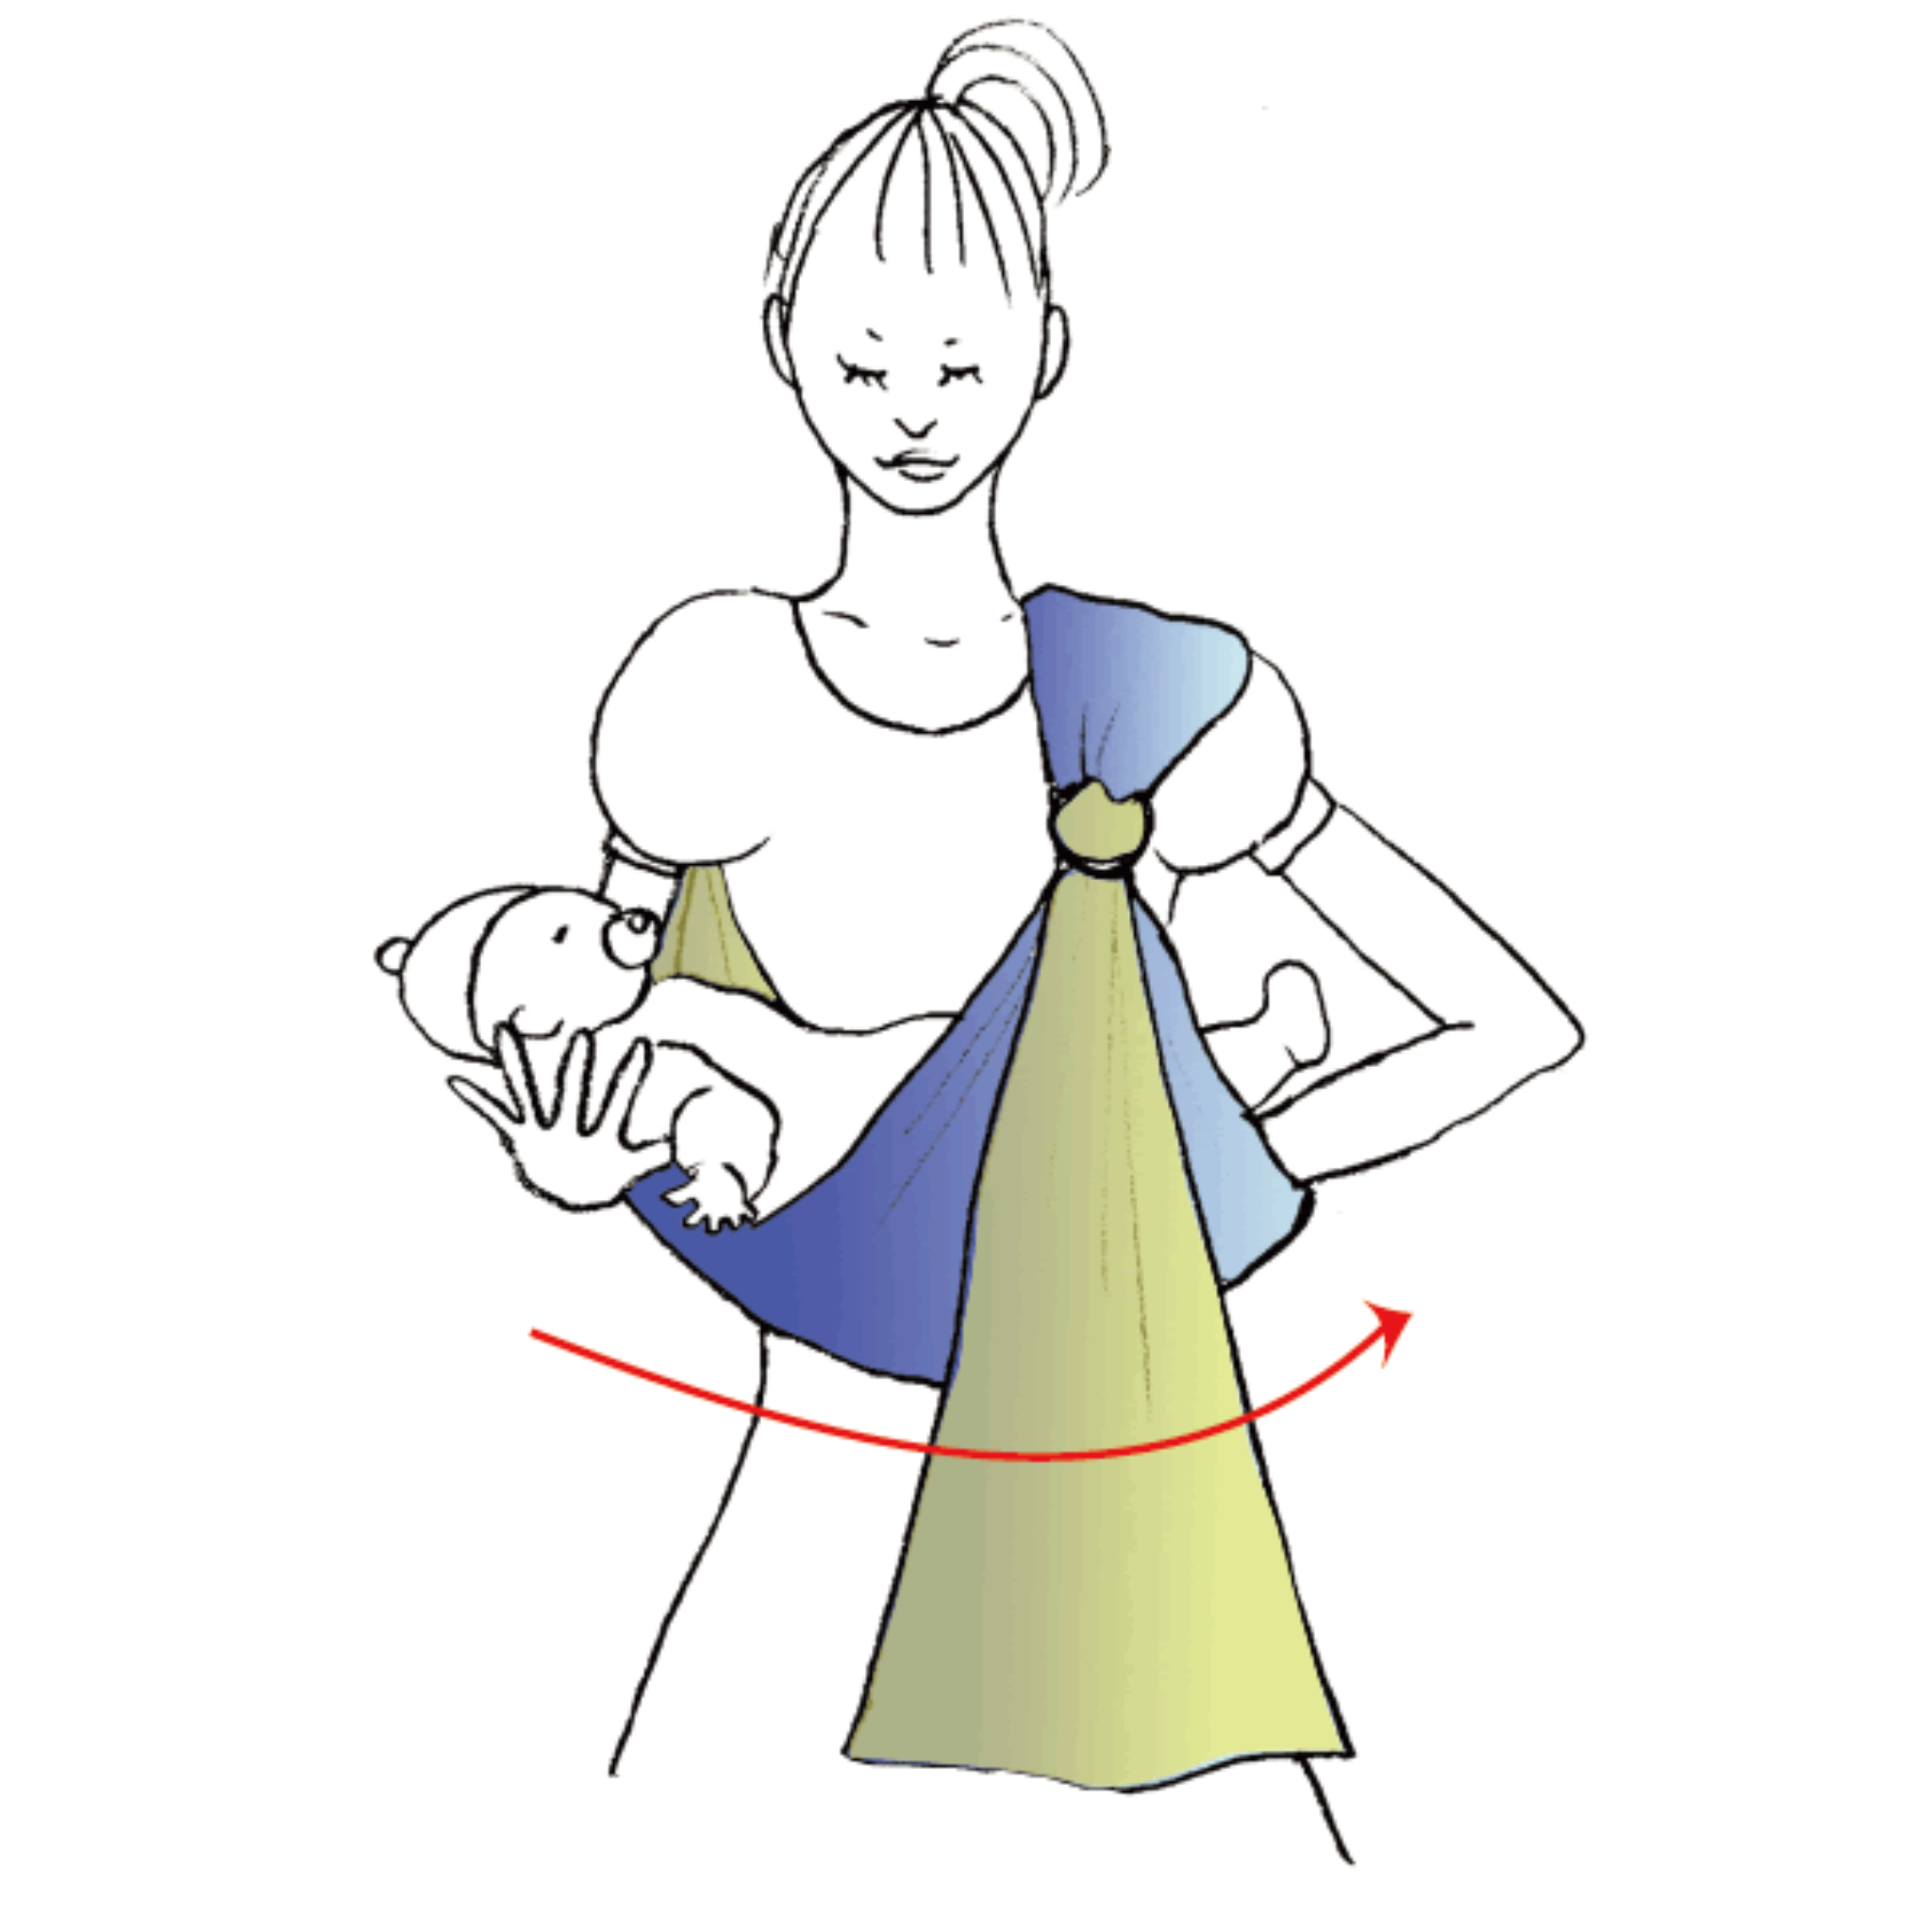
03 Guide into the Pouch
Use the arm supporting from inside to guide the baby gently into the deepest part of the open pouch.
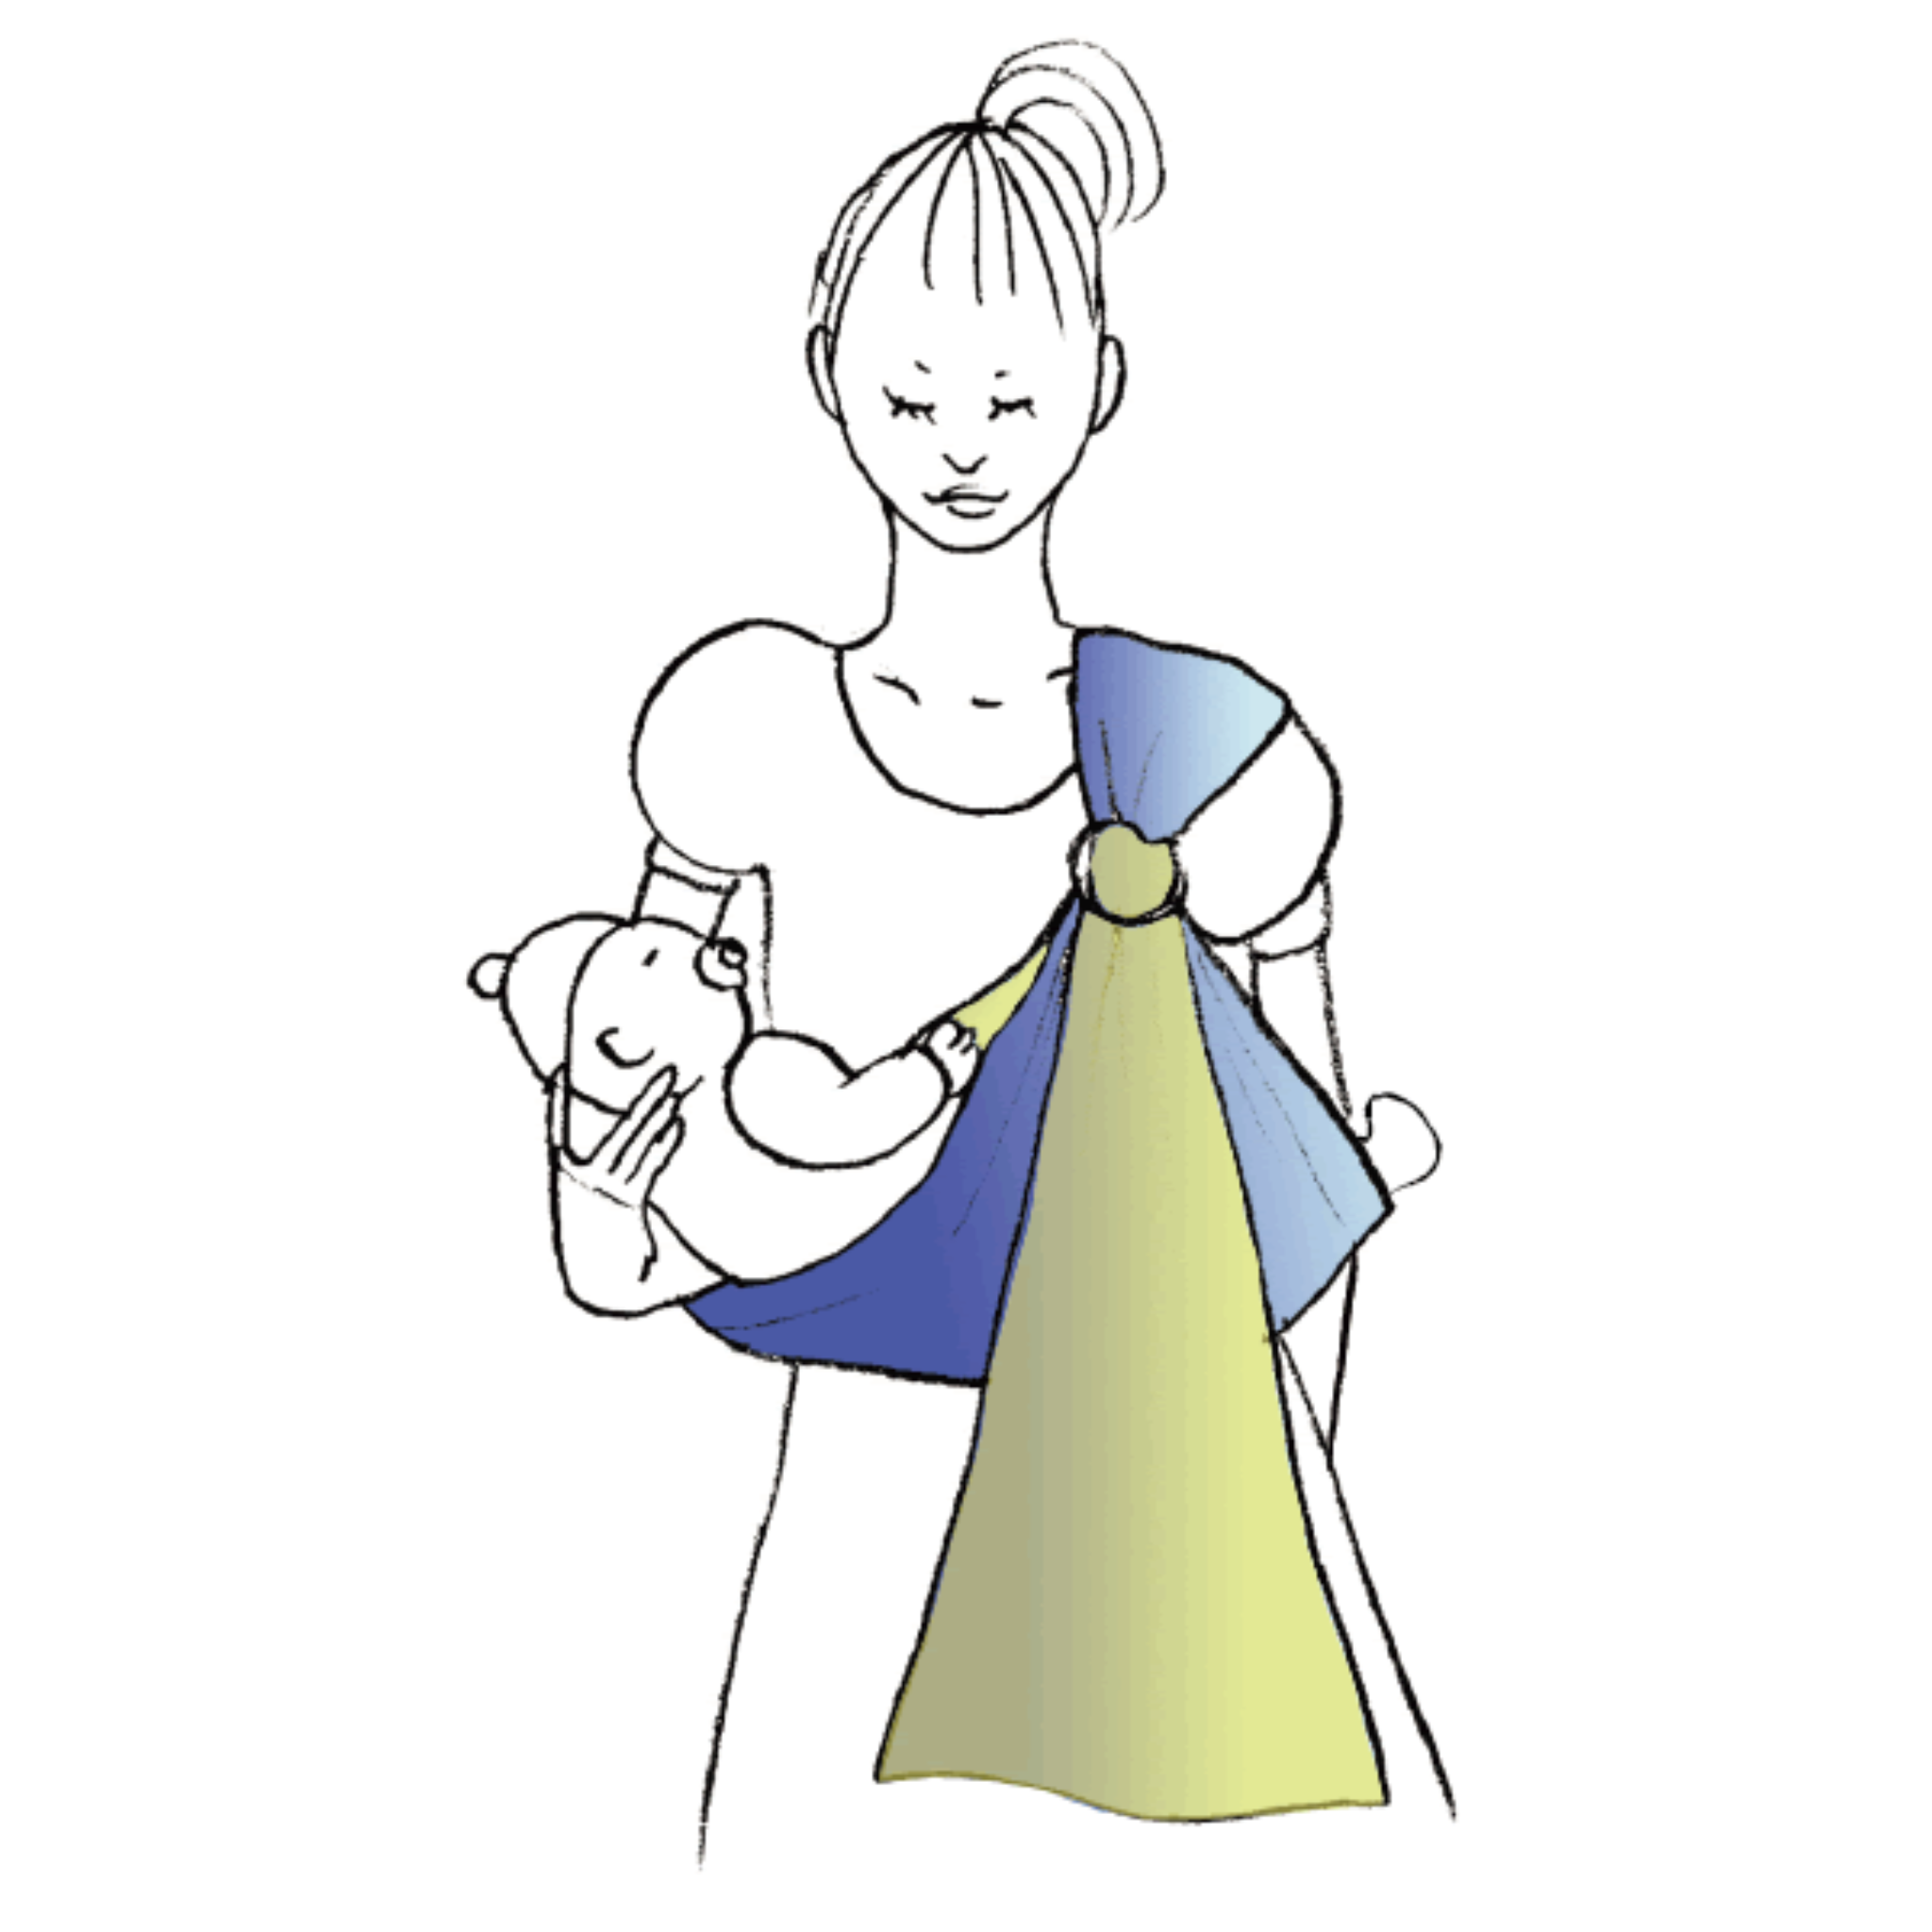
04 Position the Bottom
Adjust gently so the baby’s bottom rests at the centre and deepest point of the pouch.
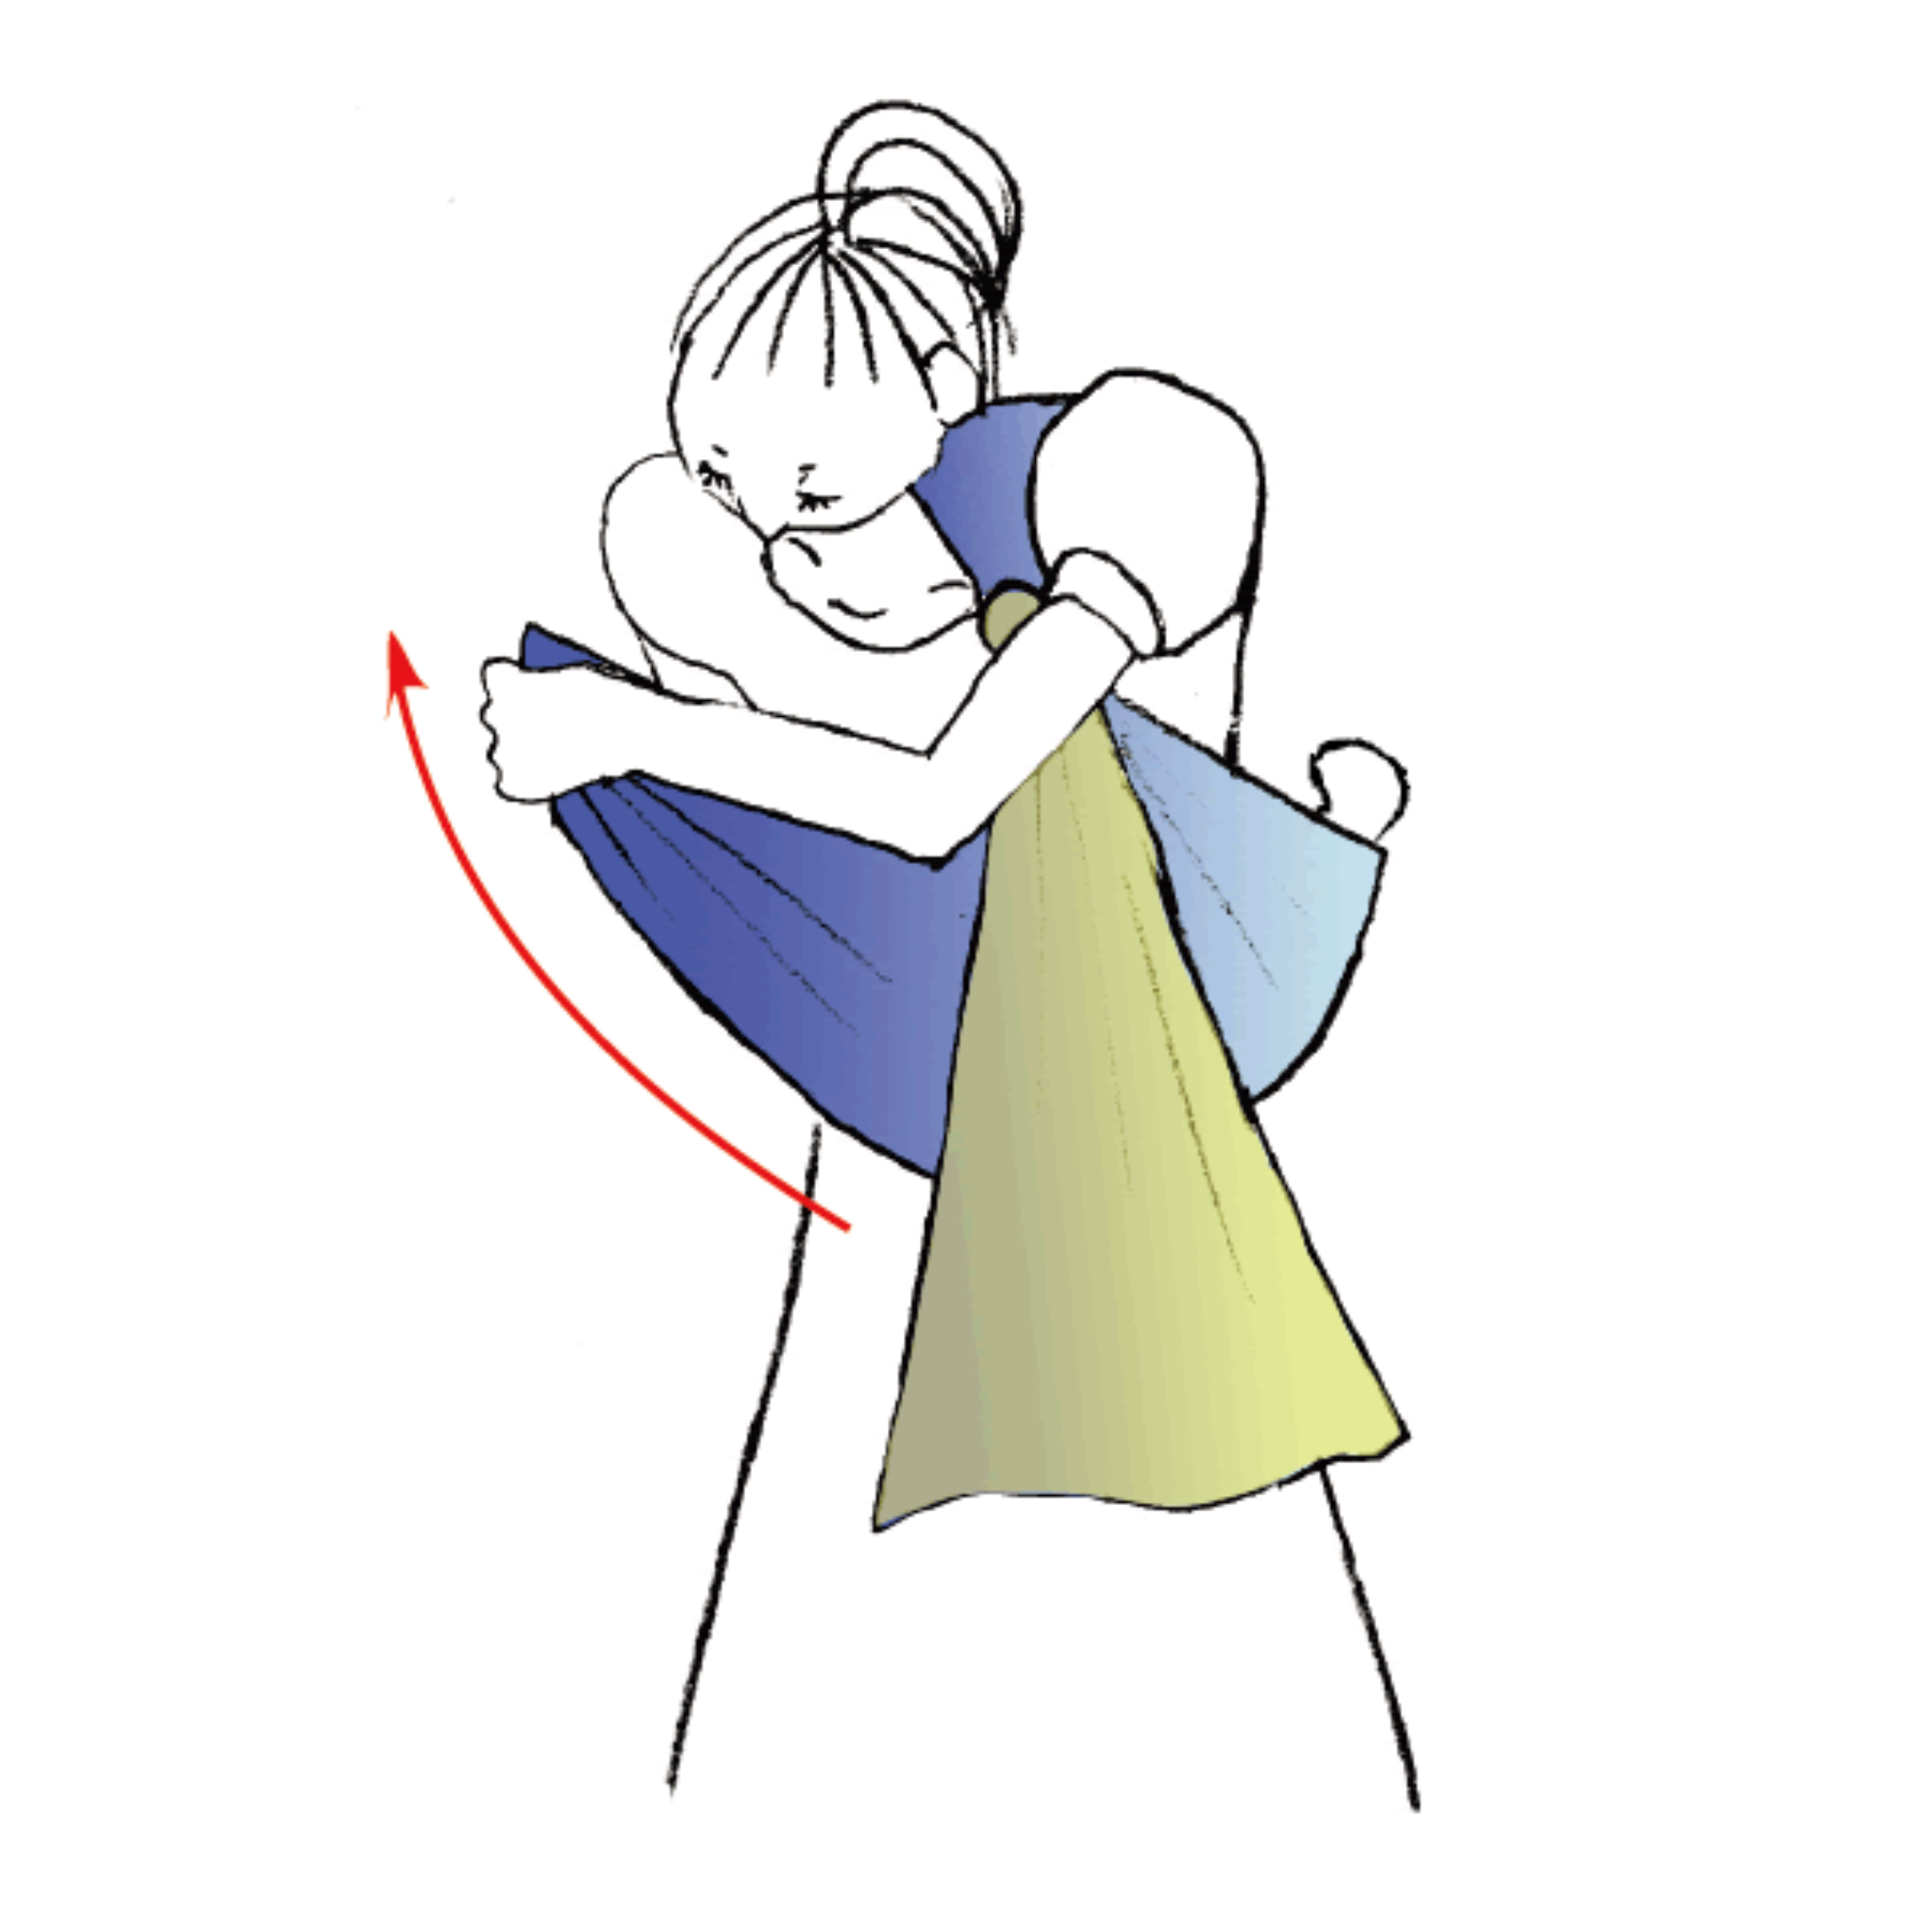
05 Spread the Pouch
Spread the pouch fabric outwards so it supports the baby’s back and bottom evenly, while keeping the face fully visible and clear of fabric.
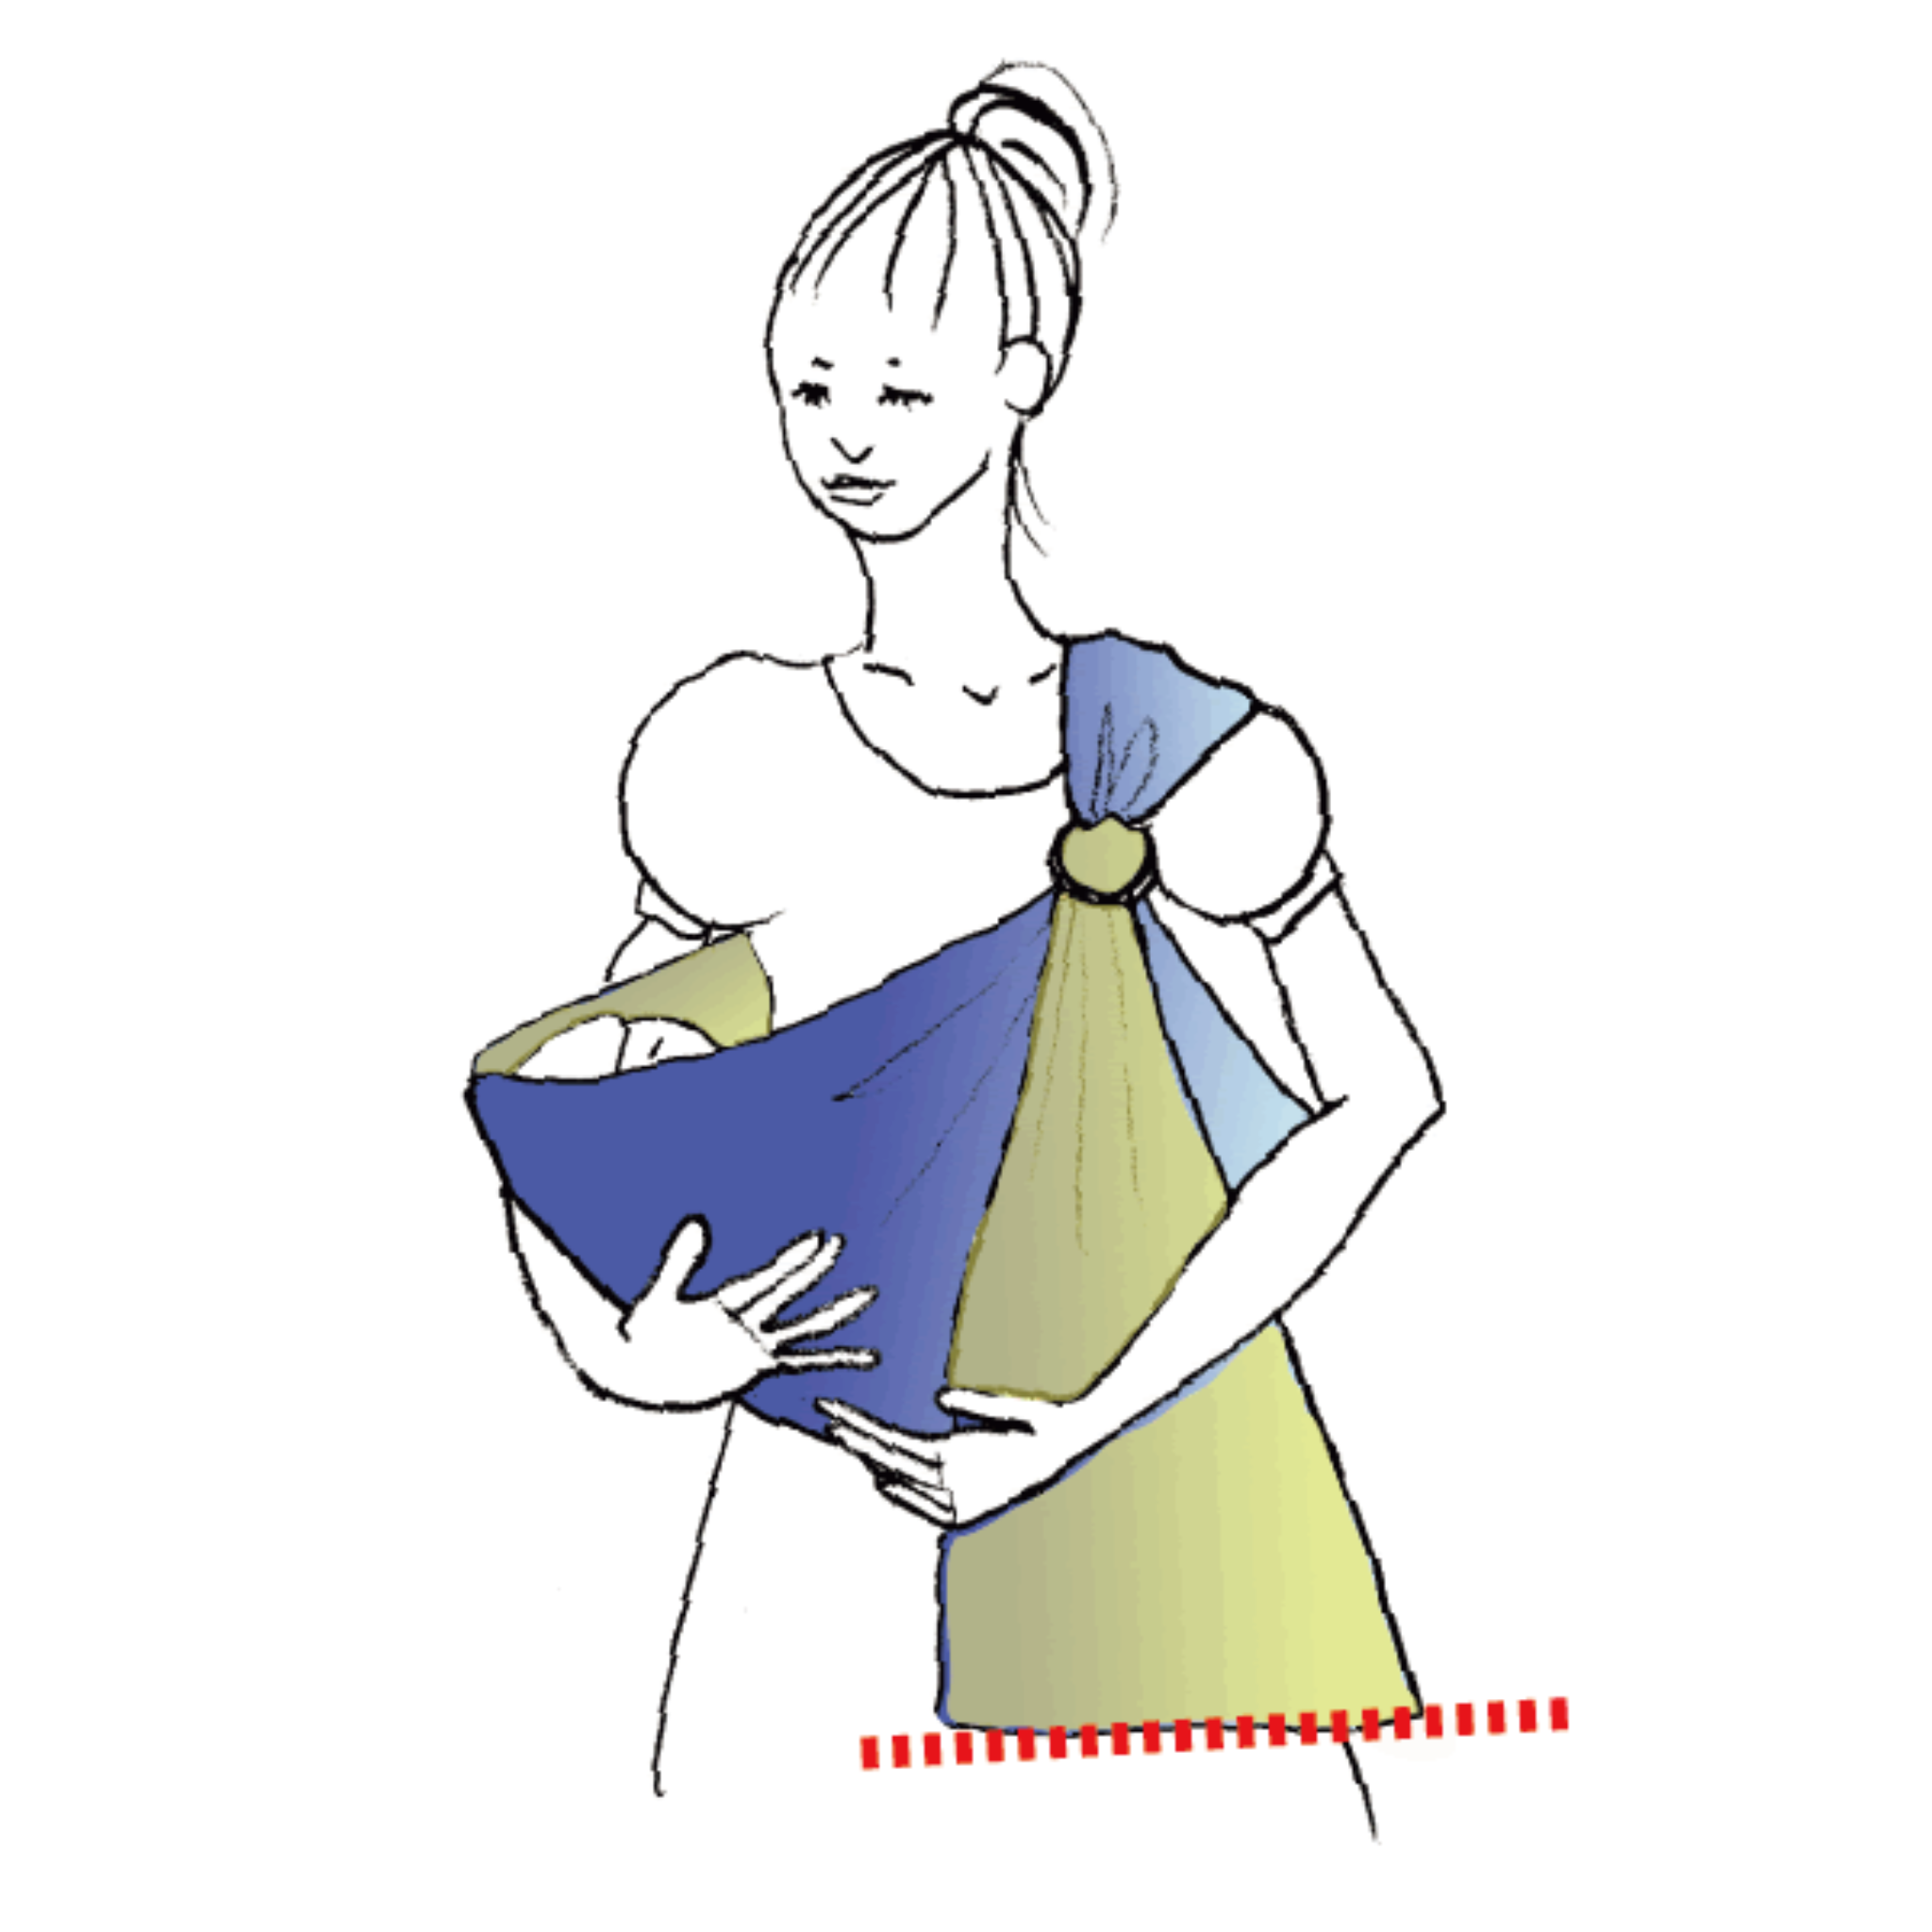
06 Check the Tail Edges
Once the position is settled, check that both edges of the tail hang straight from the rings without twisting.
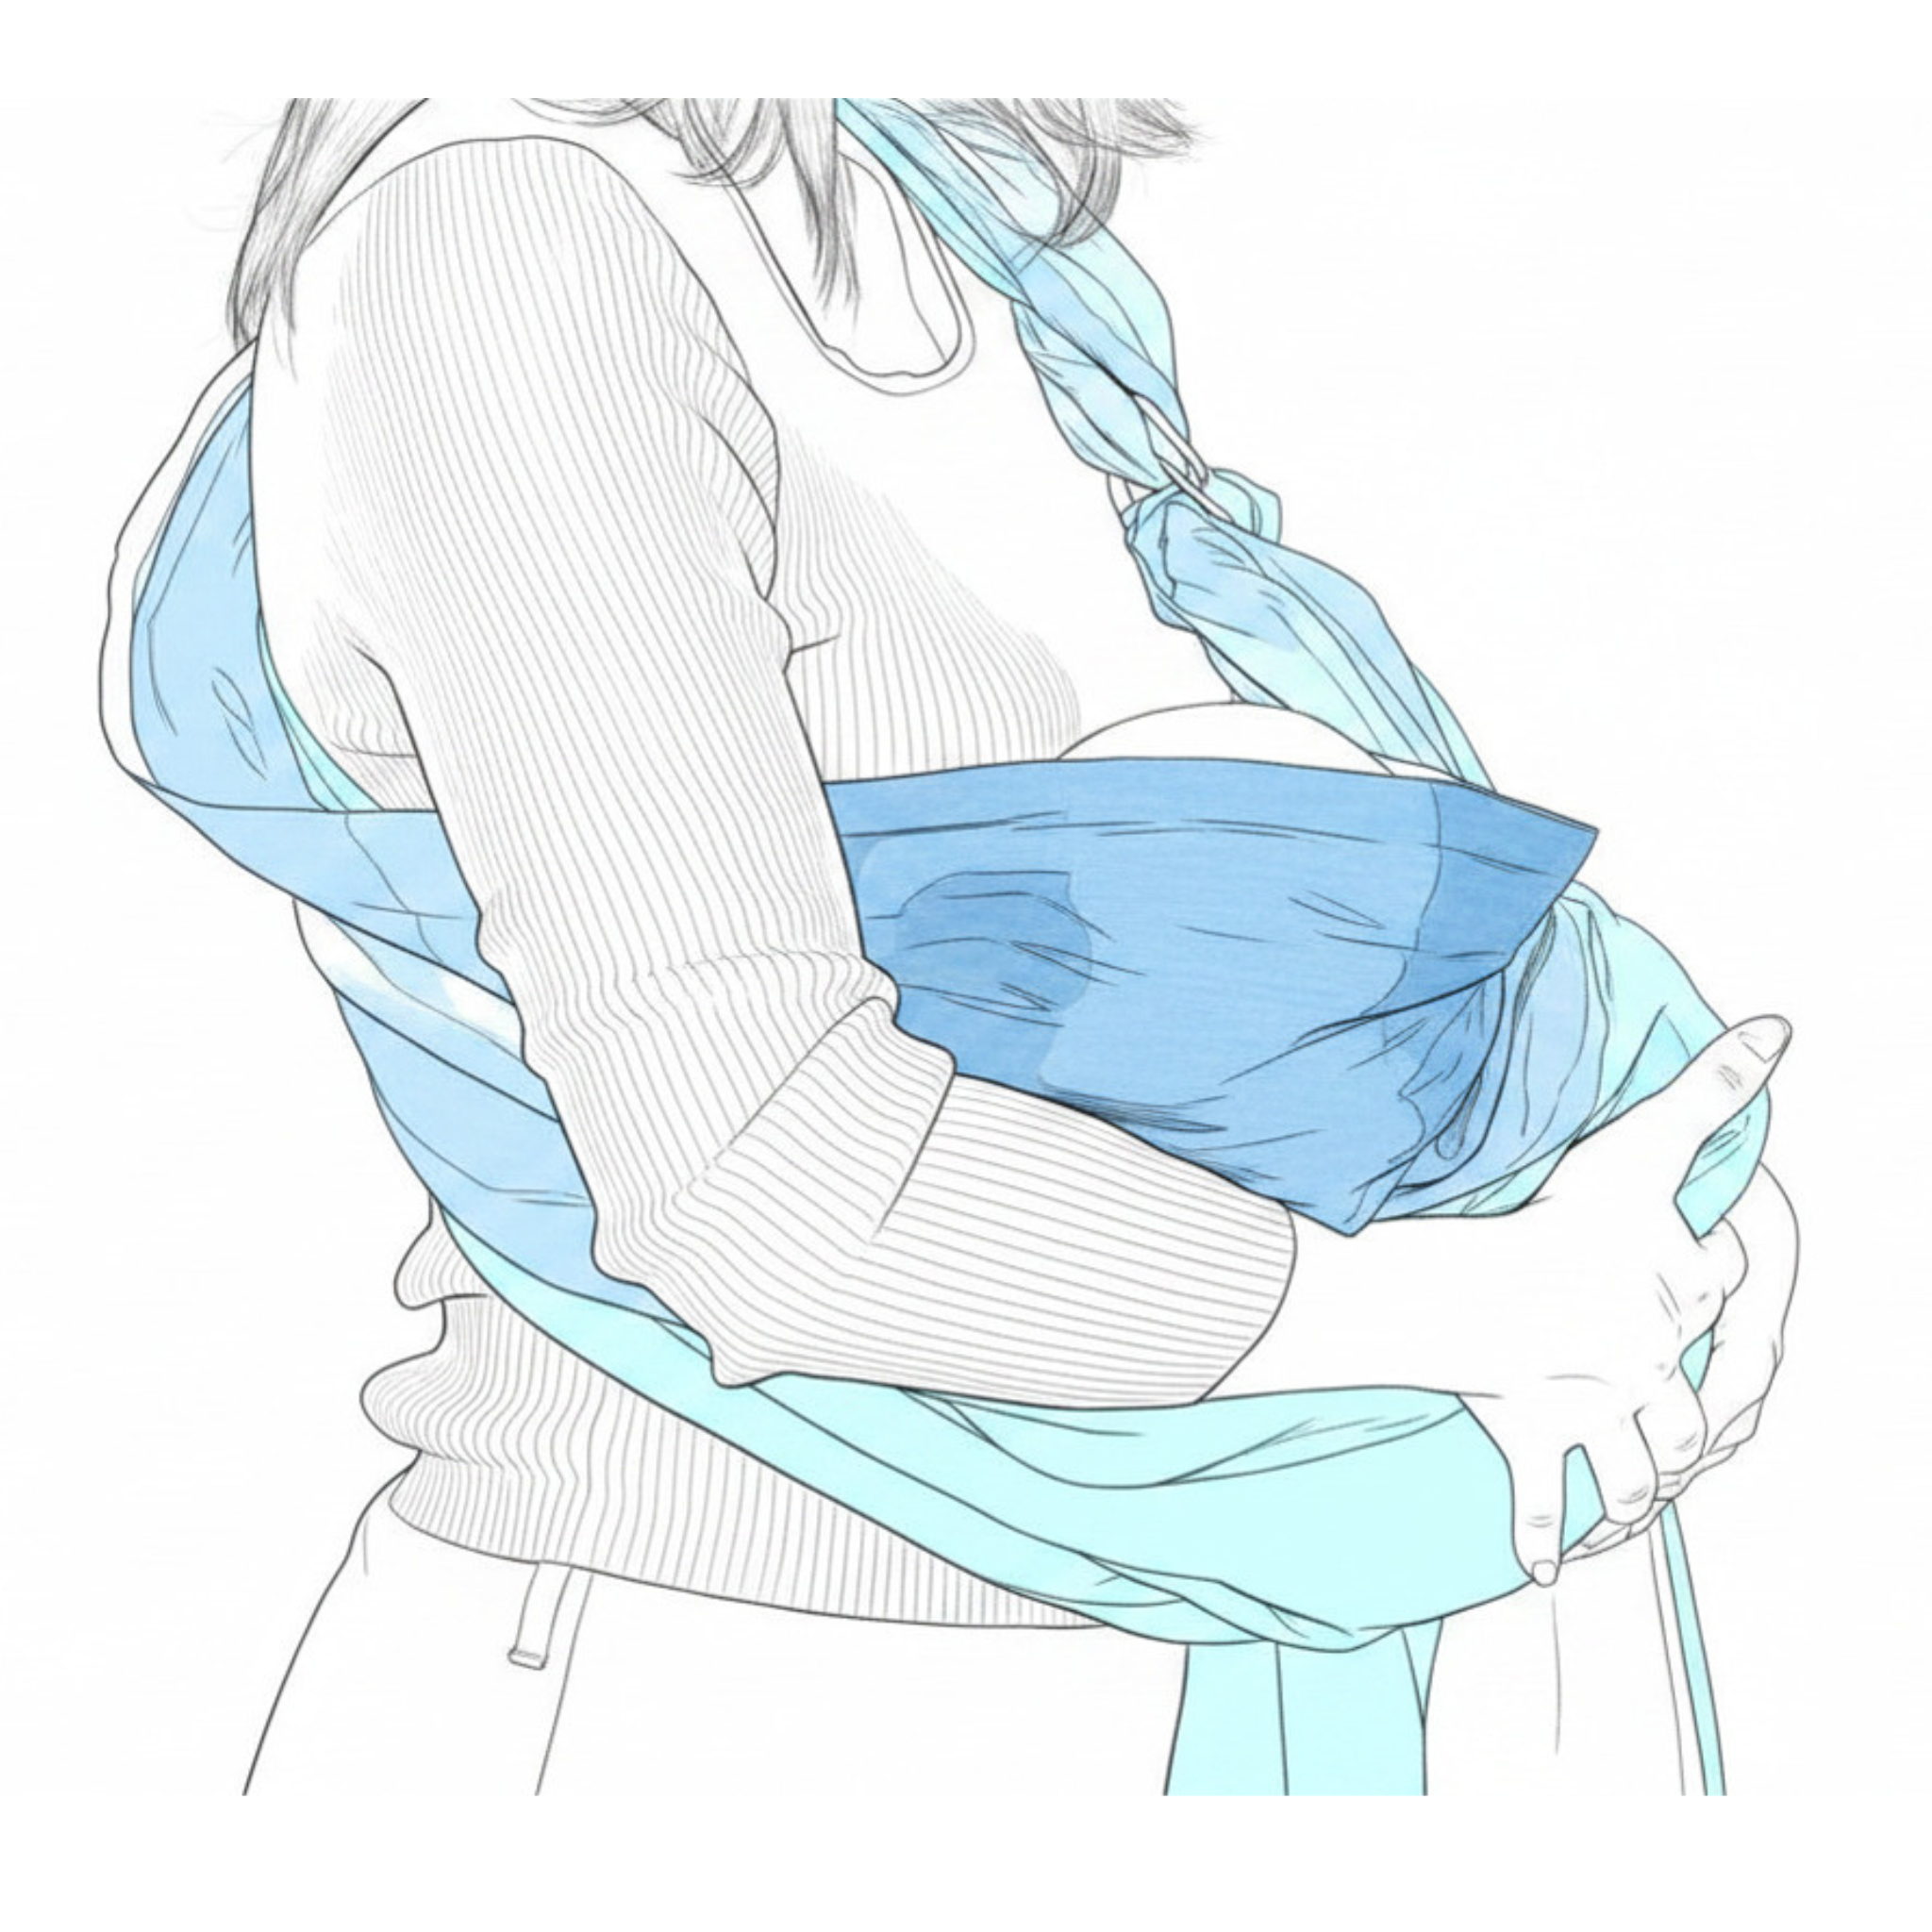
07 A Gentle Supported Curve
In cradle carry, the baby’s body should not be compressed into a tight curl. Maintain a gentle, supported curve, with the neck and back supported and the airway clear.
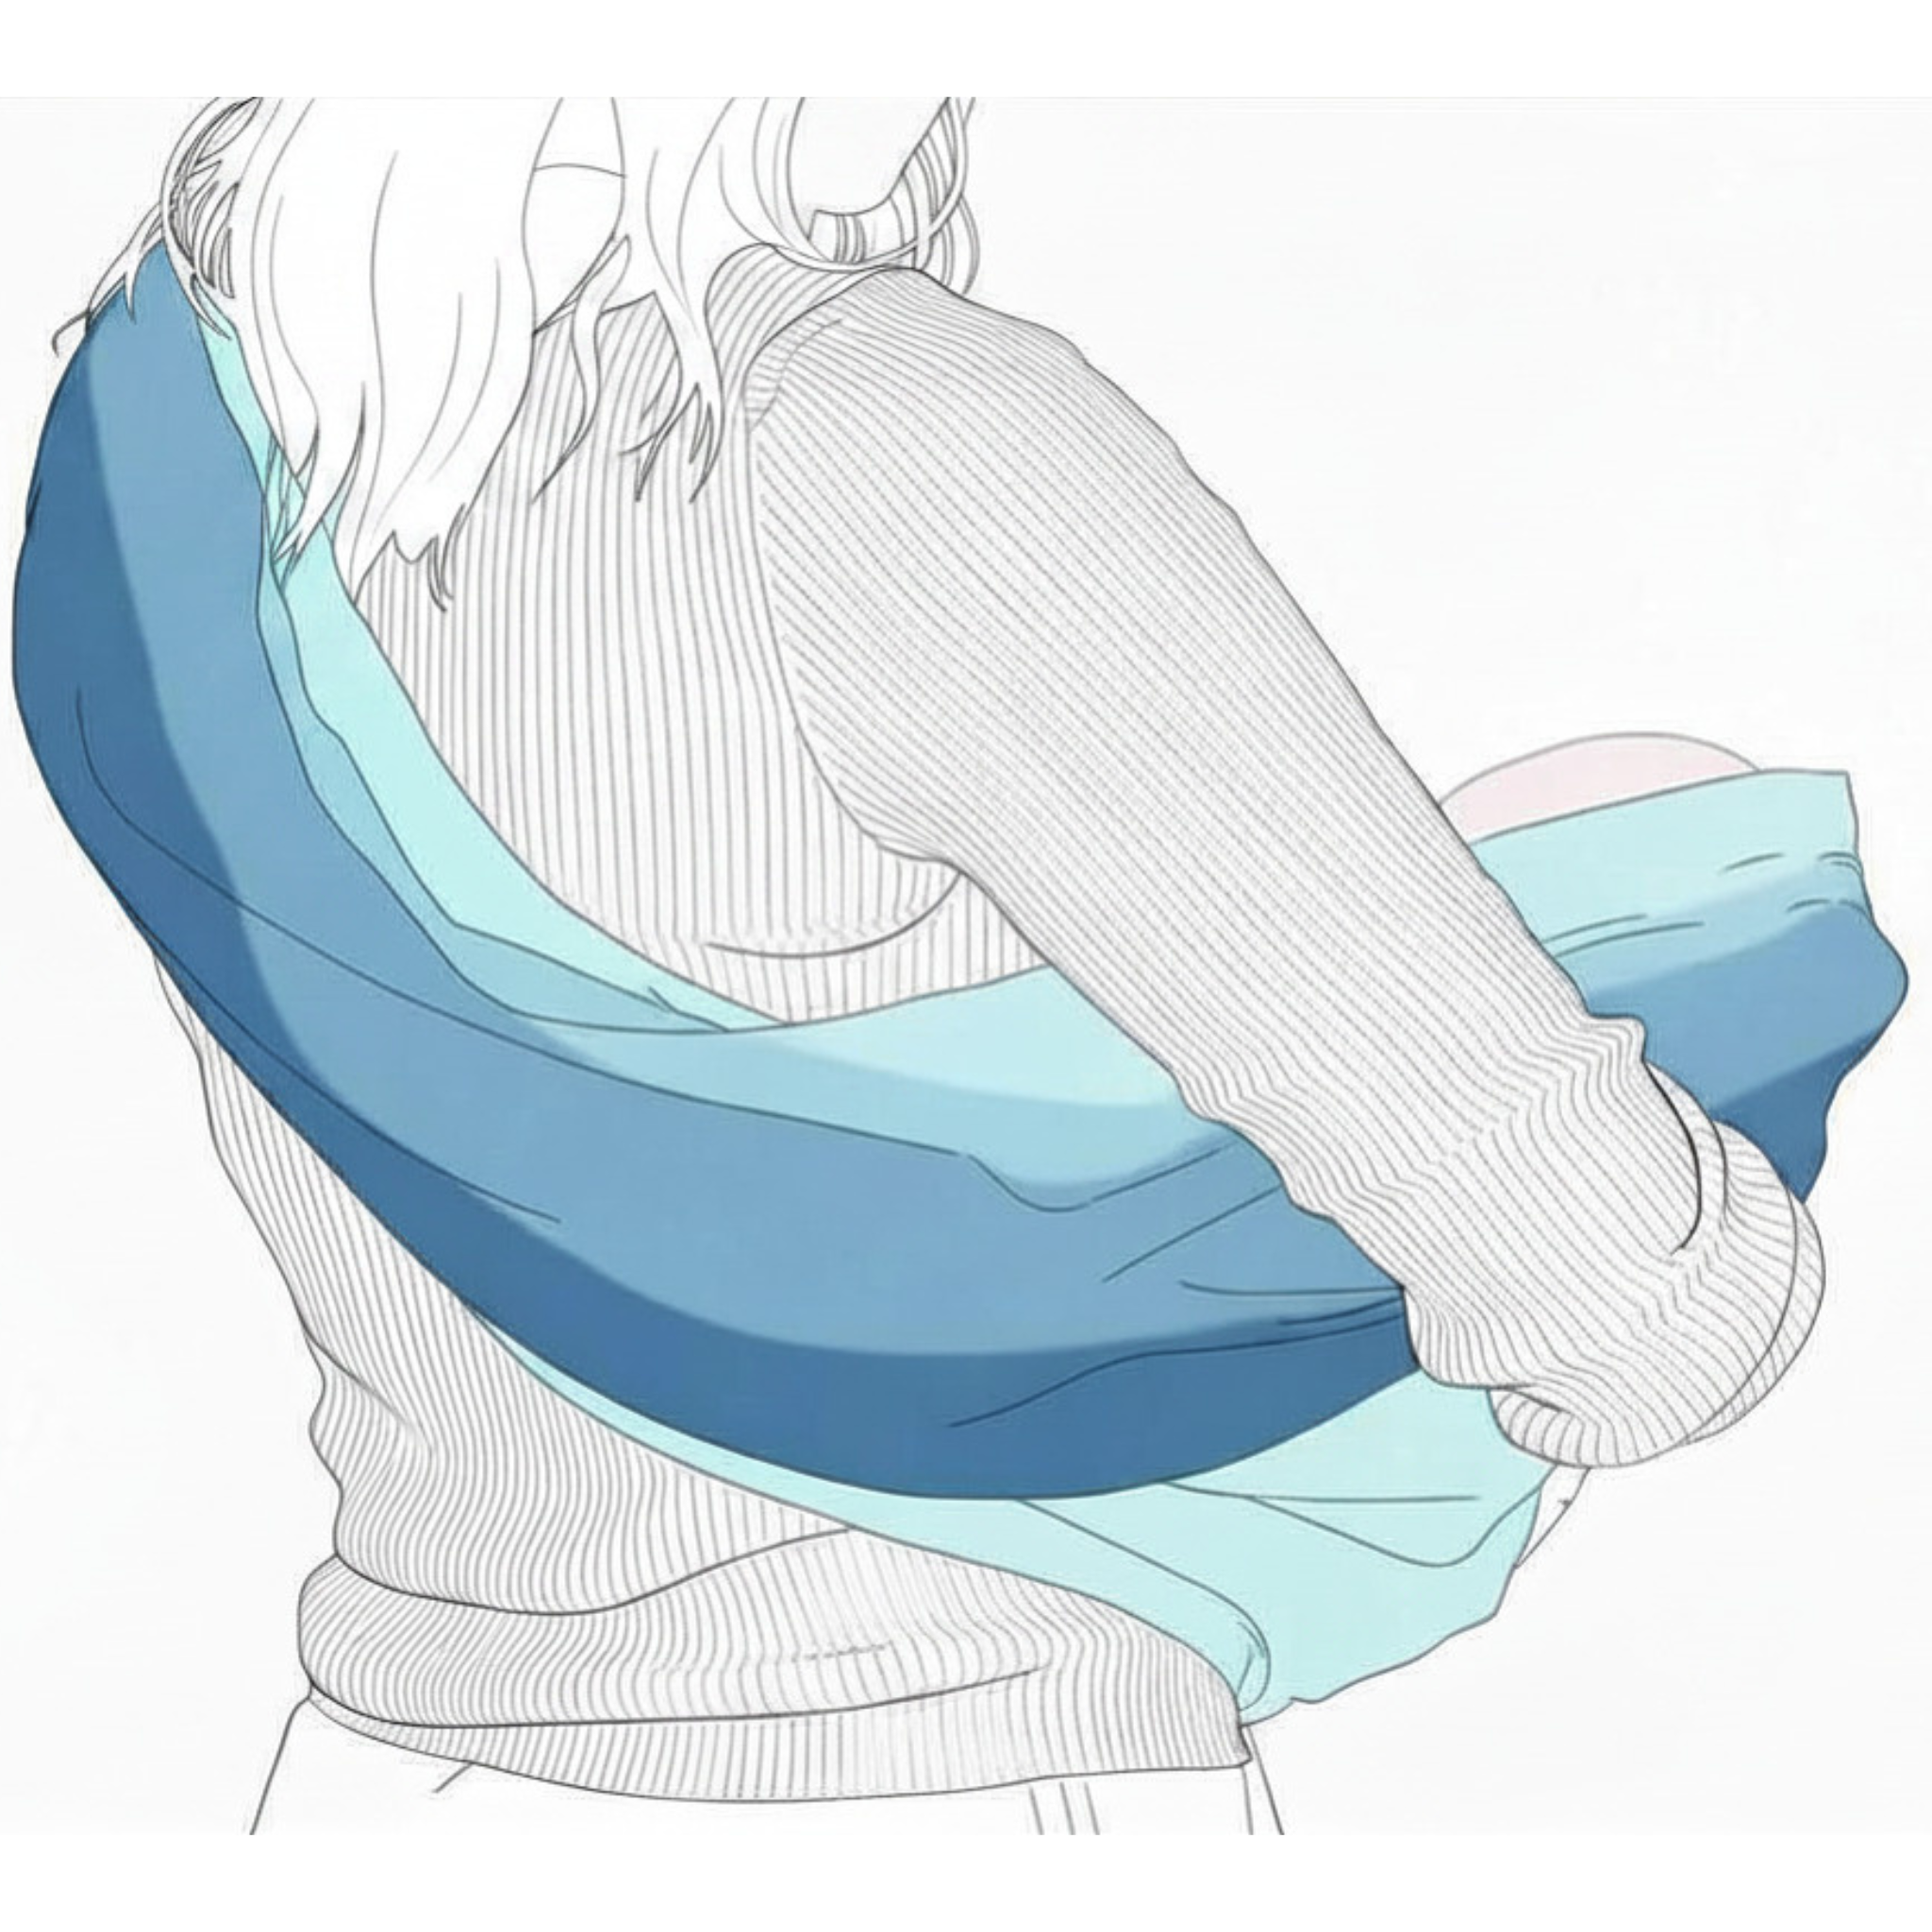
08 Keep the Label Inside
After putting on the sling, confirm that the shoulder label remains inside and the fabric is not twisted.
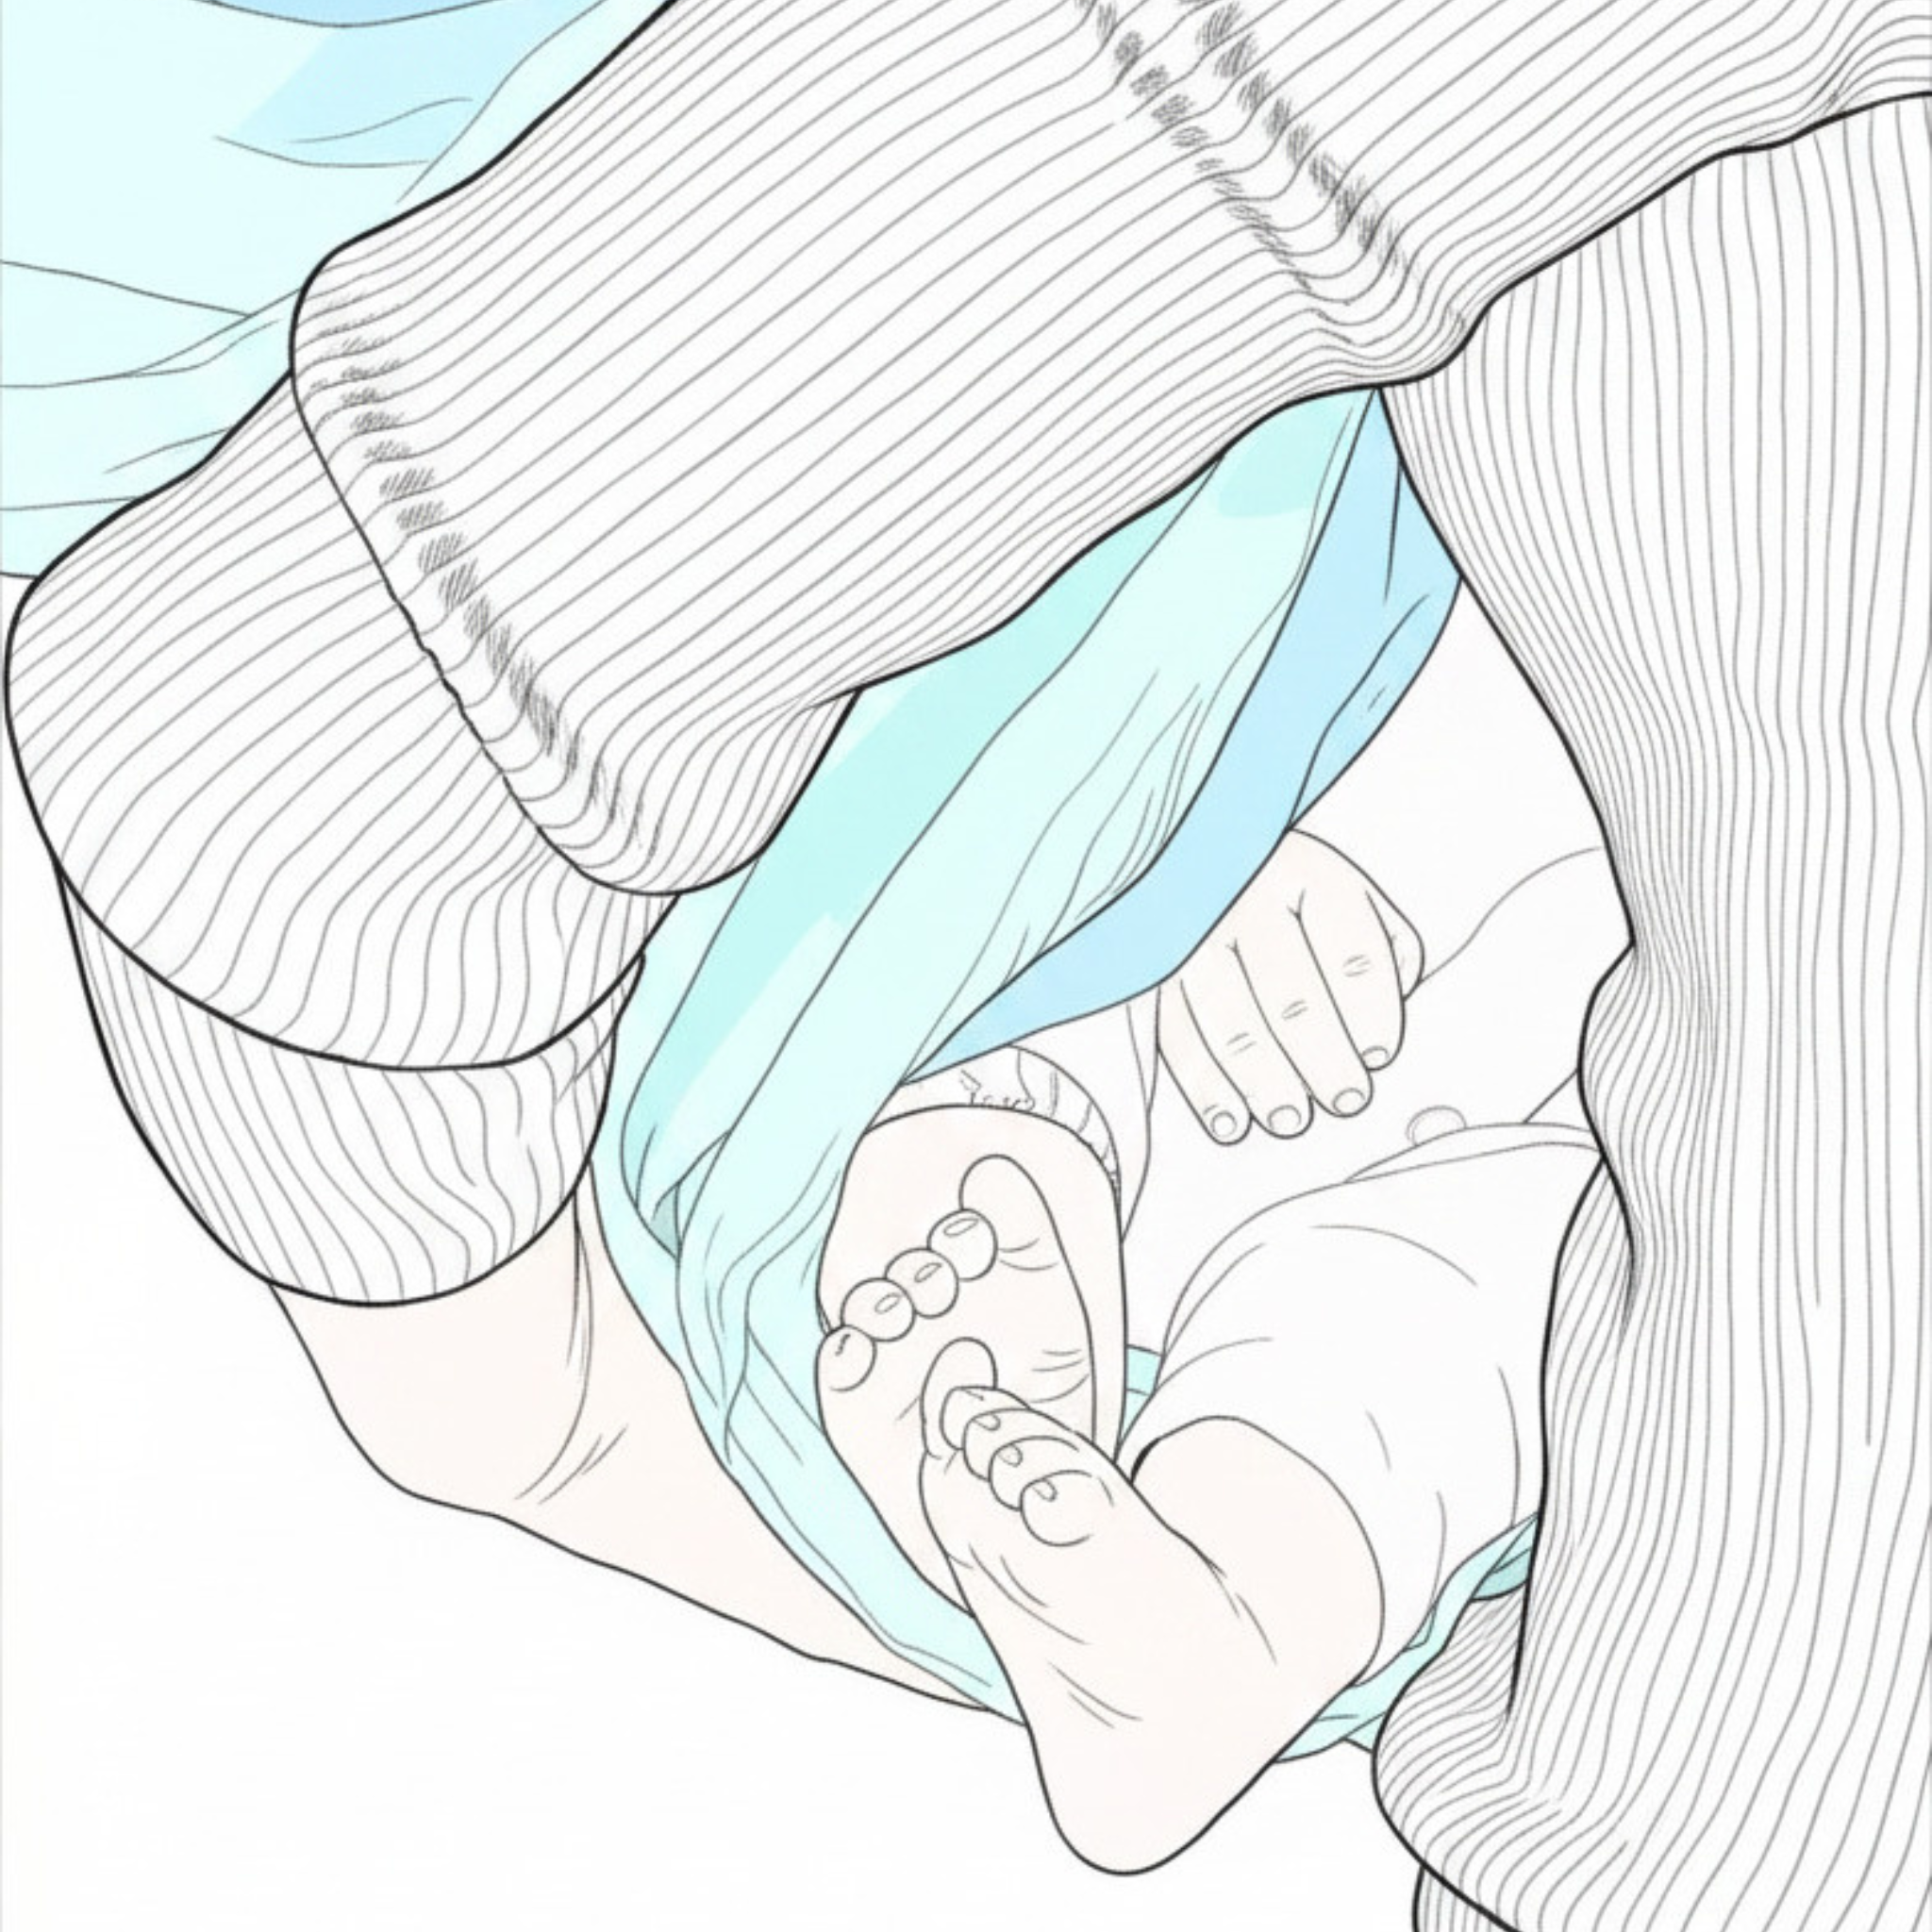
09 Feet Visible from the Side
From the side, check that the feet are visible beyond the pouch edge. This indicates that the baby’s bottom has settled into the intended depth.
Vertical Carry
Upright Carry
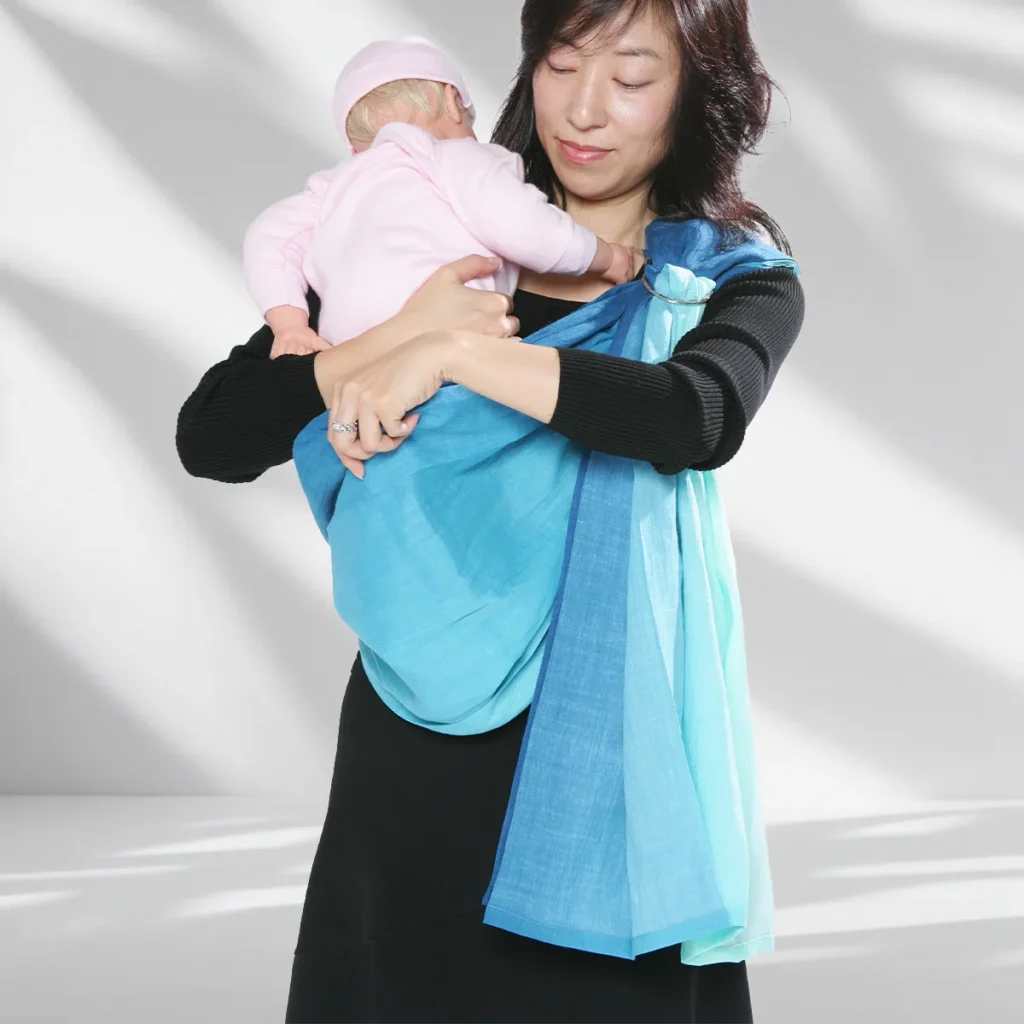
Upright carry is for the stage after the baby has developed full head control. It maintains the close contact established in cradle carry while giving the baby a higher, more open view.
Upright carry is for use after full head control. It retains close contact while giving the baby a higher view.
Step 13
Vertical Positioning
Vertical Position
Hold High and Guide the Legs In
Hold High and Guide the Legs In
Hold the baby high on your shoulder and keep the body close to yours.
Reach your other hand up through the pouch, receive both legs and guide them gently inside. Beginning high provides a stable starting position for the fit.
Hold the baby high and close on your shoulder. Reach through the pouch, receive both legs and guide them gently inside.
Step 14
Vertical Seating
Vertical Seating
Seat the Baby Deeply in the Pouch
Seat the Baby Deeply
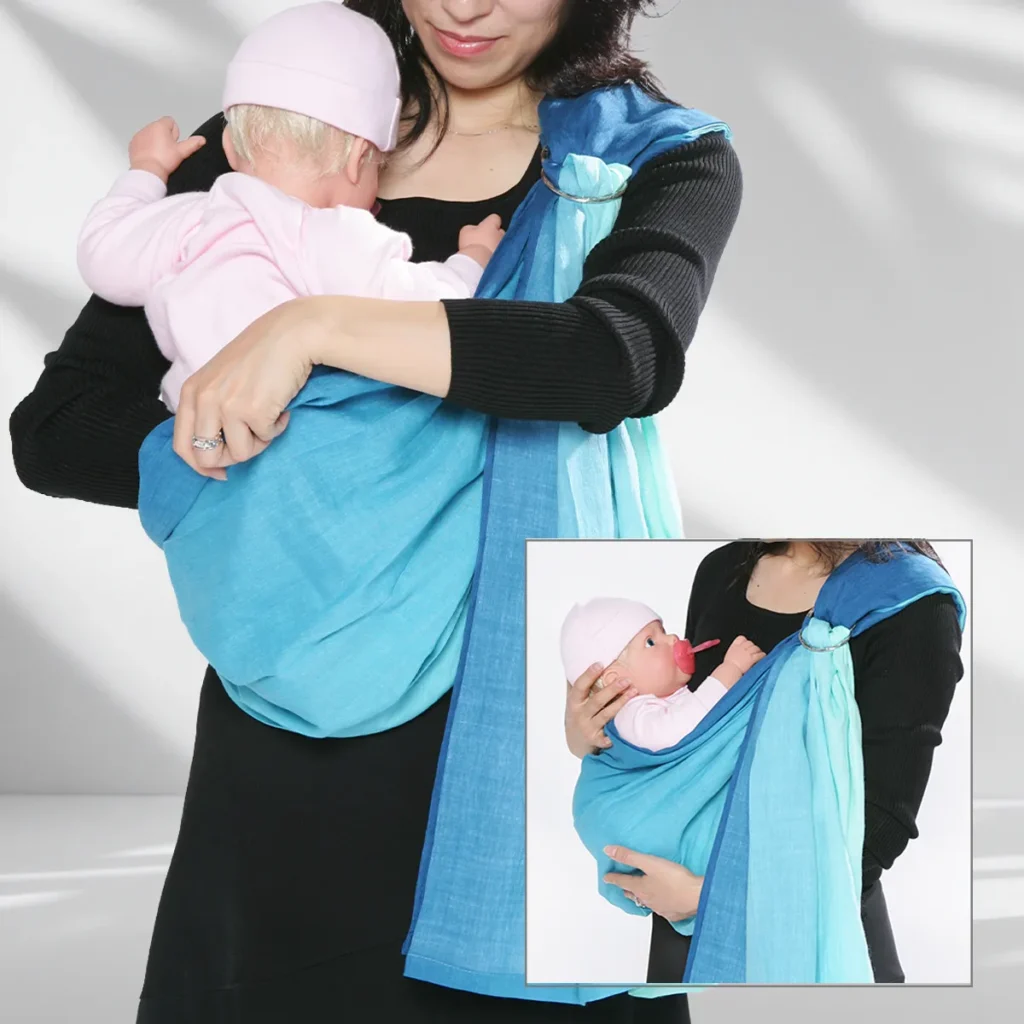
Open the baby’s legs gently so they rest around your torso.
Guide both legs through and settle the baby’s bottom into the deepest part of the pouch. The baby should be seated and supported by the pouch rather than hanging from the fabric.
Open the baby’s legs gently around your torso. Guide both legs through and settle the bottom into the deepest part of the pouch so the baby is seated and supported, not hanging from the fabric.
Step 15
The Vertical Embrace
Vertical Embrace
Bring Both Feet Out and Check the Fit
Bring Both Feet Out
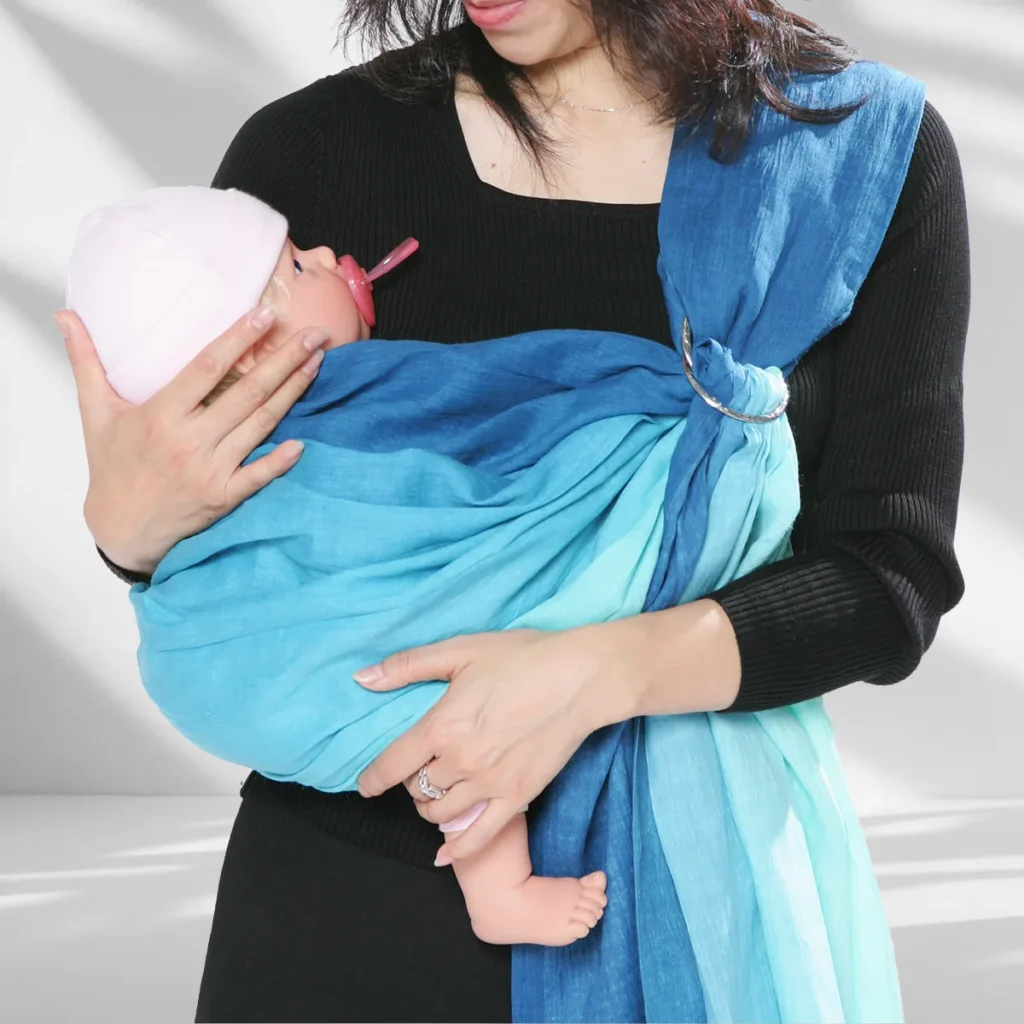
After the limited fit adjustment described below, check that the fabric supports the baby smoothly from back to bottom.
Both feet should extend evenly outside the pouch, with slack removed while the baby remains comfortably supported against your body.
Check that the fabric supports the baby smoothly from back to bottom, with both feet evenly outside the pouch and no loose fabric around the supported body.
The Vertical Embrace
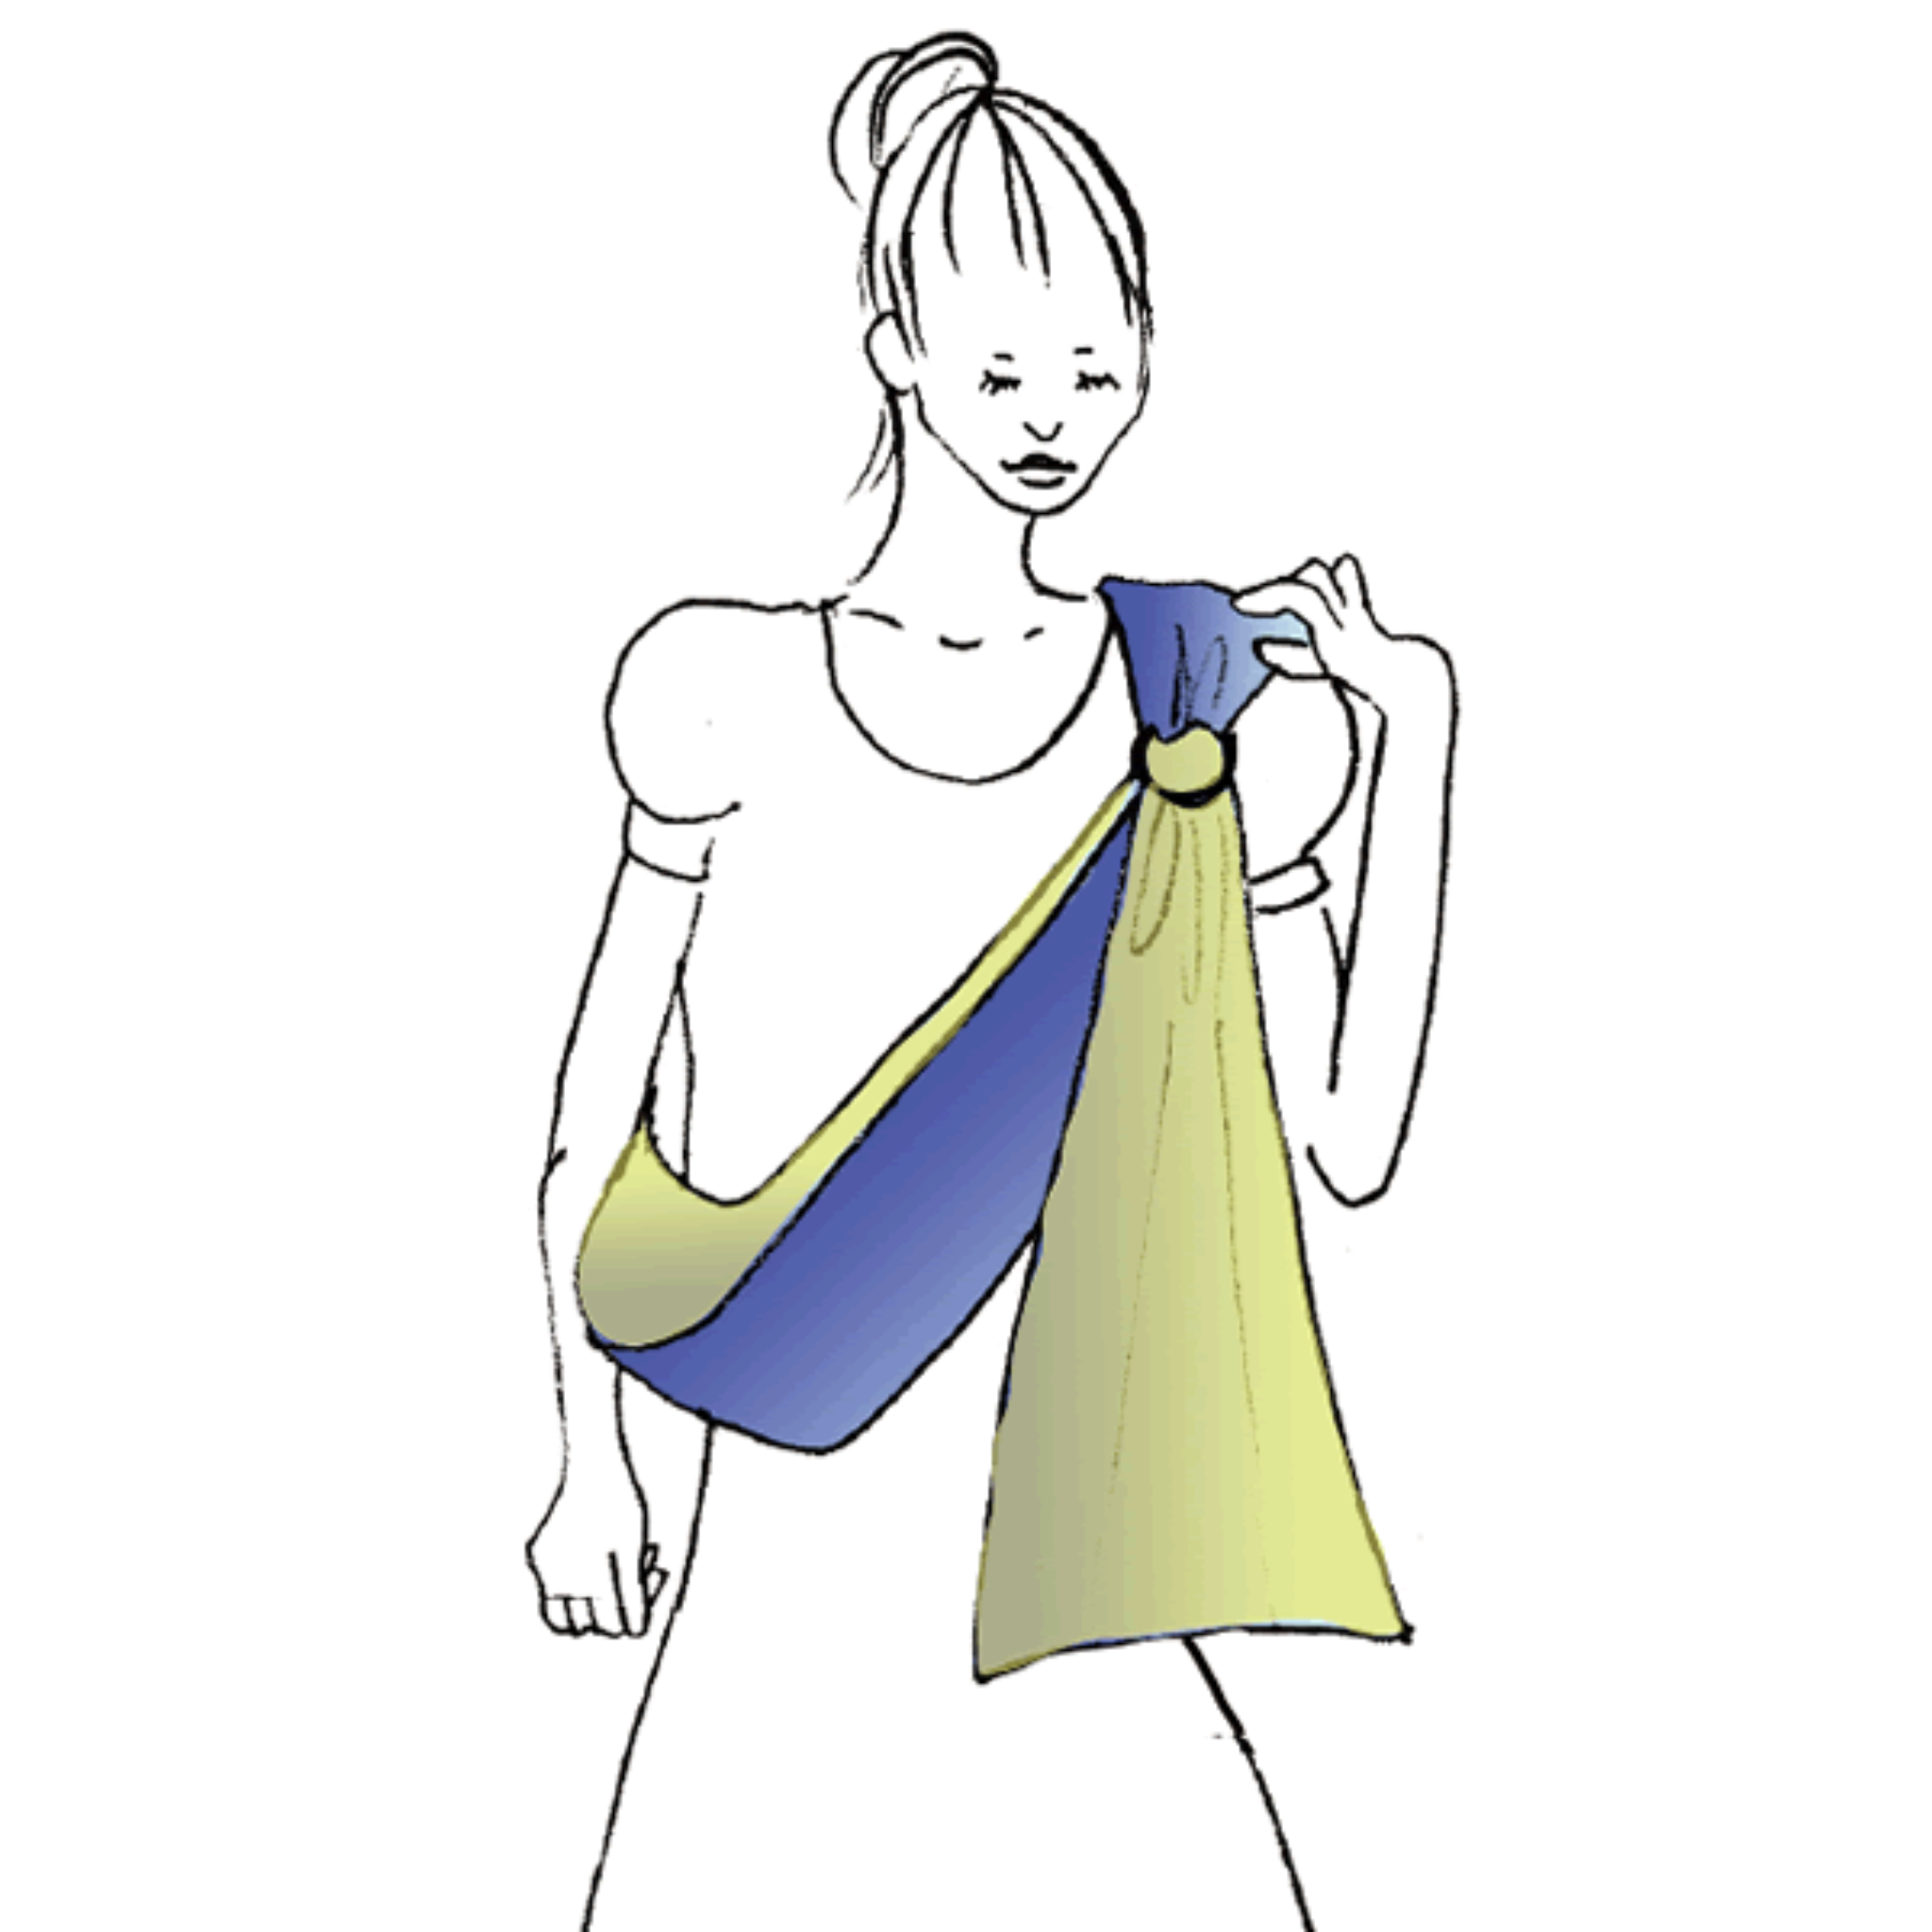
01 Check the Rings
Before bringing the baby into the sling, use a mirror to confirm that both rings sit immediately below your collarbone.
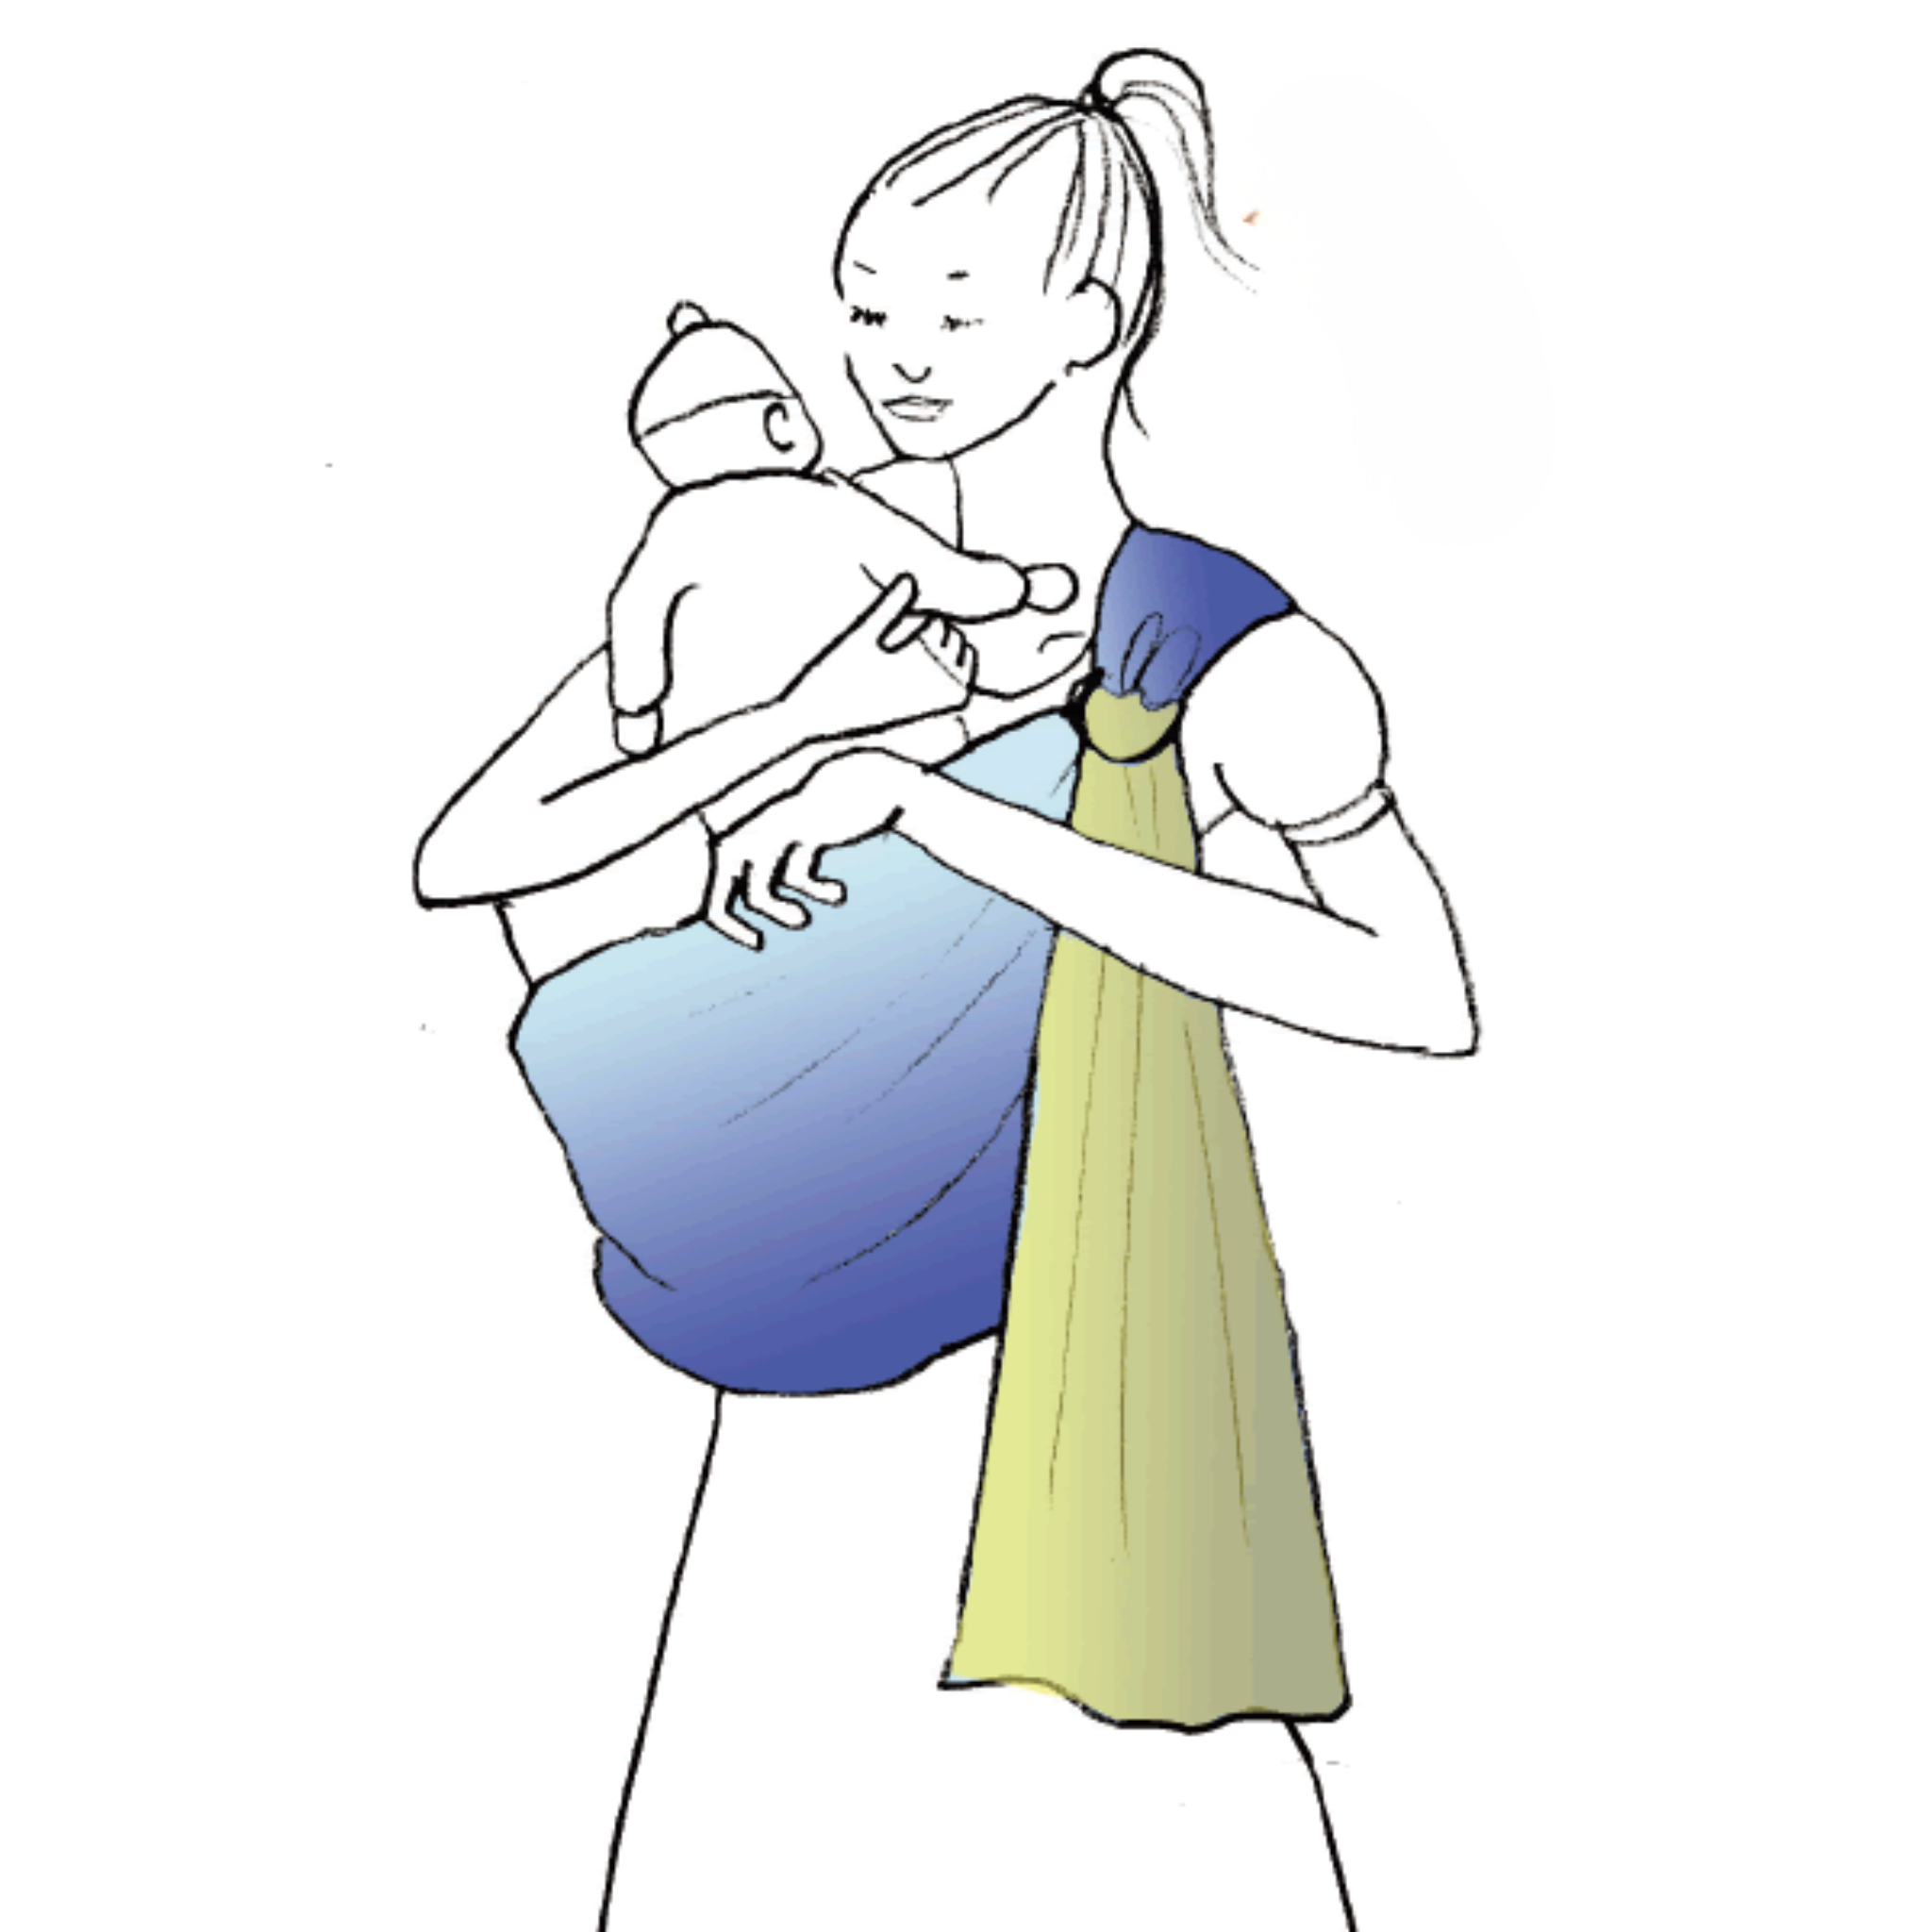
02 Receive the Baby
Hold the baby high on your shoulder and guide both legs into the pouch in front of your chest.
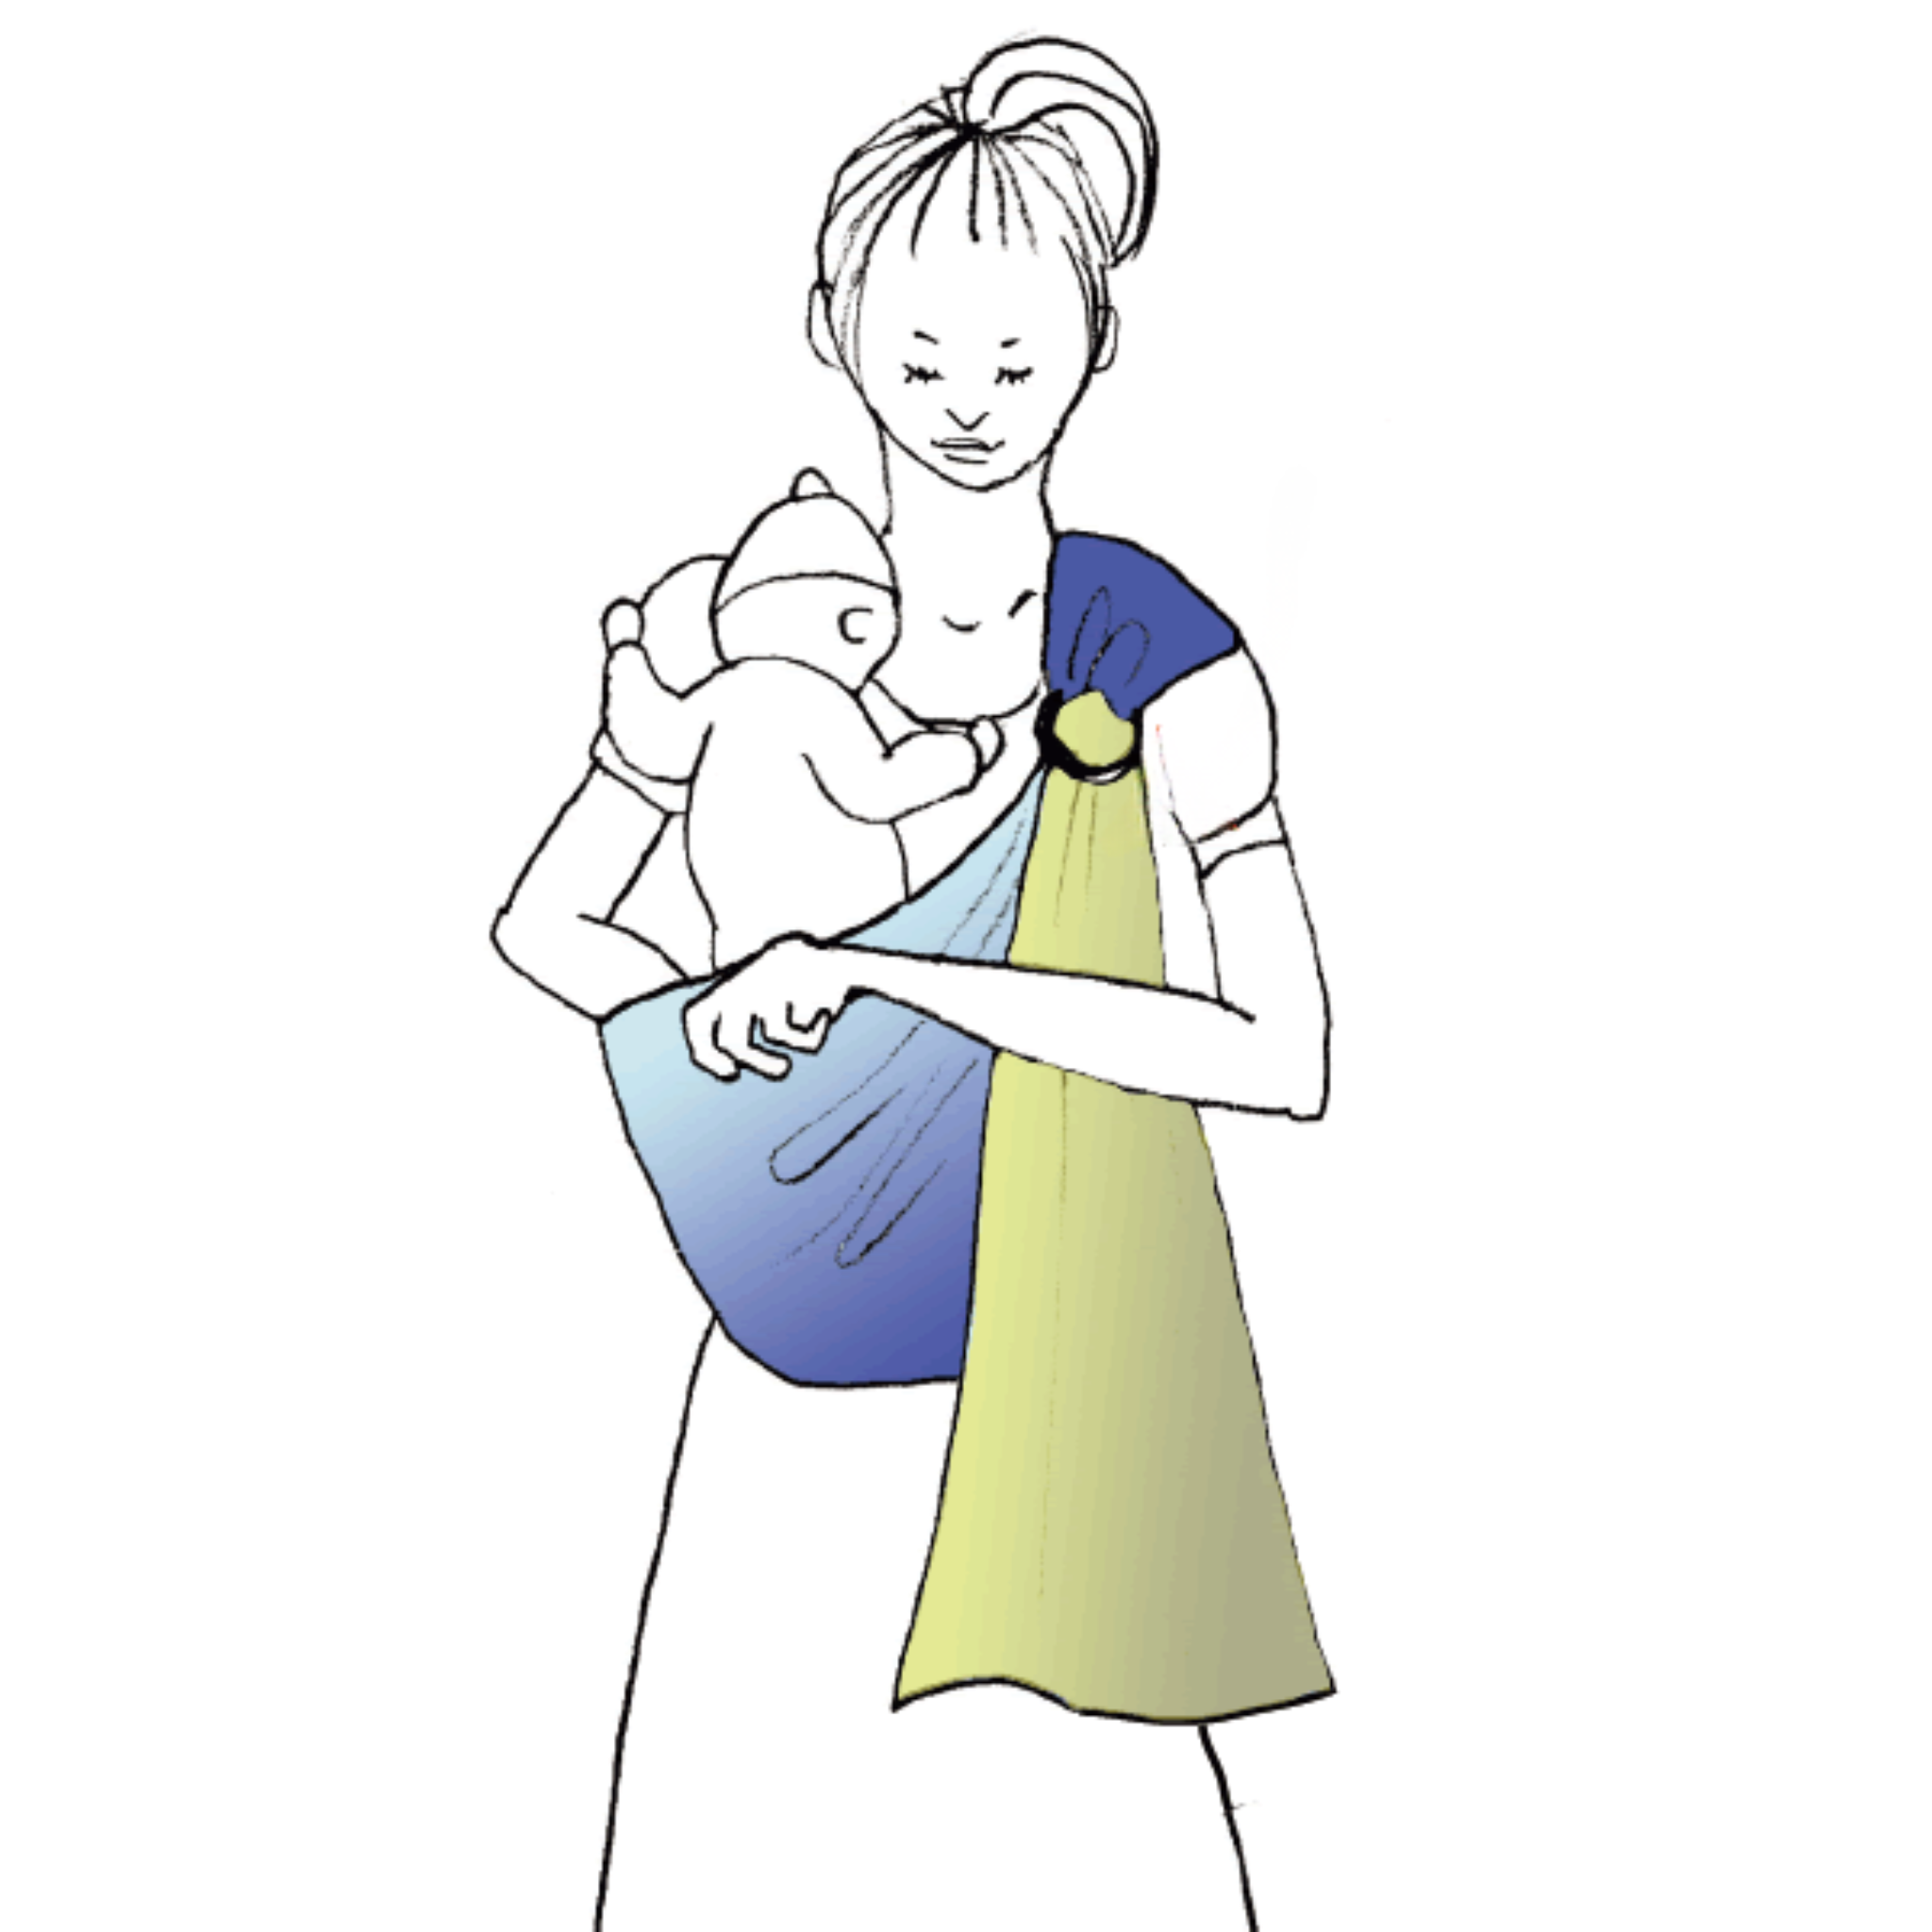
03 Seat in the Pouch
Open the baby’s legs gently around your torso and settle the bottom into the pouch.
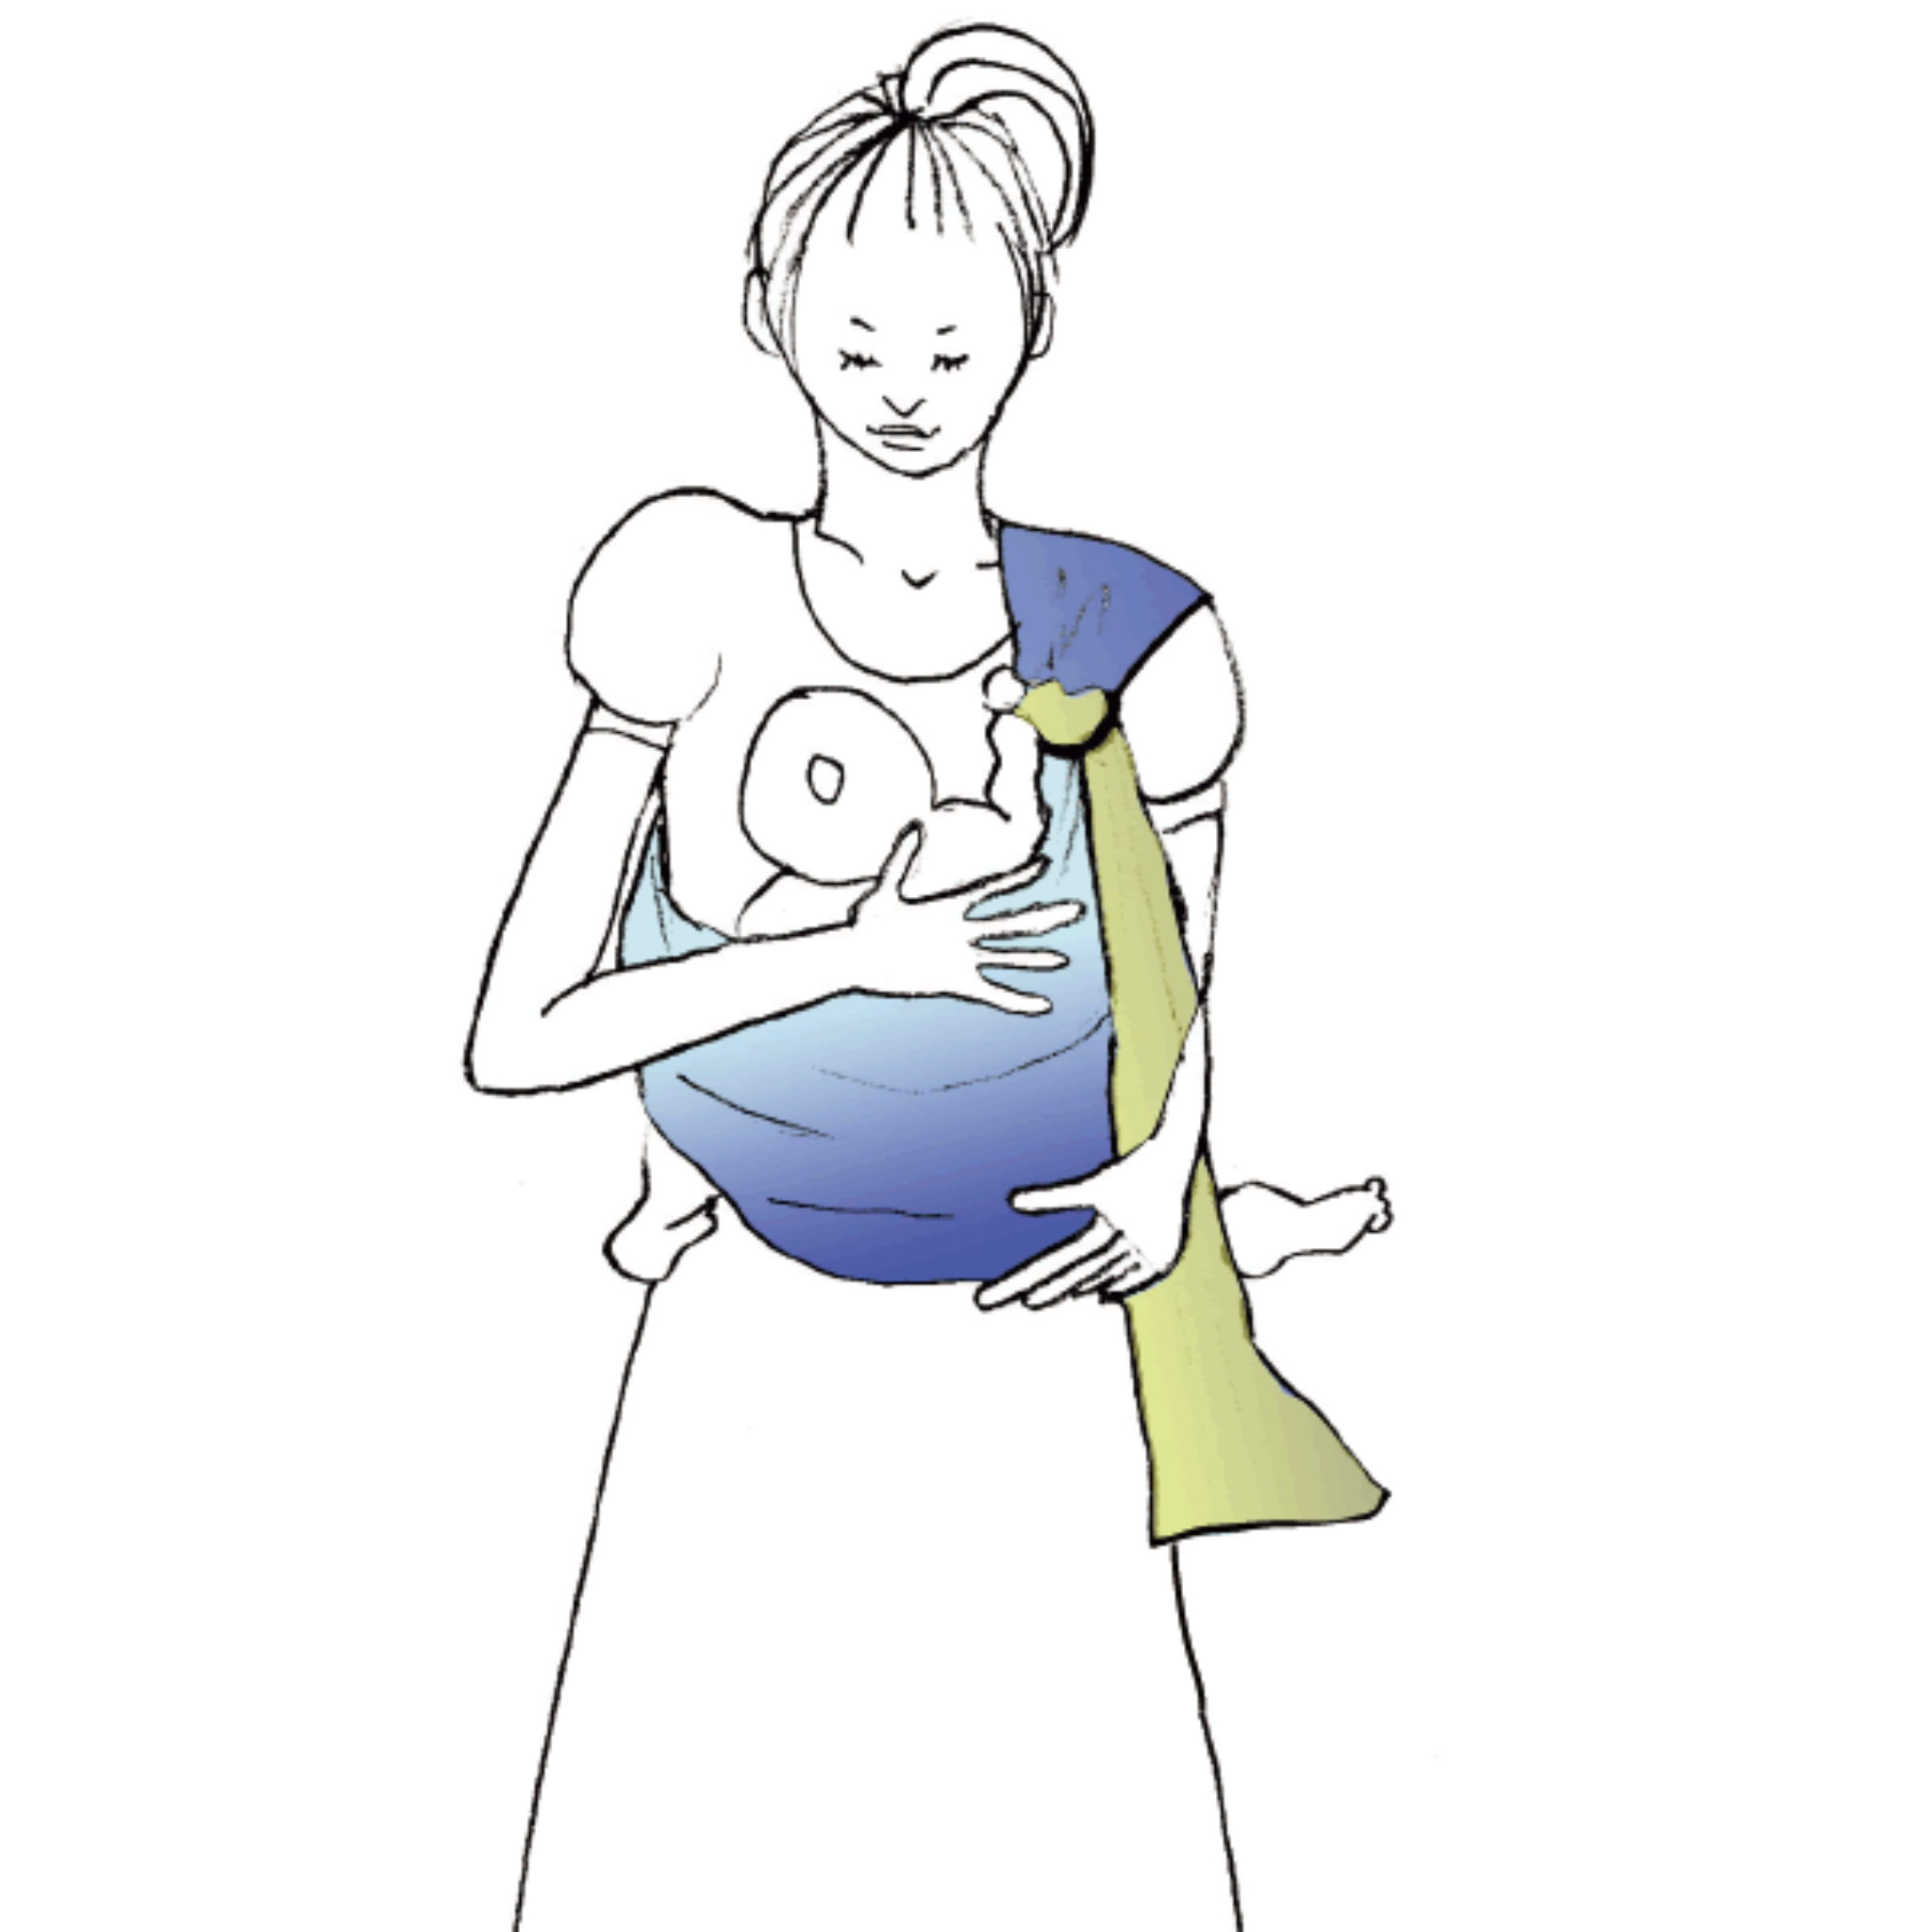
04 Position the Bottom
Bring both feet outside the pouch and settle the baby’s bottom deeply and securely at its centre.
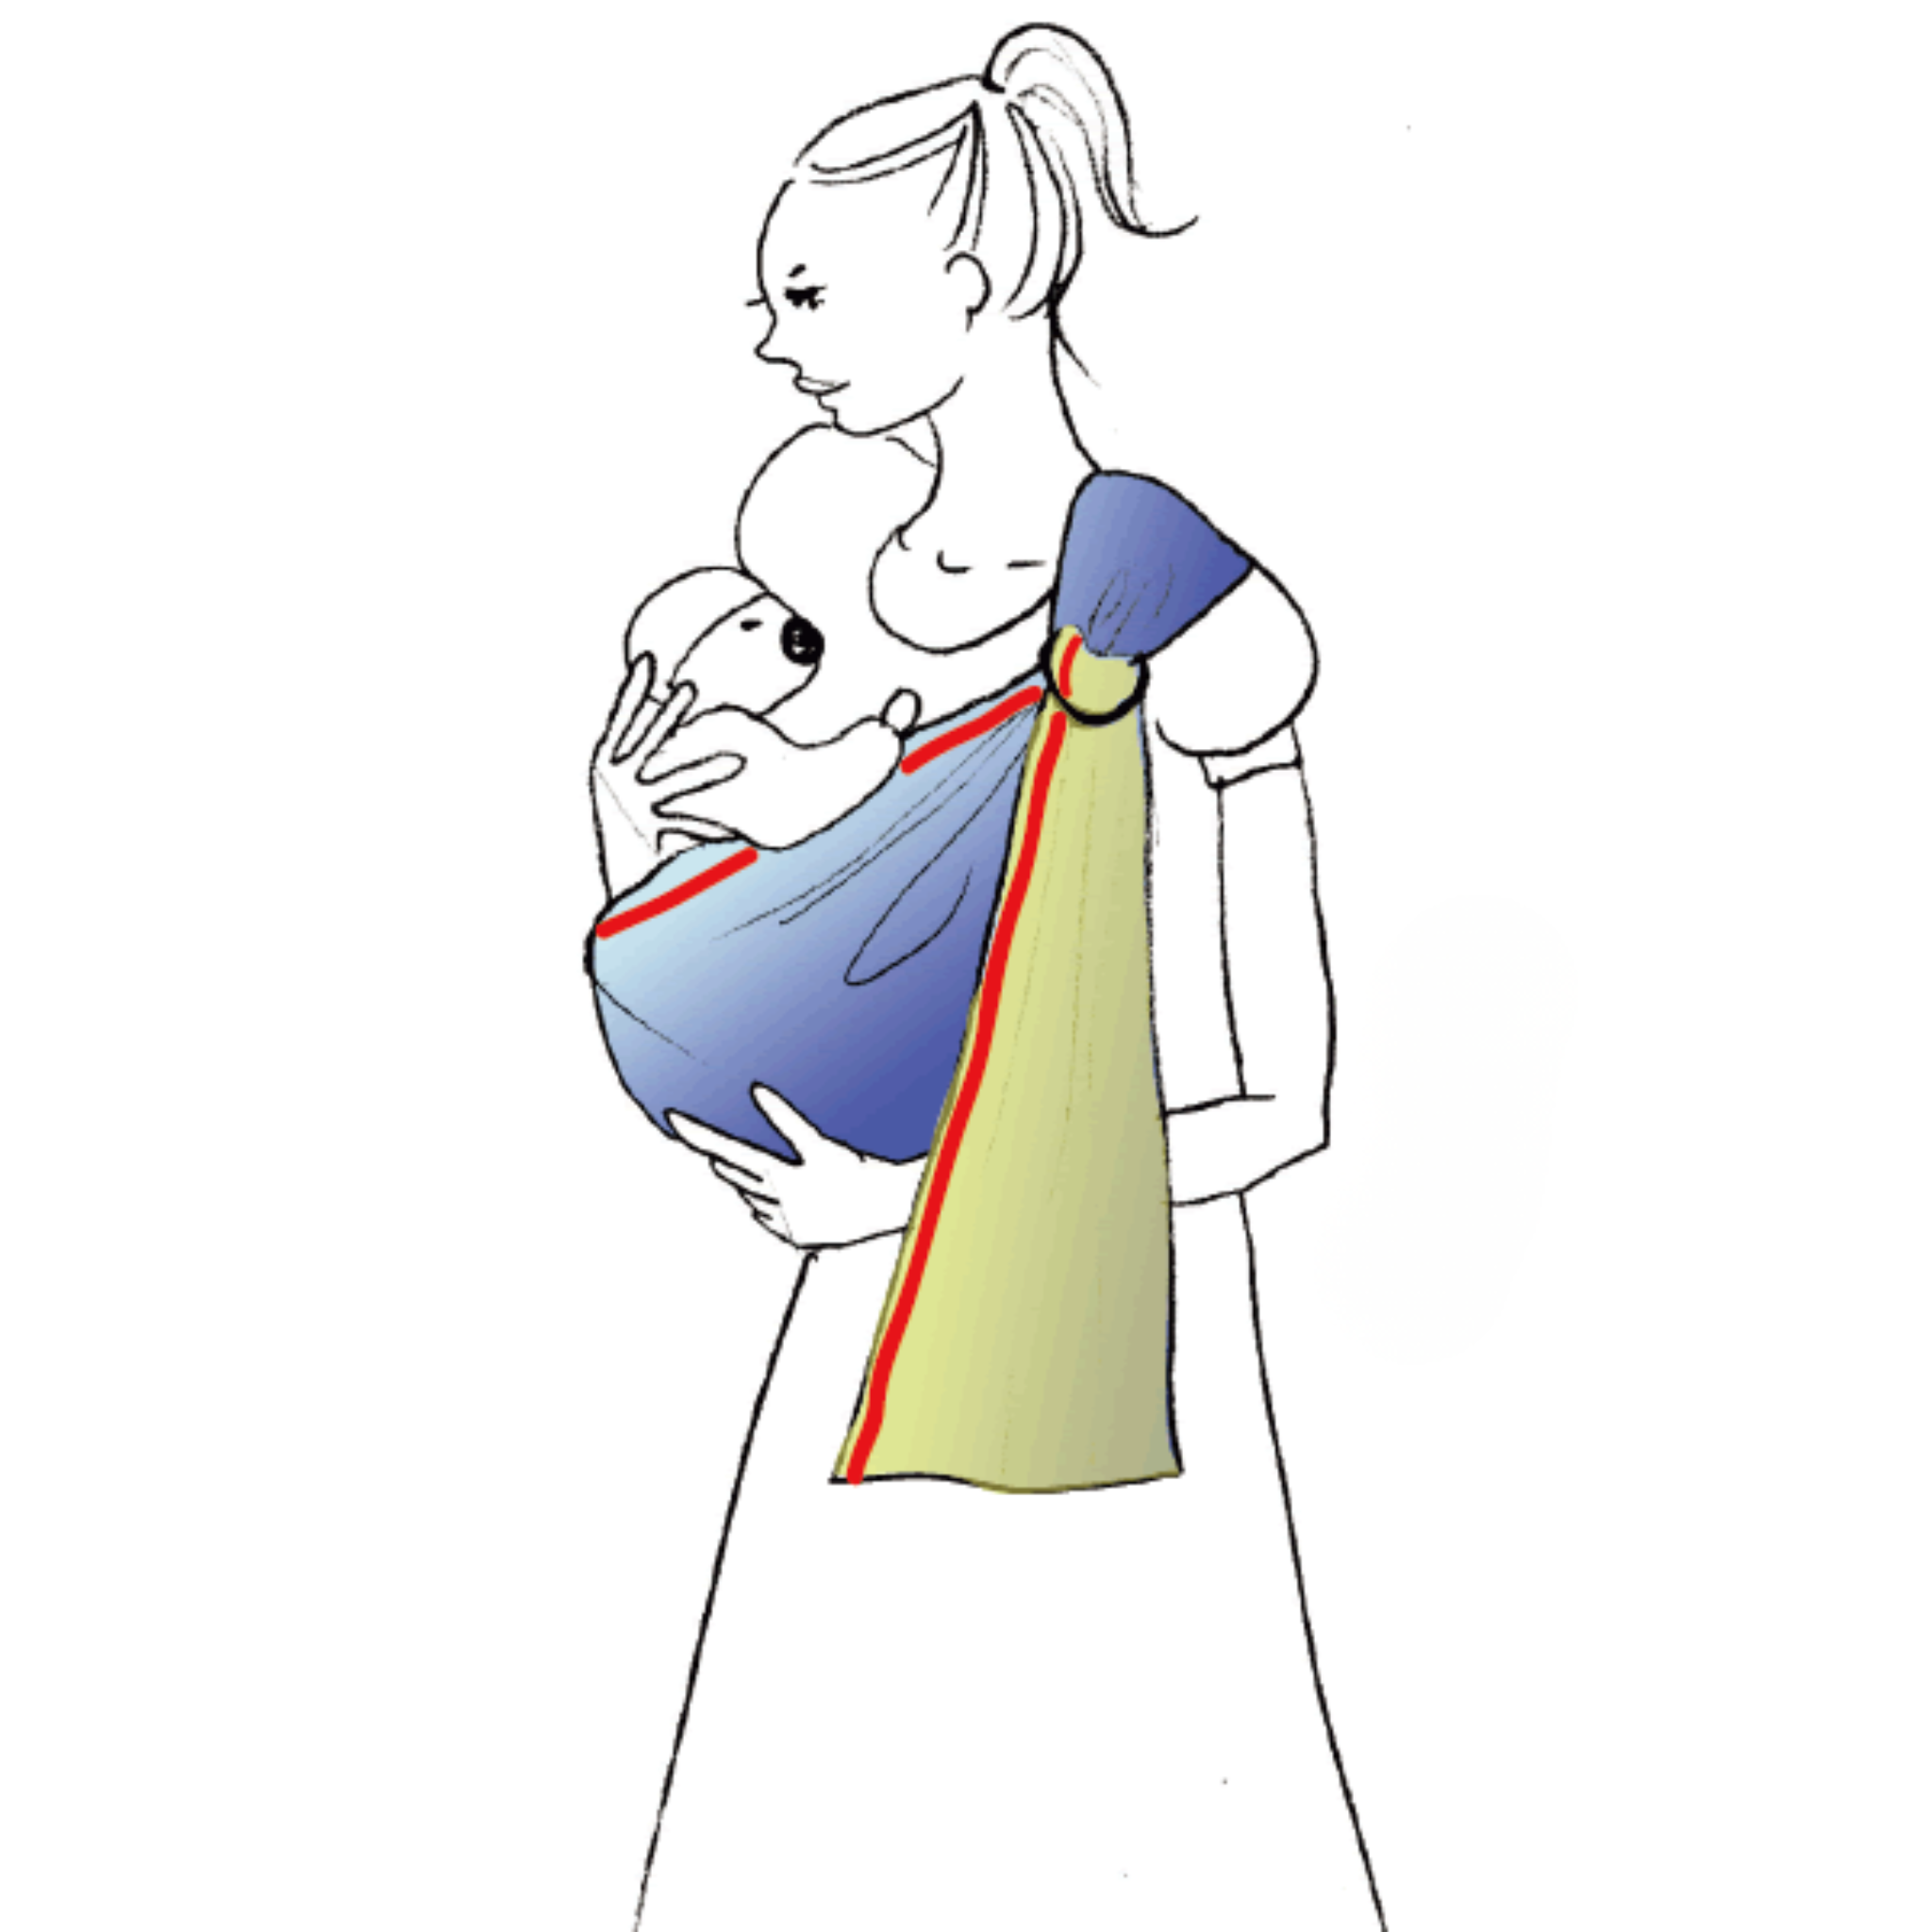
05 Fine-Tune the Fit
Only after full head control, if excess fabric remains around the baby’s shoulder, support the baby’s full weight with one hand to remove the load from the rings. With the other hand, move only that excess fabric through the rings a little at a time. Do not pull the tail forcefully under load.
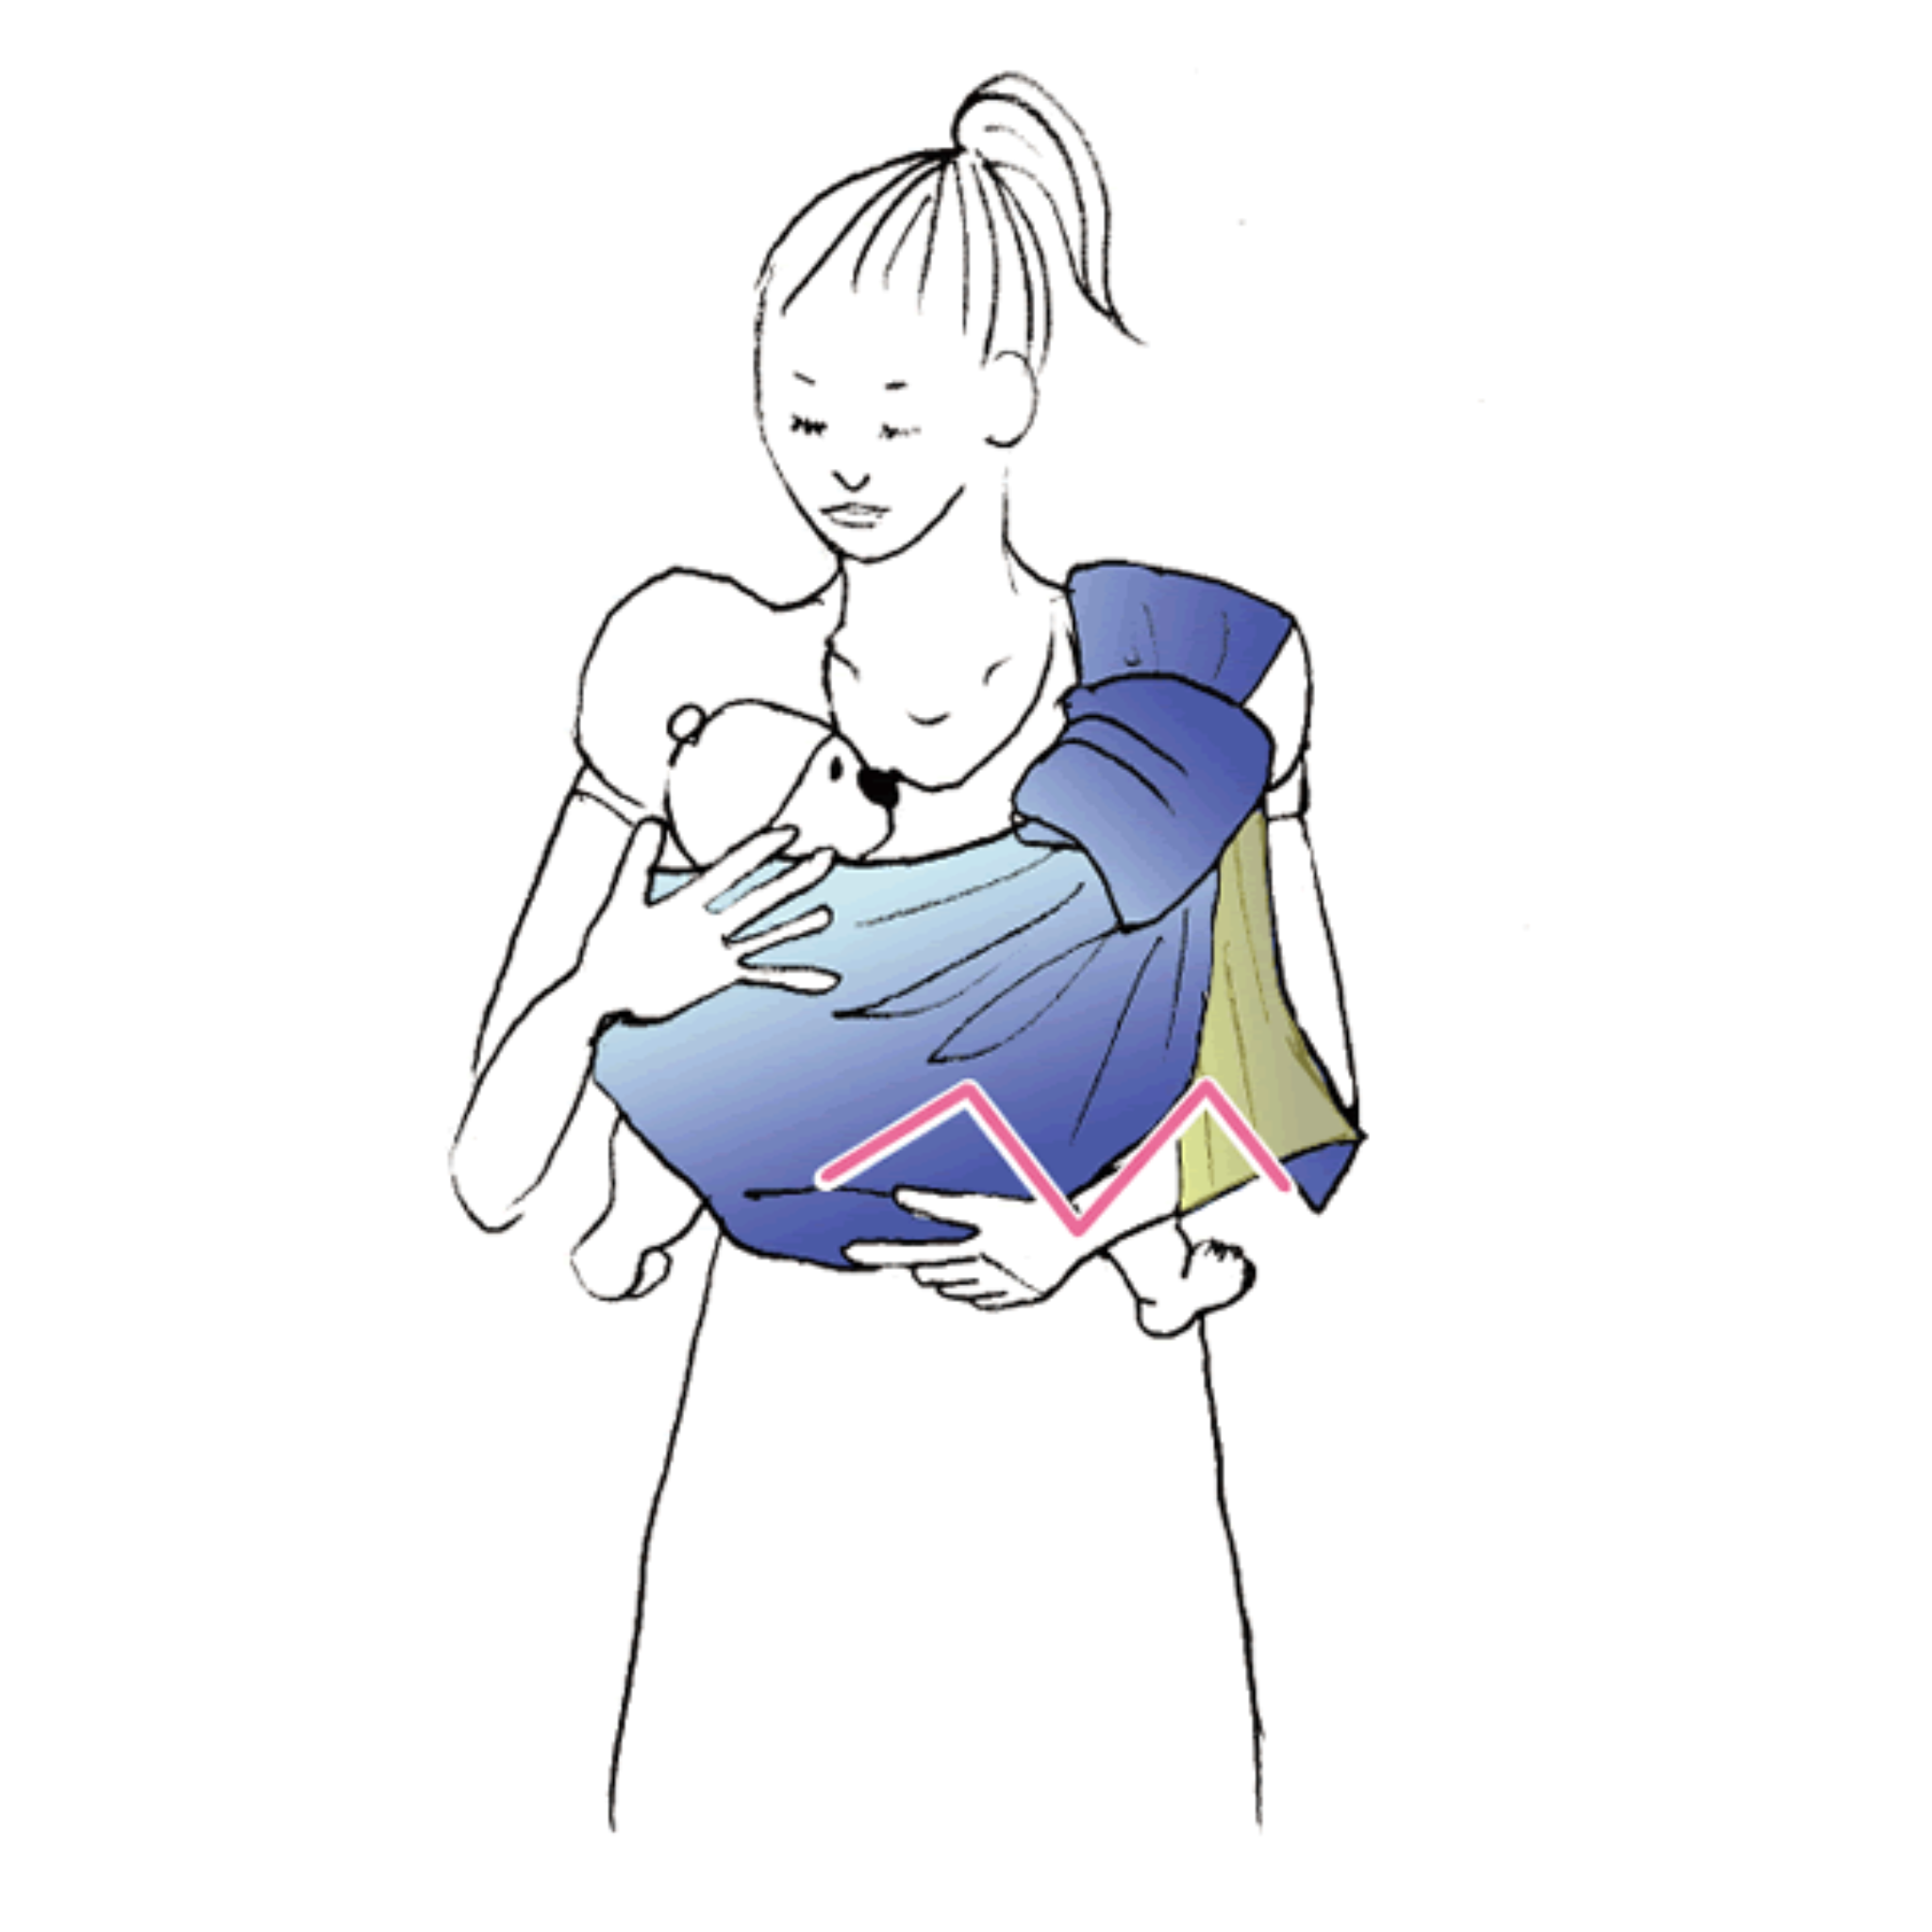
06 Check the M Position
Finally, check that the knees are higher than the bottom in an M-shaped position and that sufficient fabric supports the baby beneath the seat.
Everyday Care
Sleep Transfer and Feeding
Everyday care continues after cradle or upright carry. This section explains how to remove a sleeping baby from the sling and place them on a sleep surface, and how the long tail may be used as a temporary feeding cover while the baby’s face and airway remain actively monitored.
Learn how to remove a sleeping baby from the sling for placement on a sleep surface, and how to use the tail temporarily during feeding while monitoring the face and airway.
Step 16
A Gentle Transition
A Gentle Transition
Remove the Sling Before Sleep
Remove the Sling Before Sleep
If the baby falls asleep while being carried, prepare to transfer them slowly.
Support the baby’s head with one hand. With the other, lift the rings slightly to release the lock and slide the sling carefully from your shoulder. Keeping the baby low and fully supported, remove the baby completely from the sling and place them on their back on a firm, flat sleep surface. Make sure no sling fabric or other loose material remains around the face.
Support the baby’s head, release the ring lock and slide the sling carefully from your shoulder. Keeping the baby low and fully supported, remove the baby completely from the sling and place them on their back on a firm, flat sleep surface. Leave no fabric around the face.
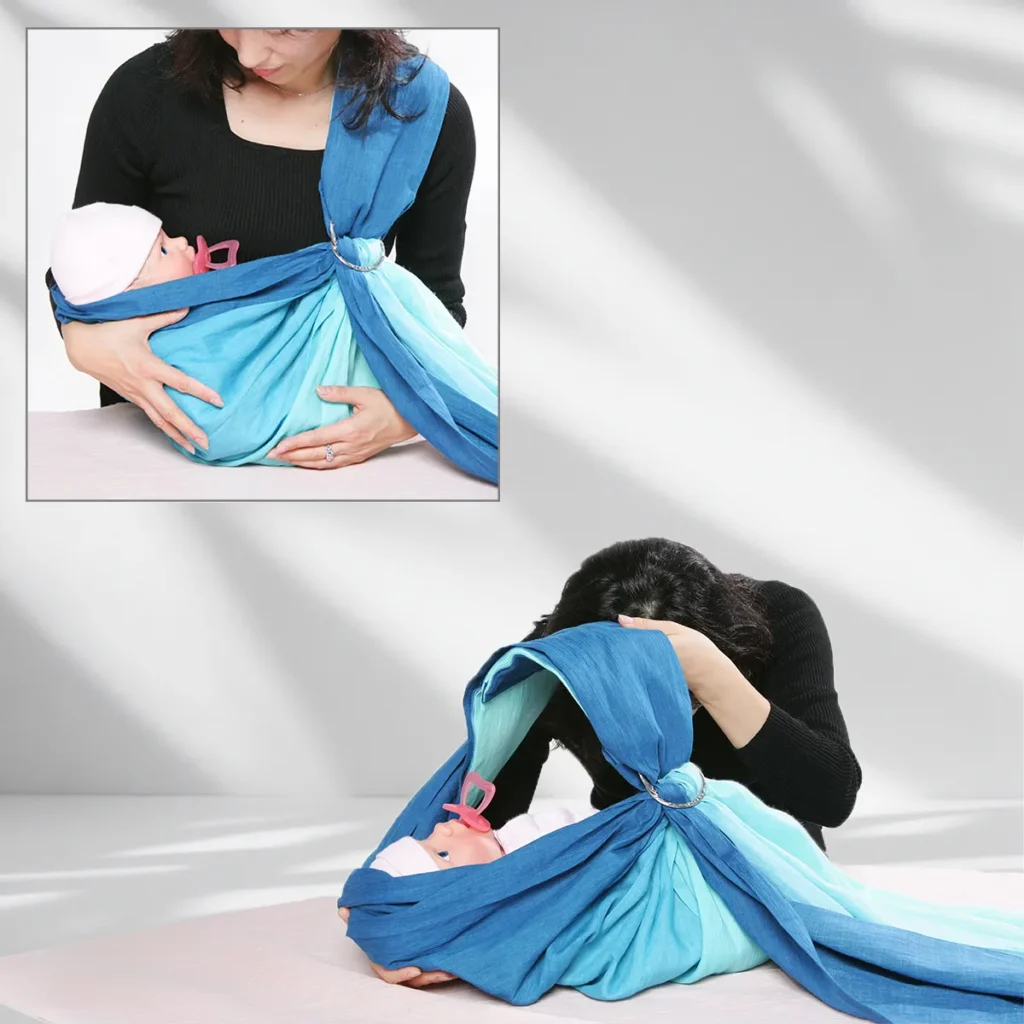

Final View
The Sleeping Sanctuary
Sweet Dreams
Place the Baby on the Sleep Surface
Place on the Sleep Surface
Support the baby’s head and body while moving at a low height over the sleep surface. After removing the sling from your shoulder, take the baby completely out of the sling and place them on their back on a firm, flat sleep surface. Confirm that no sling or loose fabric remains around the face.
Support the head and body, remove the baby completely from the sling and place them on their back on a firm, flat sleep surface. Leave no fabric around the face.
Nursing
Exclusive Topics
Exclusive Topics
Using the Tail During Feeding
Using the Tail During Feeding
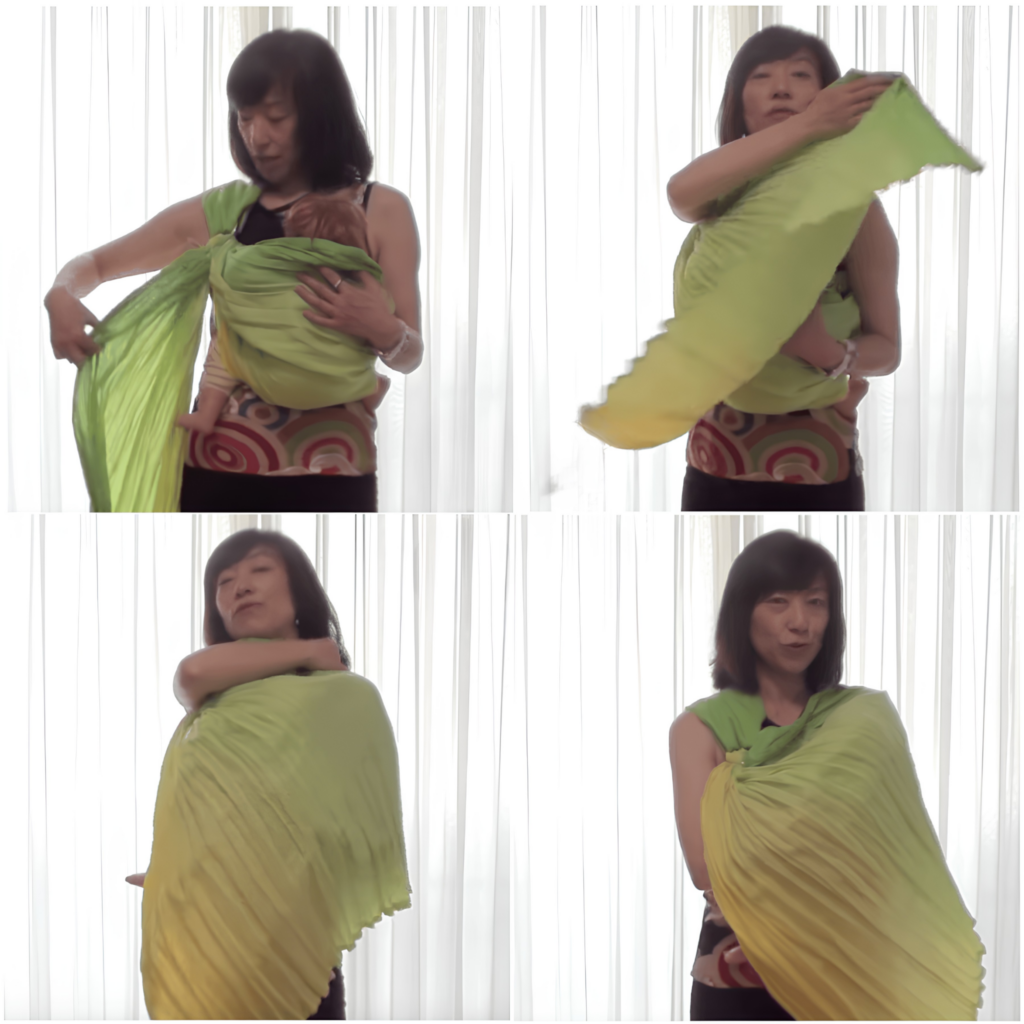
The long tail can provide temporary visual coverage while feeding away from home.
Drape the spare tail loosely towards the opposite side or behind your shoulder without covering or pressing against the baby’s face. Throughout feeding, check the face and airway frequently. After feeding, return the tail to its normal position and restore a carrying position in which the entire face is visible and neither fabric nor the wearer’s body covers the nose or mouth.
The tail can provide temporary visual coverage during feeding. Drape it loosely without covering the baby’s face, and check the face and airway frequently. Afterwards, return the tail and restore a position with the entire face visible and the nose and mouth unobstructed.
Safety Principles
Safety Principles
Point 01
Newborn Safety
Newborn Safety
Newborn Carrying Precautions
Carrying a Newborn
- Keep the airway clear:
When carrying a newborn in the sling, keep the baby’s face visible at all times and make sure nothing obstructs the airway. Check that the baby’s chin is not pressed down onto the chest. - Maintain a supported position:
Support the newborn’s neck and back securely, and avoid forcing the baby into an unnatural position. - Check the fit:
An overly tight fit may make breathing difficult. Adjust the sling so the baby is stable while preserving appropriate space.
- Keep the airway clear:
Keep the baby’s face visible and make sure nothing obstructs the airway. Check that the chin is not pressed down onto the chest. - Maintain a supported position:
Support the neck and back securely, and avoid forcing the baby into an unnatural position. - Check the fit:
An overly tight fit may make breathing difficult. Keep the baby stable while preserving appropriate space.
Point 02
Safe Adjustment
SAFE ADJUSTMENT
Do Not Pull Forcefully
Do Not Pull Forcefully
The rings lock securely under load. Do not pull the tail forcefully.
Trying to adjust the sling while it is supporting the baby’s full weight can make your position unstable. Pulling the tail unevenly may also hold the baby in an unnatural position. The PsLing rings are designed to lock when loaded, so do not try to force the tail through while carrying.
The rings lock under load. Do not pull the tail forcefully.
Adjusting while the sling supports the baby’s full weight can make your position unstable, and pulling unevenly may hold the baby unnaturally. Support the baby’s weight, release the ring lock and move the fabric a little at a time. Never force the tail while carrying.
Point 03
Safe Usage
Safe Usage
Follow PsLing Instructions
Follow PsLing Instructions
Wearing and adjustment methods differ between products. Always follow the instructions provided specifically for PsLing, rather than instructions for another carrier.
Wearing and adjustment methods differ between products. Always follow the instructions provided specifically for PsLing.
Point 04
No Pouch Bag
No Pouch Bag
Do Not Create a Closed Pouch
Do Not Create a Closed Pouch
PsLing does not recommend tightening the pouch into a narrow, closed bag. Prevent the baby’s chin from being pressed onto the chest, and keep the face clear of both the fabric and the wearer’s body. Recheck breathing and position frequently.
Do not turn the pouch into a closed bag. Some carriers are adjusted by pulling the tail while the baby is being carried. With PsLing, adjustment while carrying is limited to one situation: after the baby has full head control, during upright carry, support the baby’s weight and adjust only the excess fabric around the baby’s shoulder. Do not fine-tune the tail in other positions, including cradle carry.
Do not tighten the pouch into a narrow, closed bag. Keep the baby’s chin away from the chest and the face clear of both fabric and the wearer’s body. Recheck breathing and position frequently.
Do not create a closed pouch. PsLing adjustment while carrying is limited to upright carry after full head control: support the baby’s weight and adjust only excess fabric at the shoulder. Do not fine-tune the tail in other positions, including cradle carry.
Point 05
Avoid These
Avoid These
Incorrect Use Examples
Incorrect Use Examples
Threading Fundamentals
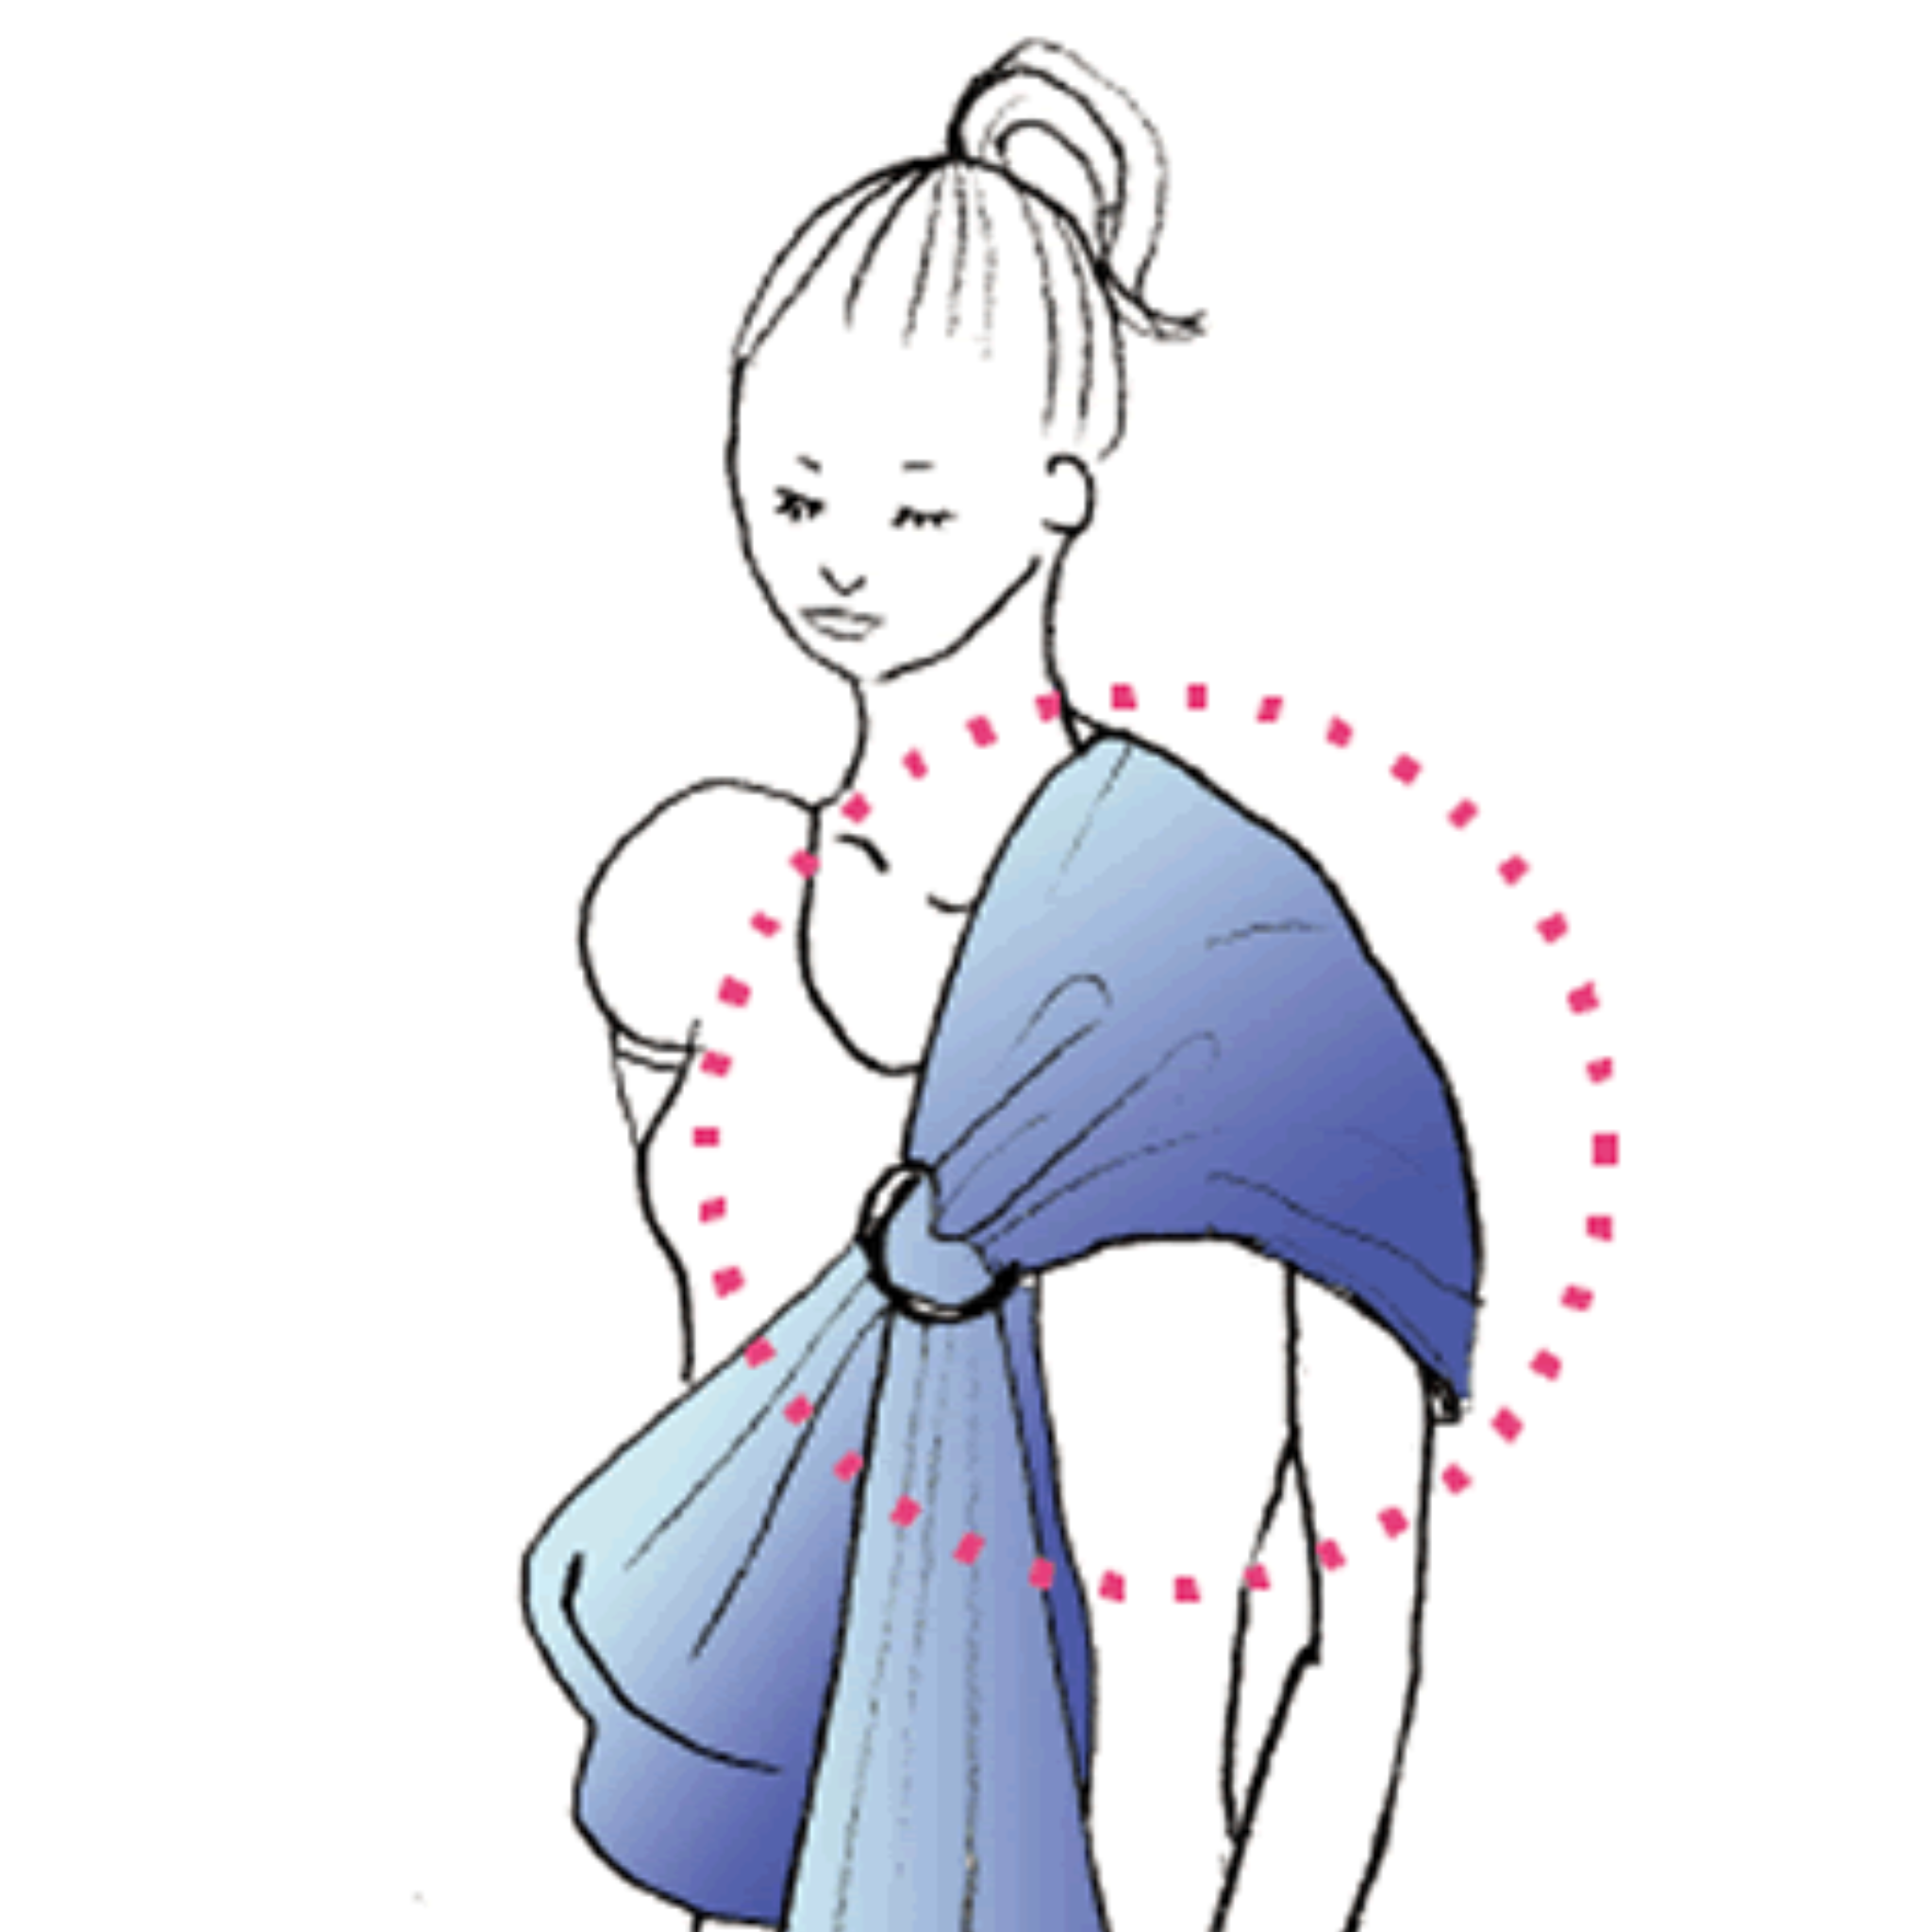
01 Covering the Upper Arm
Spreading the shoulder cover down the arm may compress the upper arm and restrict circulation.
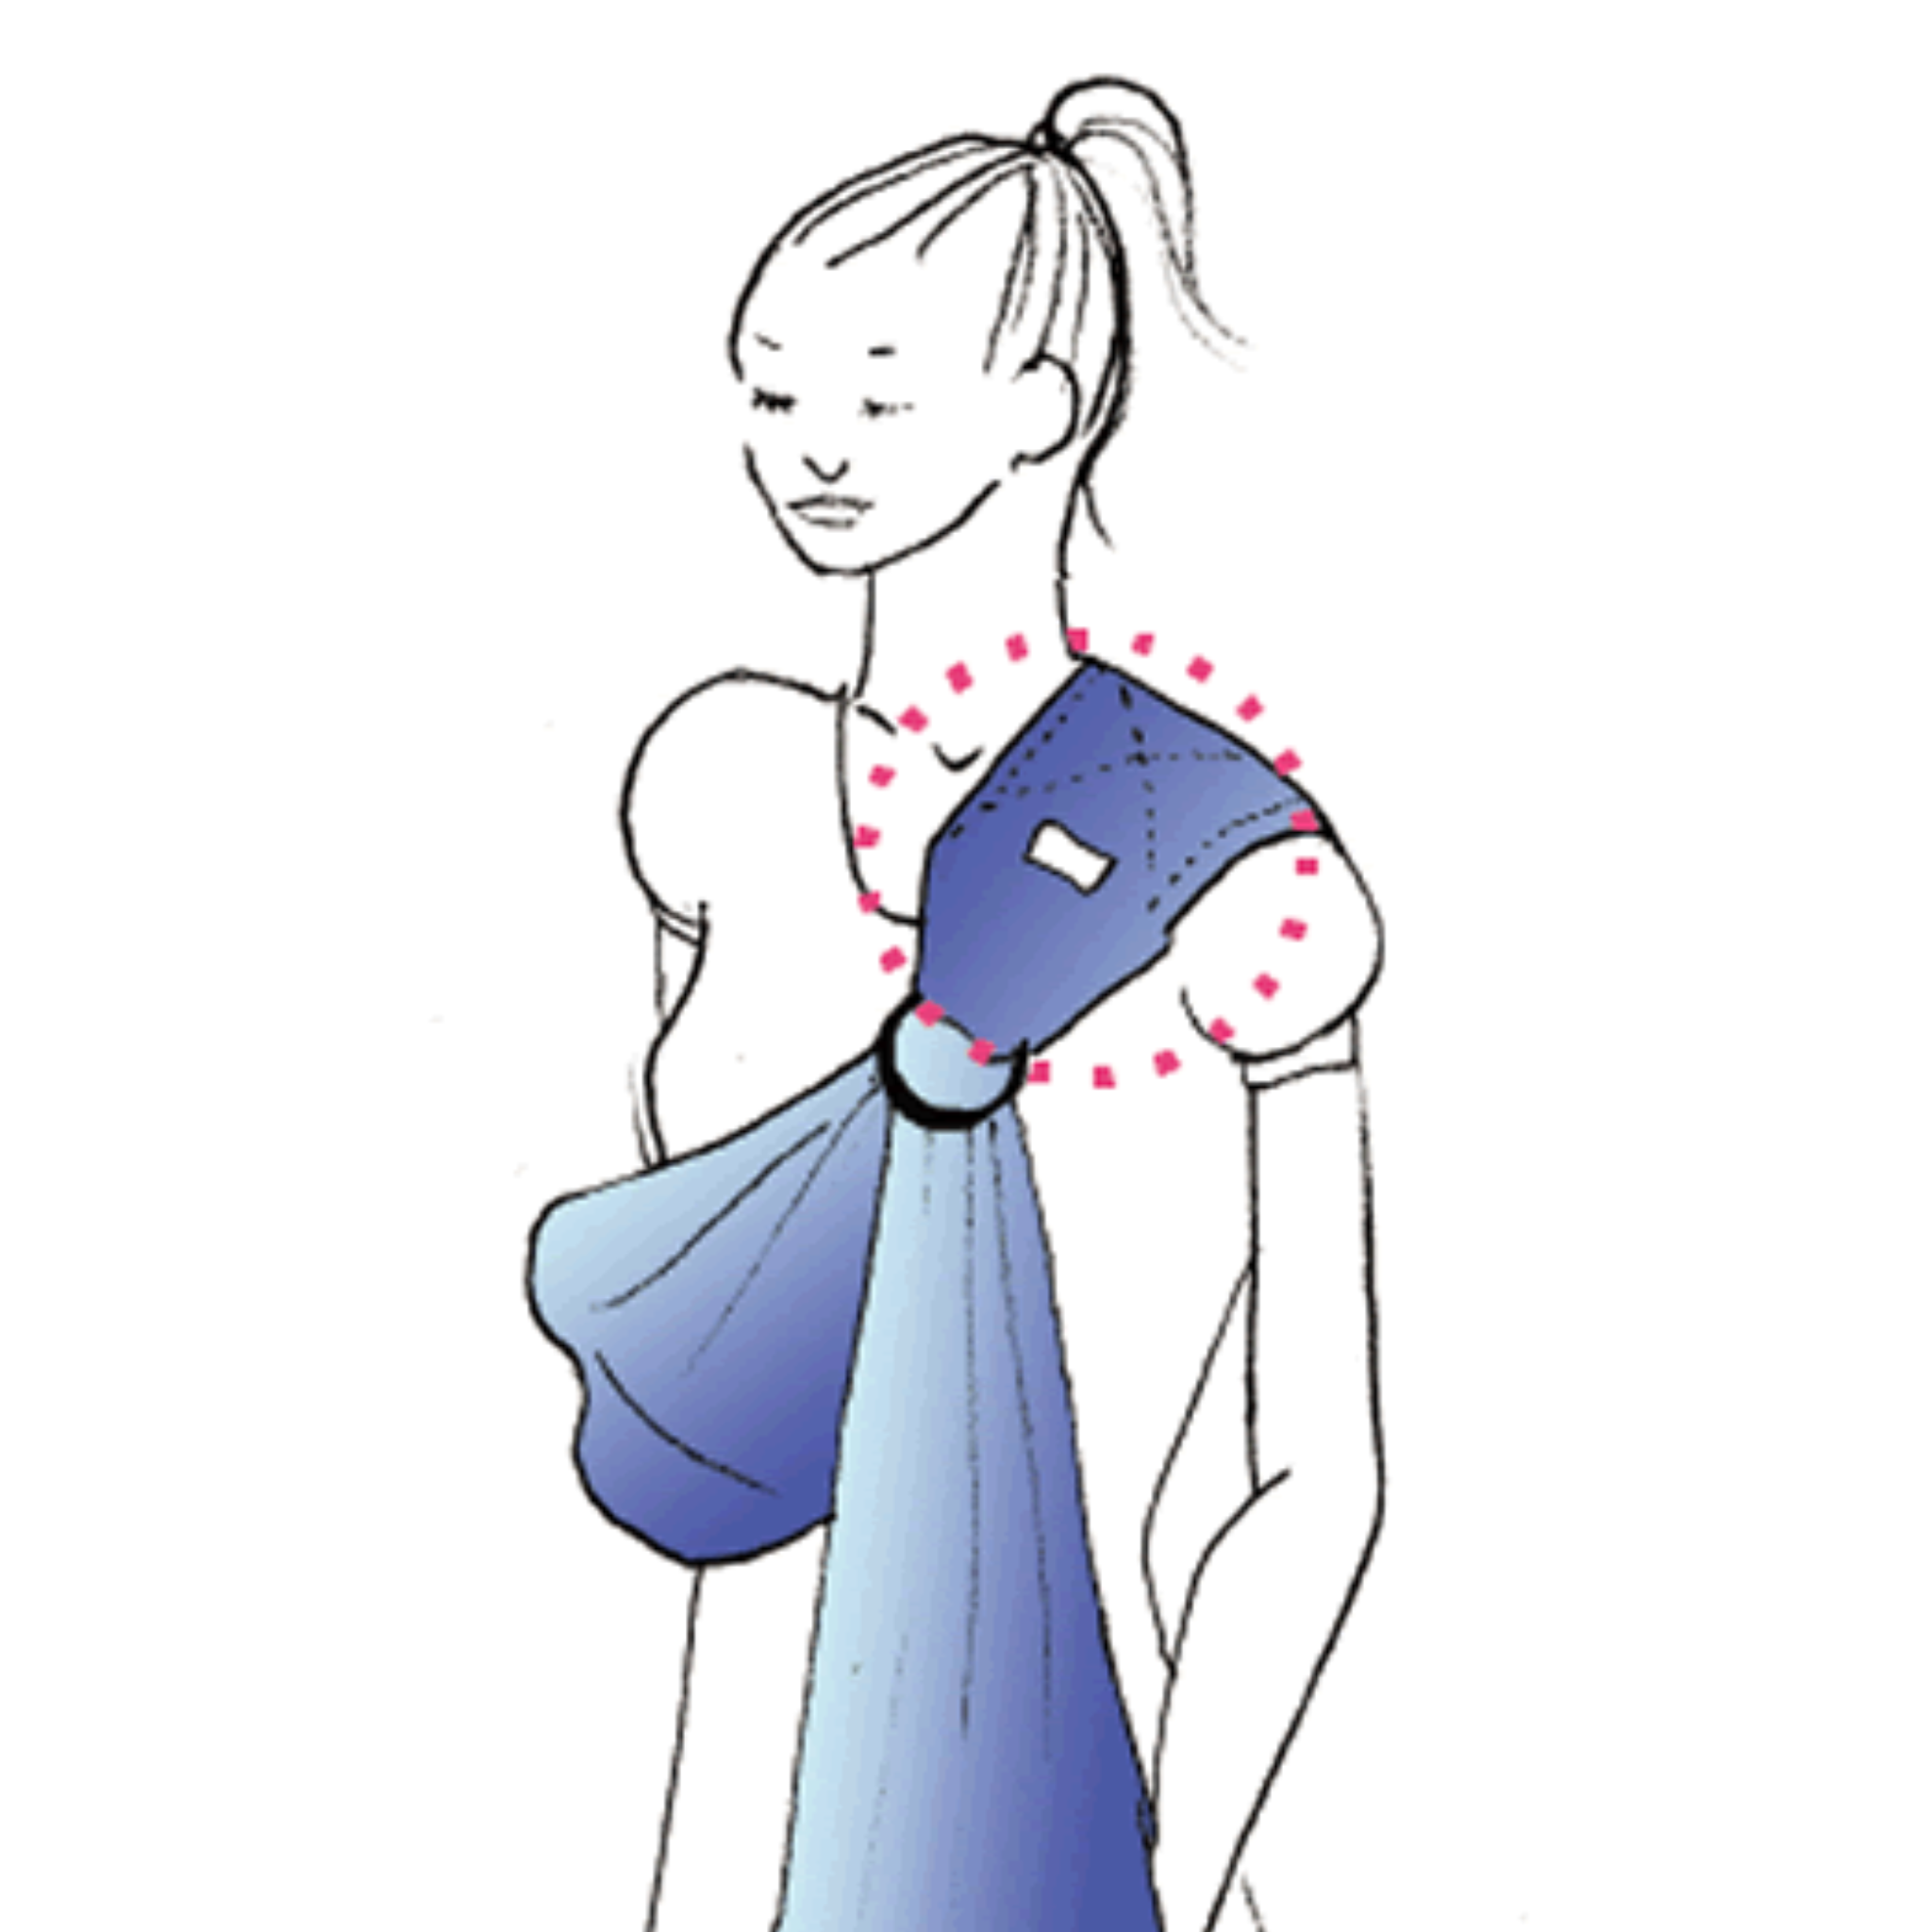
02 Wearing It Inside Out
Wearing the sling with its label and seams exposed can shorten the fabric’s service life.
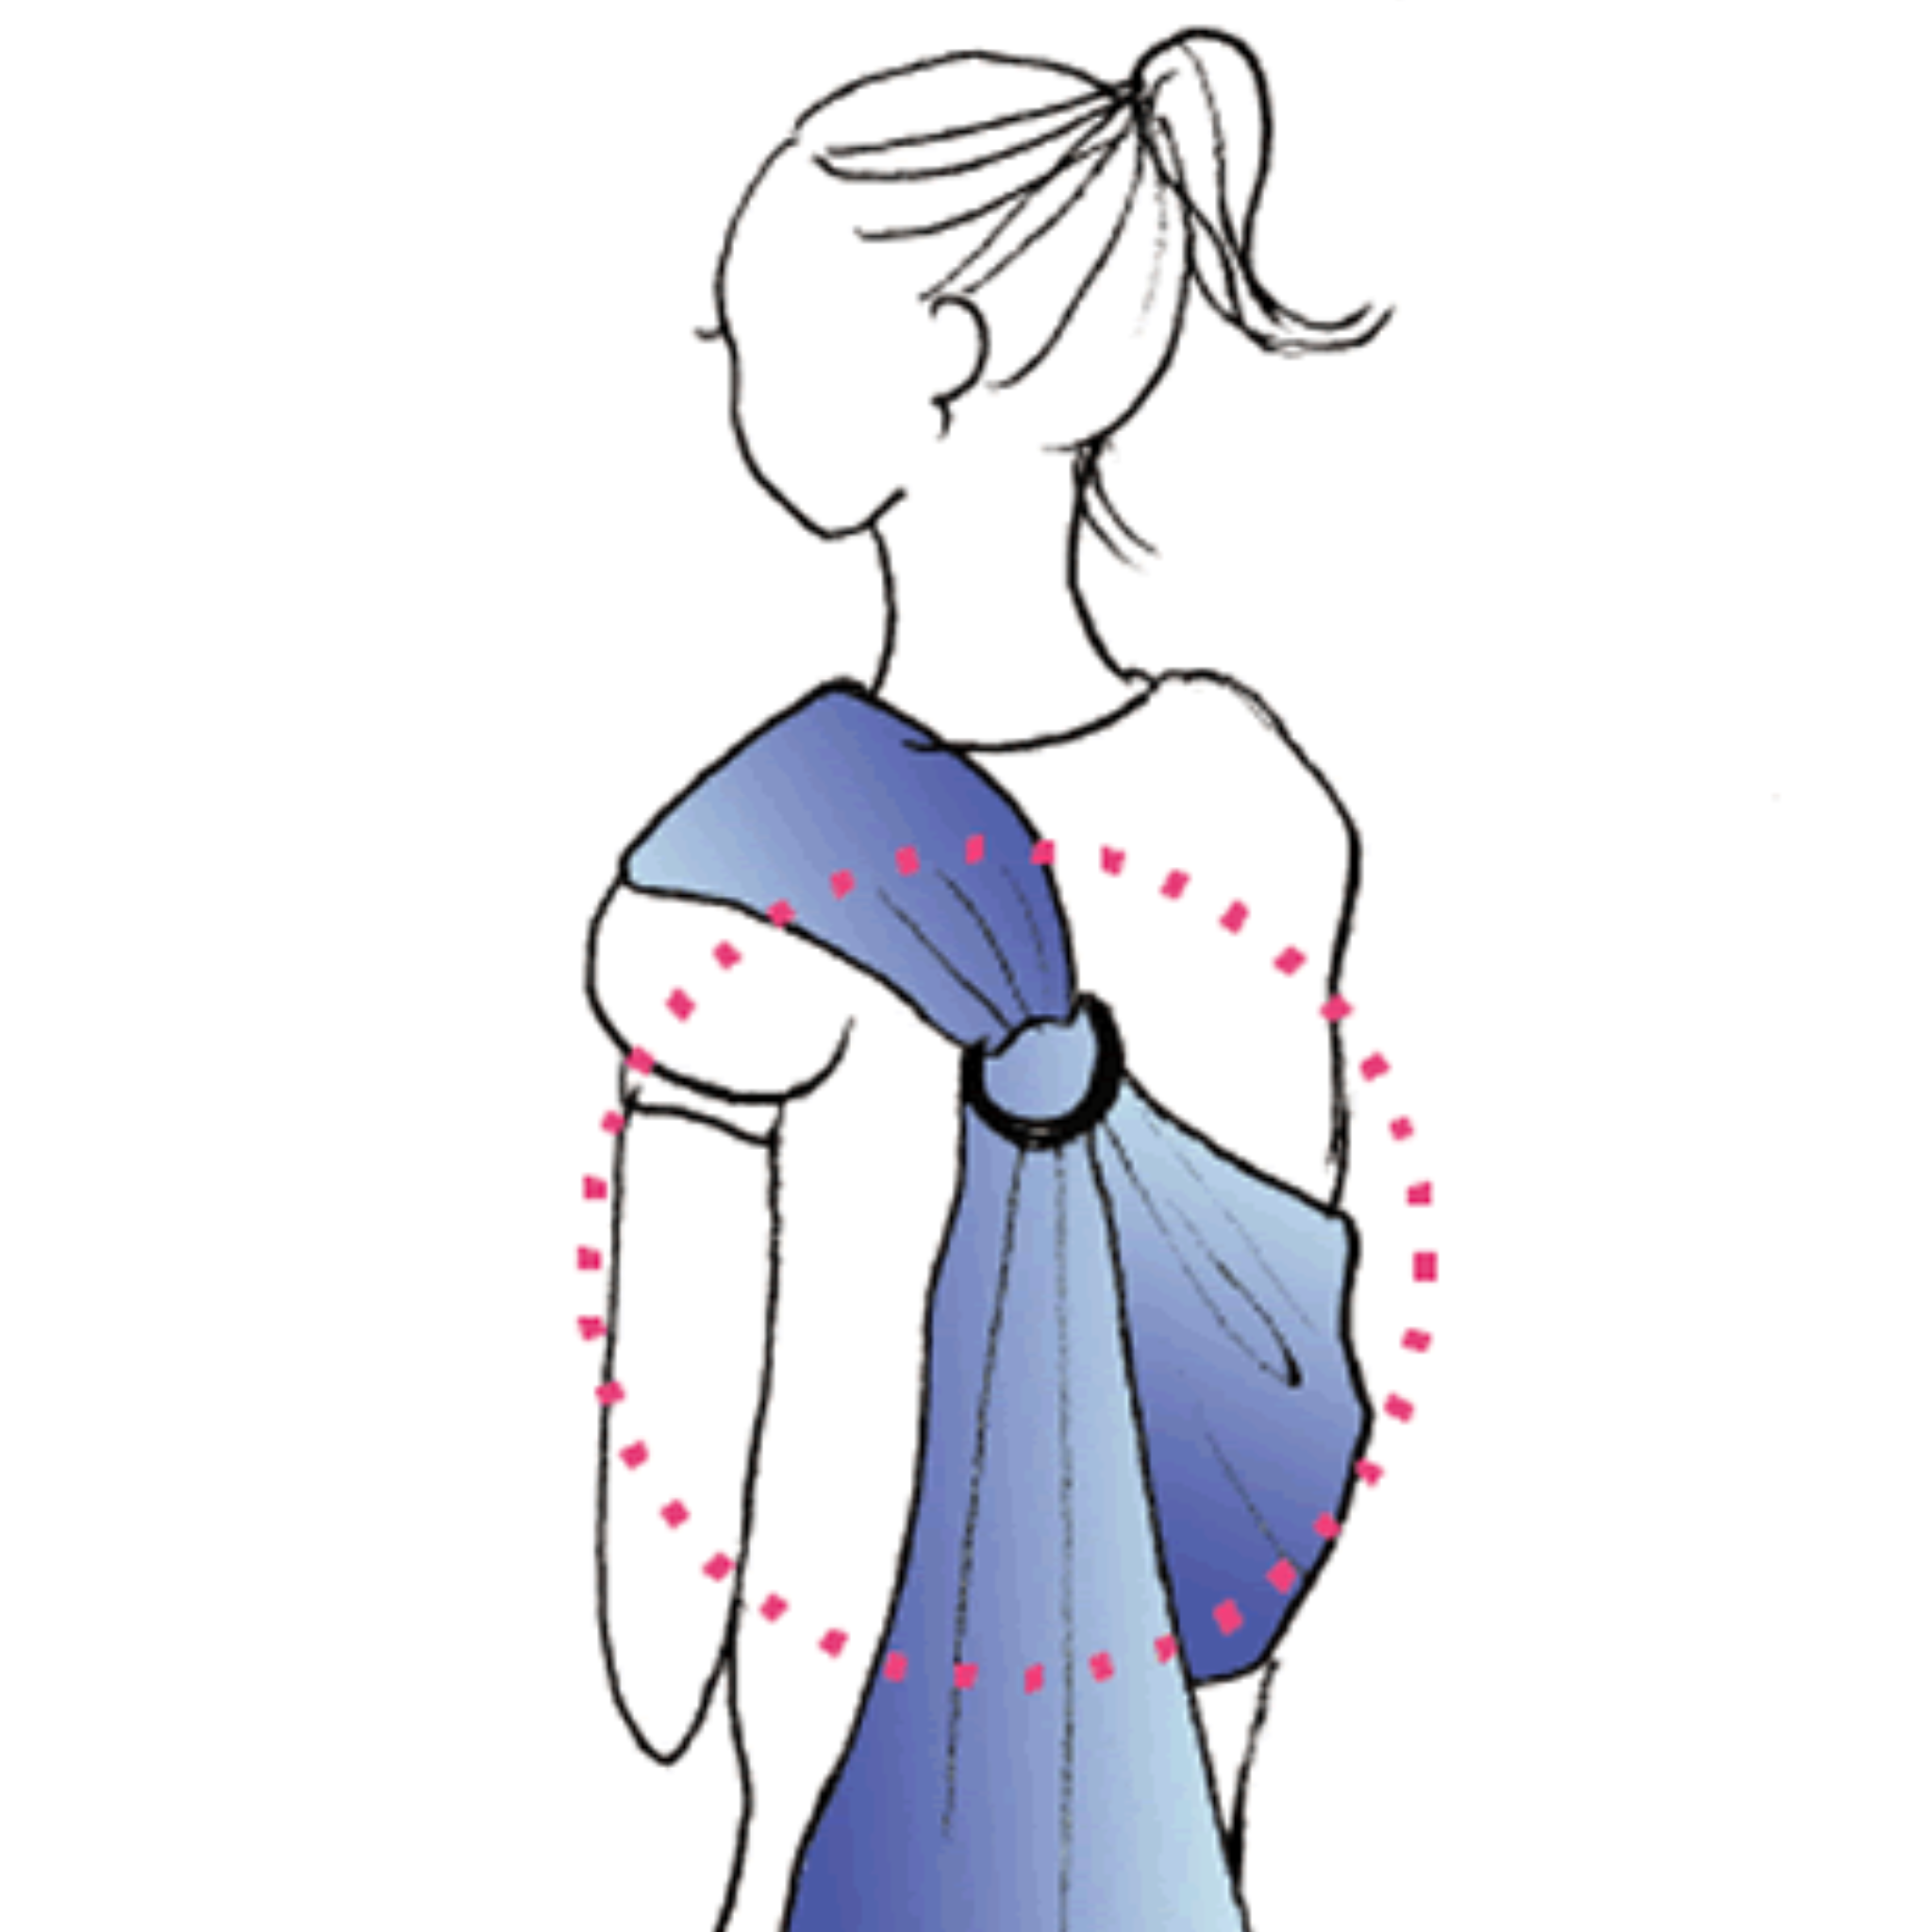
03 Wearing It Backwards
If the rings are behind your back, the tail cannot be used correctly.
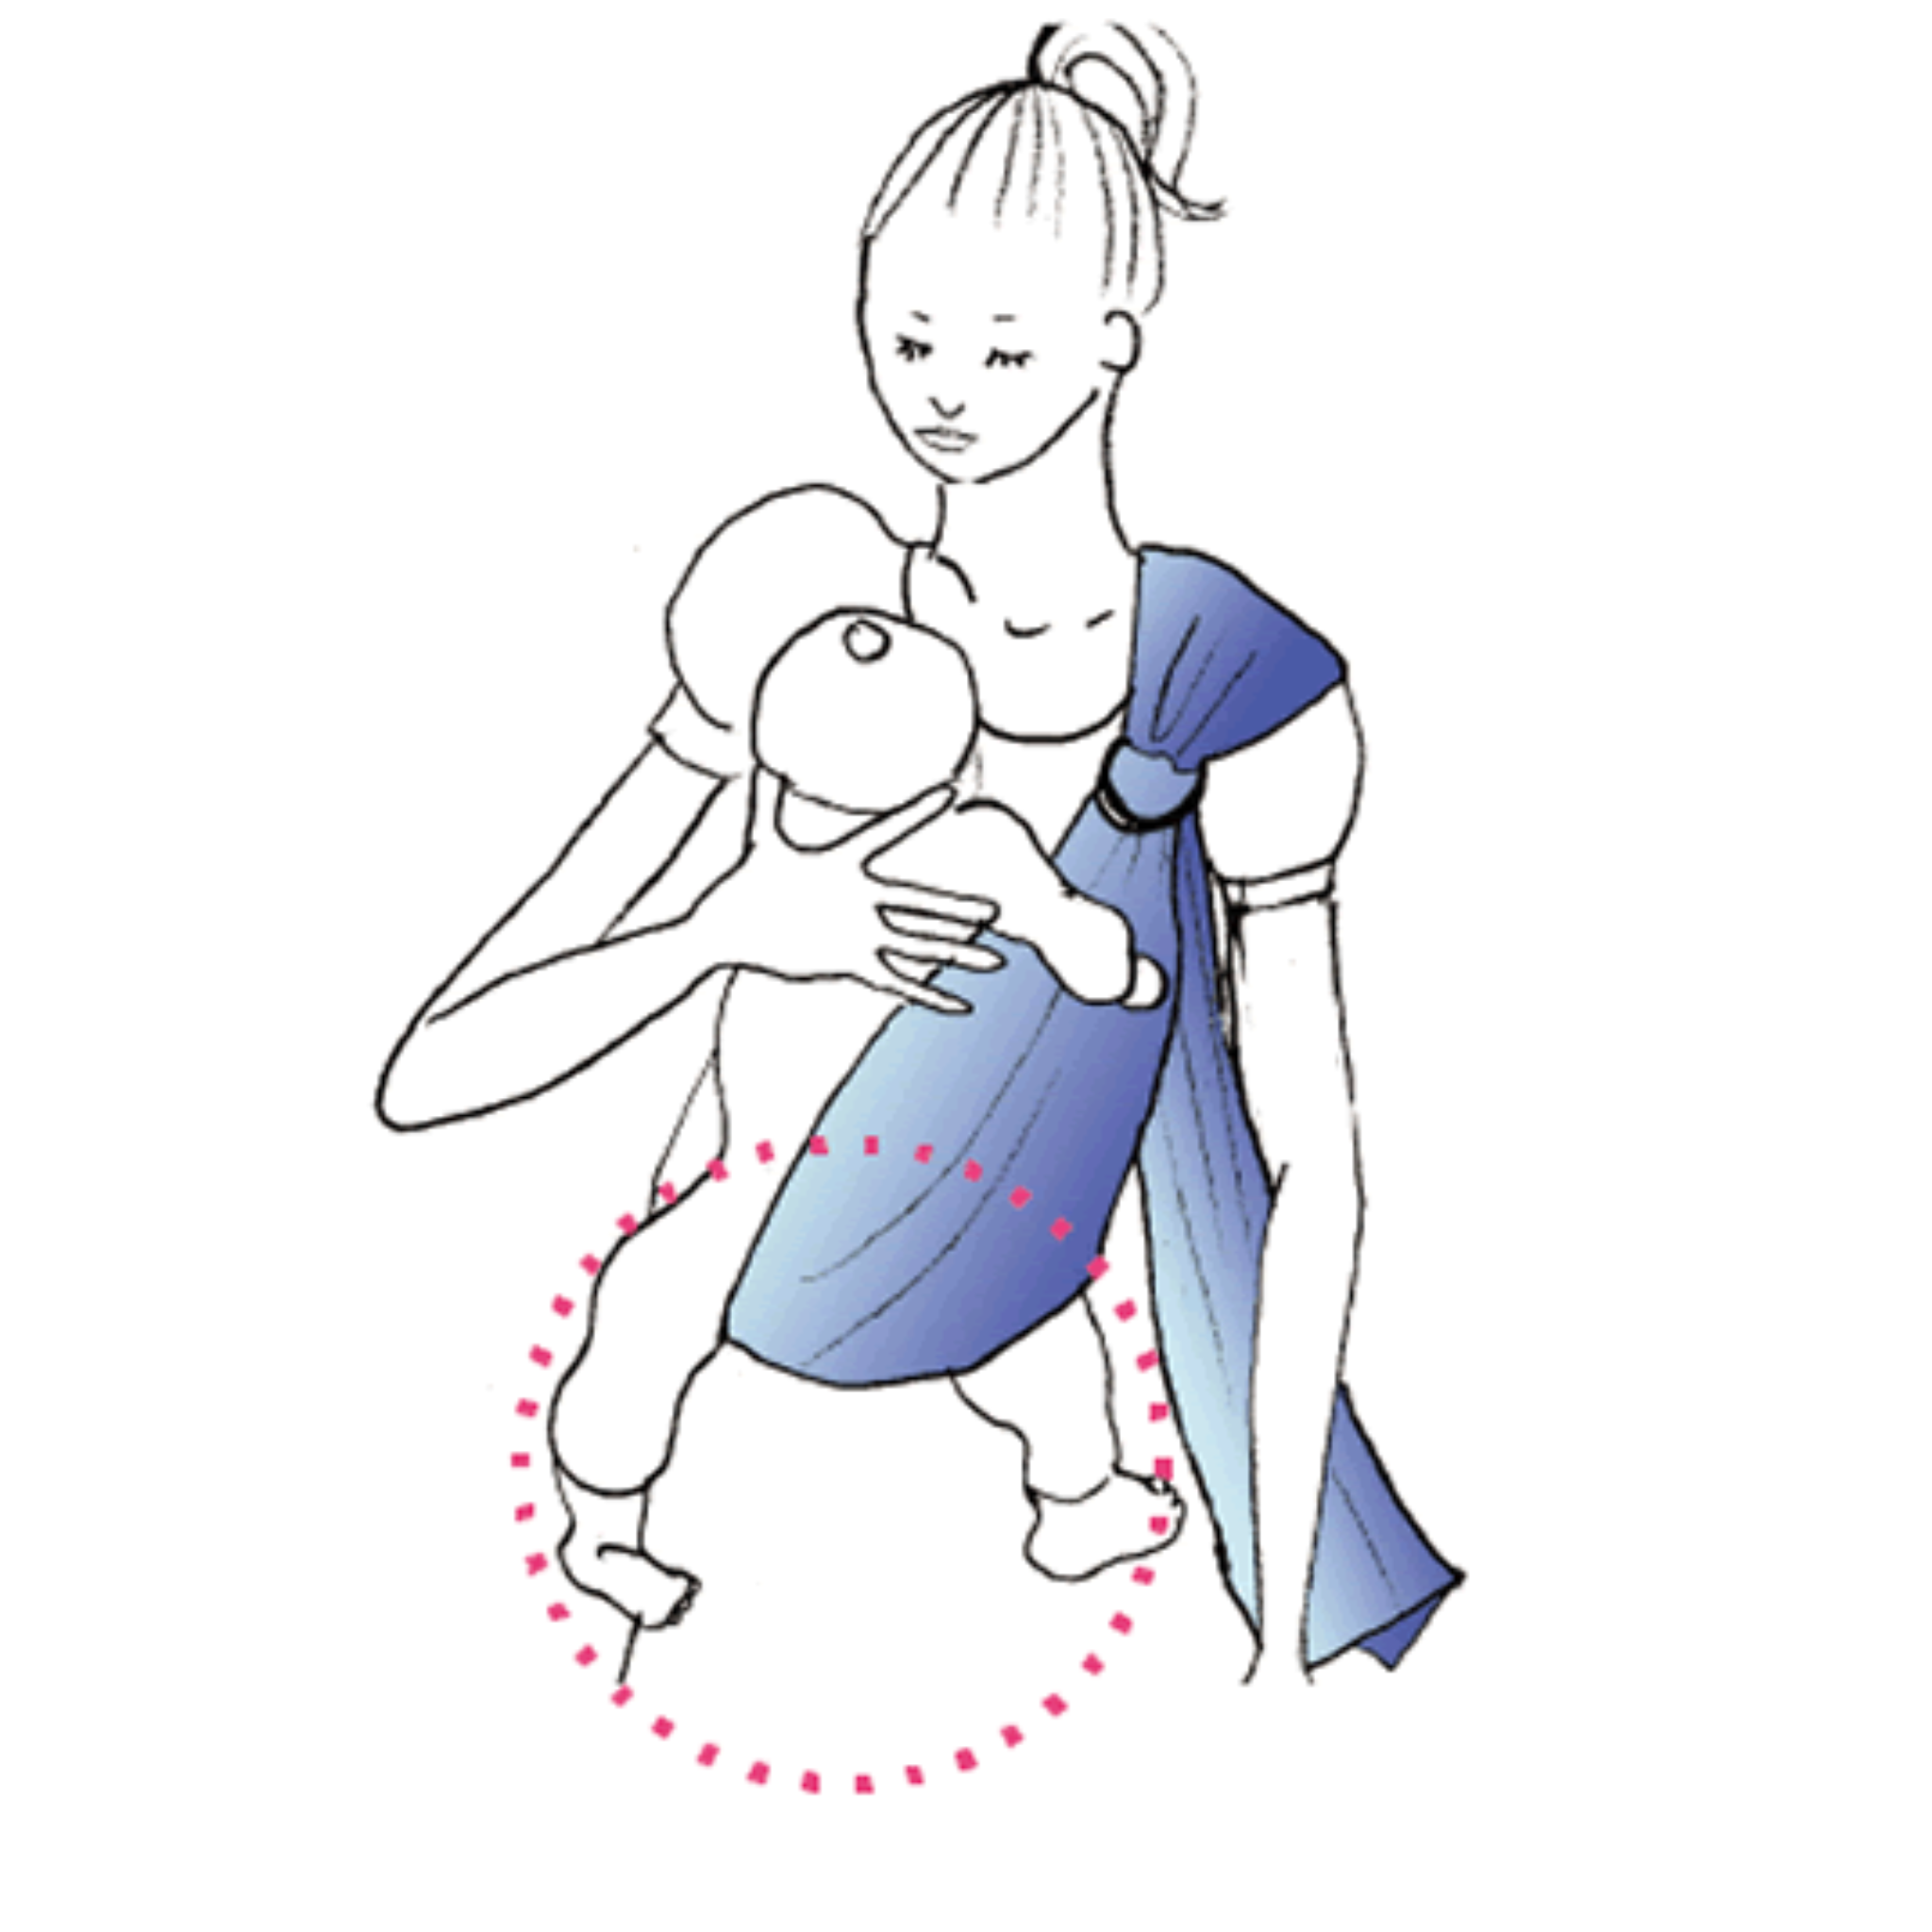
04 Straddling a Narrow Pouch
Straddling a narrow pouch prevents you from using the full width of the fabric.
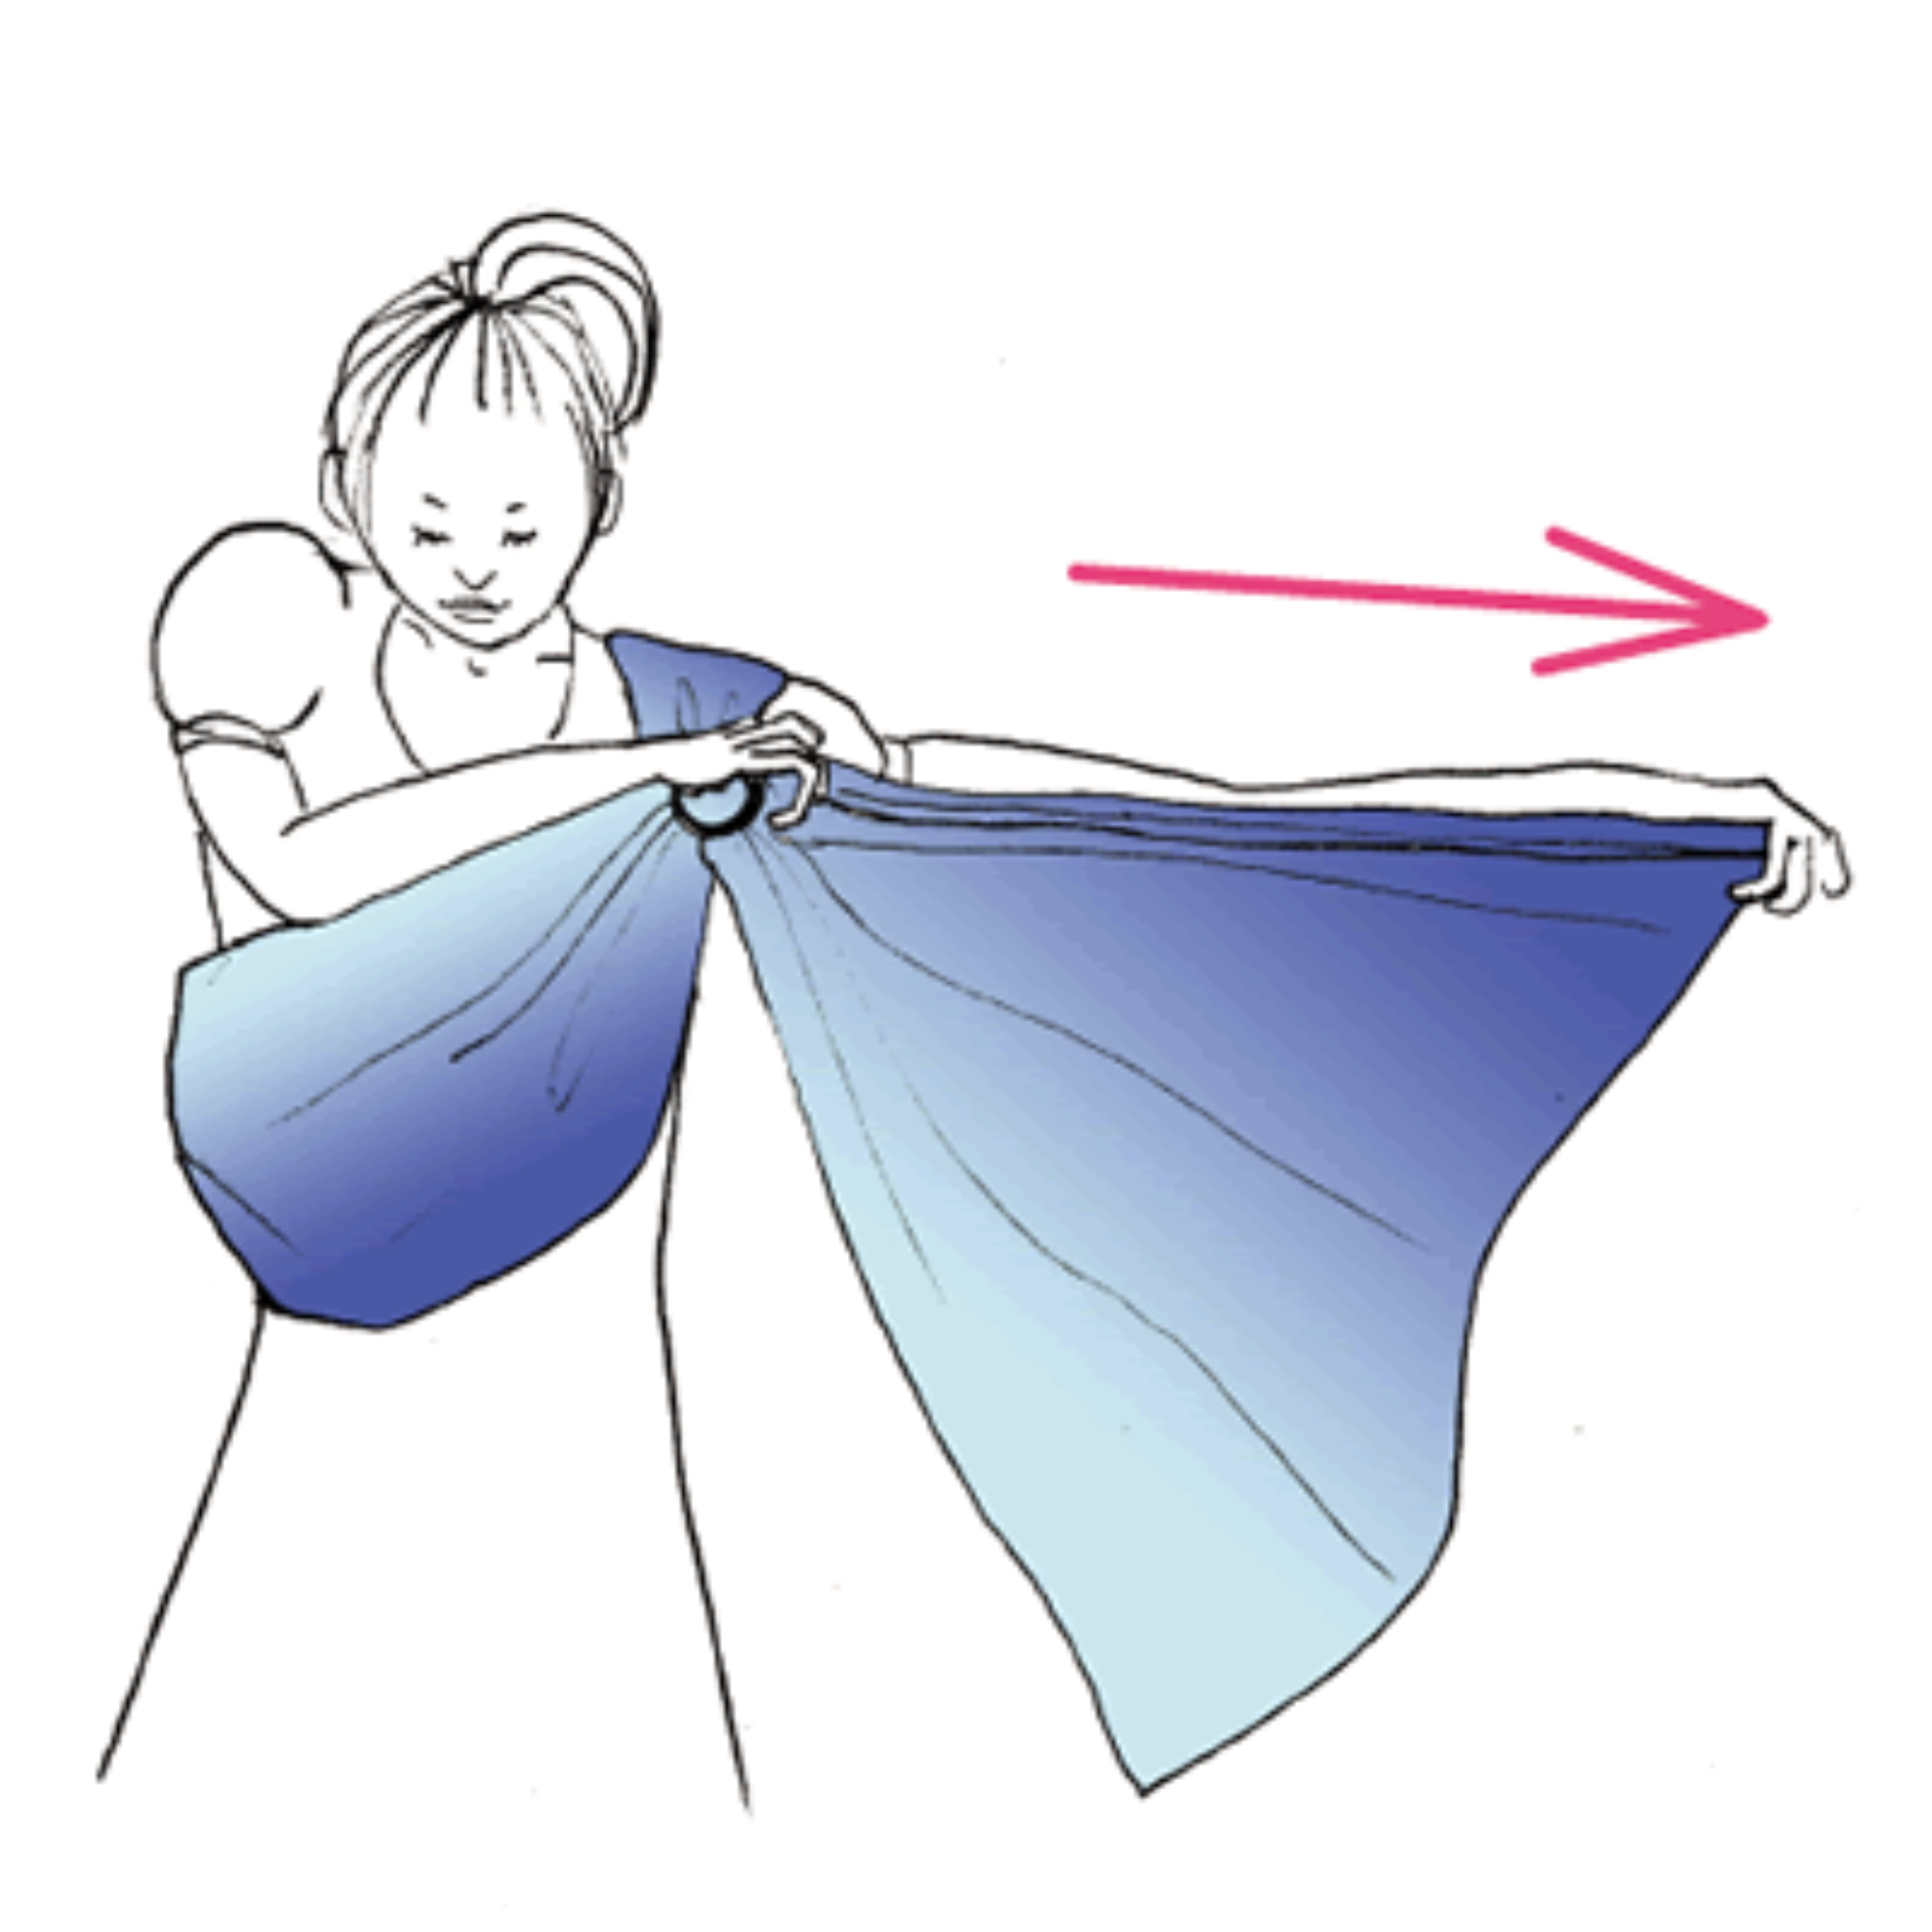
05 Damaging the Fabric
Pulling with excessive force can damage the fabric.

Instructional Video
Video Guides
Historical PsLing wearing videos. These Japanese-language videos are retained as archived guidance. Follow the current written safety instructions on this page. Each video must be checked against the current method before this English page is published.
Preparing the Sling (3:35)
- Threading the fabric through the rings (Steps 1–9)
- Correct relationship between the rings and tail
- Balancing both fabric edges and smoothing folds
- Basic checks before use
Cradle Carry Basics (0:58)
- How the fabric pouch supports the baby’s body
- Positioning the head, back and bottom
- Cradle-carry angle to check with a newborn
Cradle Carry in Practice (4:06)
- The sequence from putting on the sling to carrying and removing the baby
- Creating a stable carrying position
- Supporting the baby during removal from the sling before sleep
Upright Carry Basics (1:10)
- Moving from a prepared sling into upright carry
- Balancing the baby’s height against the wearer’s chest
- Arranging shoulder and back fabric and checking for twists
Upright Carry in Practice (2:18)
- Positioning the baby’s legs and bottom in an M-shaped seat
- Spreading the tail into a fan
- Balancing the rings and the baby’s centre of gravity
Using the Tail During Feeding (1:12)
- Using the tail for temporary visual coverage
- Positioning the tail for privacy without covering the baby’s face
- Monitoring the baby’s position, face and airway during feeding
Ways to Arrange the Tail (1:07)
- Decorative ways to wrap the tail
- Arranging fabric near the baby’s neck without obstructing the face or airway
- Tail styling for different outfits
Using the Corsage (2:02)
- Attaching the dedicated corsage to the rings
- Styling examples that change the sling’s overall appearance
- Balancing the corsage with an outfit
Frequently Asked Questions
Frequently Asked Questions
Can PsLing be used before a newborn has full head control?
Correct use and continuous safety checks are essential. Keep the baby’s entire face visible, make sure neither fabric nor the wearer’s body covers the nose or mouth, prevent the chin from being pressed onto the chest, and support the neck and back. Consult a doctor before use for a premature or low-birth-weight baby, a baby with respiratory symptoms, or whenever you are uncertain. Follow the Cradle Carry instructions and recheck the face, airway and position frequently throughout use.
Why does PsLing advise against tightening the pouch into a narrow bag?
A narrow, closed pouch can place the baby with the chin pressed onto the chest or the face obstructed by fabric or the wearer’s body. PsLing supports the baby through evenly distributed fabric tension rather than as a closed bag. Keep the face visible and recheck breathing and position frequently.
What can I check if the sling feels heavy on my shoulder?
Check that the shoulder fabric is spread broadly across the shoulder rather than gathered into a narrow band. Low rings can also increase the feeling of weight. Positioning both rings high on the upper chest, immediately below the collarbone, helps distribute the load across the shoulder and back.
Why will the tail not move smoothly through the rings?
Check whether the fabric edges, or rails, are bunched or twisted inside the rings. During Preparation Steps 03–04, align both tail edges and spread the fabric into an even fan before threading. For any permitted fine adjustment, support the baby’s full weight, remove the load from the rings and move the relevant fabric a little at a time. Never force the tail while the rings are under load.
How should I wash a PsLing linen sling?
To preserve the character of the natural fibre, we recommend gentle hand washing with a mild detergent. PsLing linen gradually softens through washing and use and becomes more responsive to the wearer’s body. We think of this gradual change as letting the sling grow with you.
Media Reviews & Mother’s Voice
Reviews and Recognition
01
All About
All About
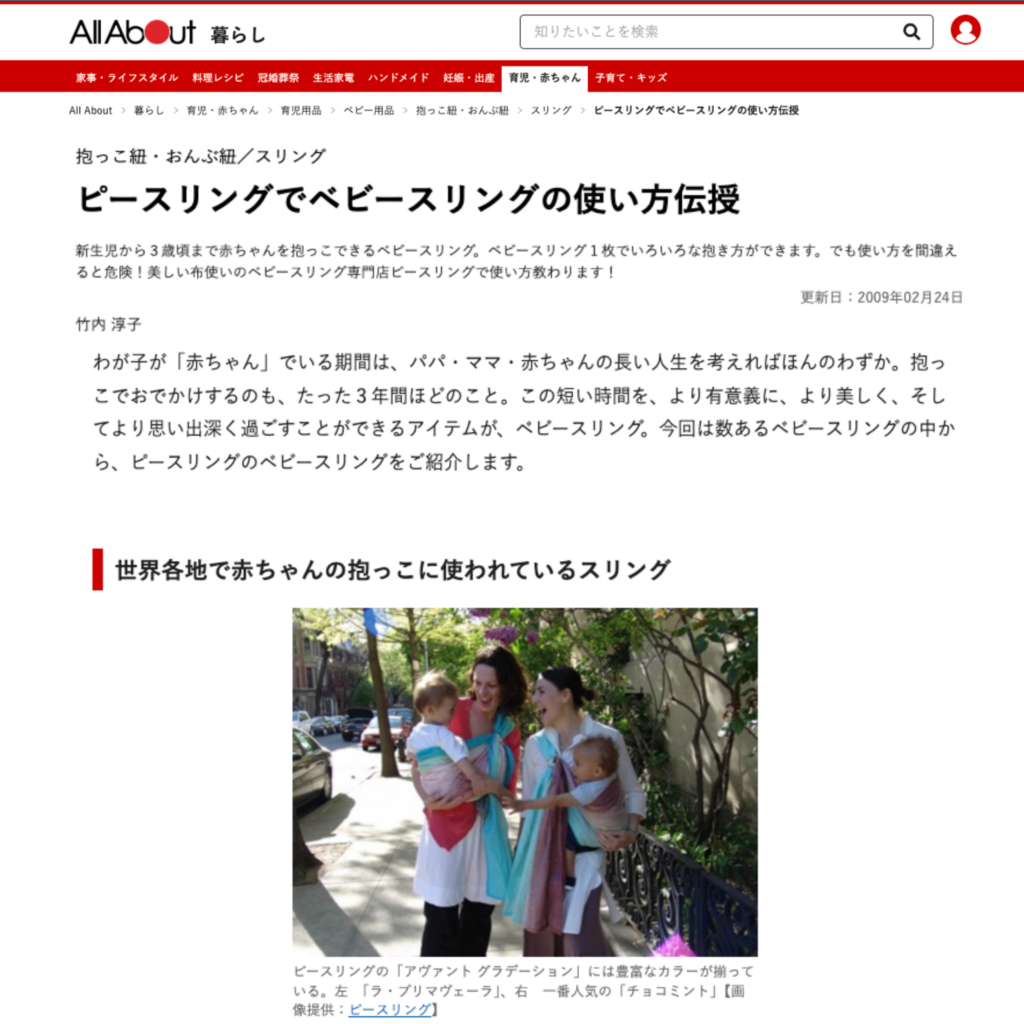
PsLing Guide on All About
Featured on All About
The Japanese information publisher All About produced a photographed guide to wearing PsLing. It remains part of the brand’s historical media coverage.
Japanese publisher All About produced a photographed PsLing guide as part of the brand’s historical media coverage.
02
Moms’ Voices
Moms’ Voices
A Parent’s Personal Experience
A Parent’s Experience
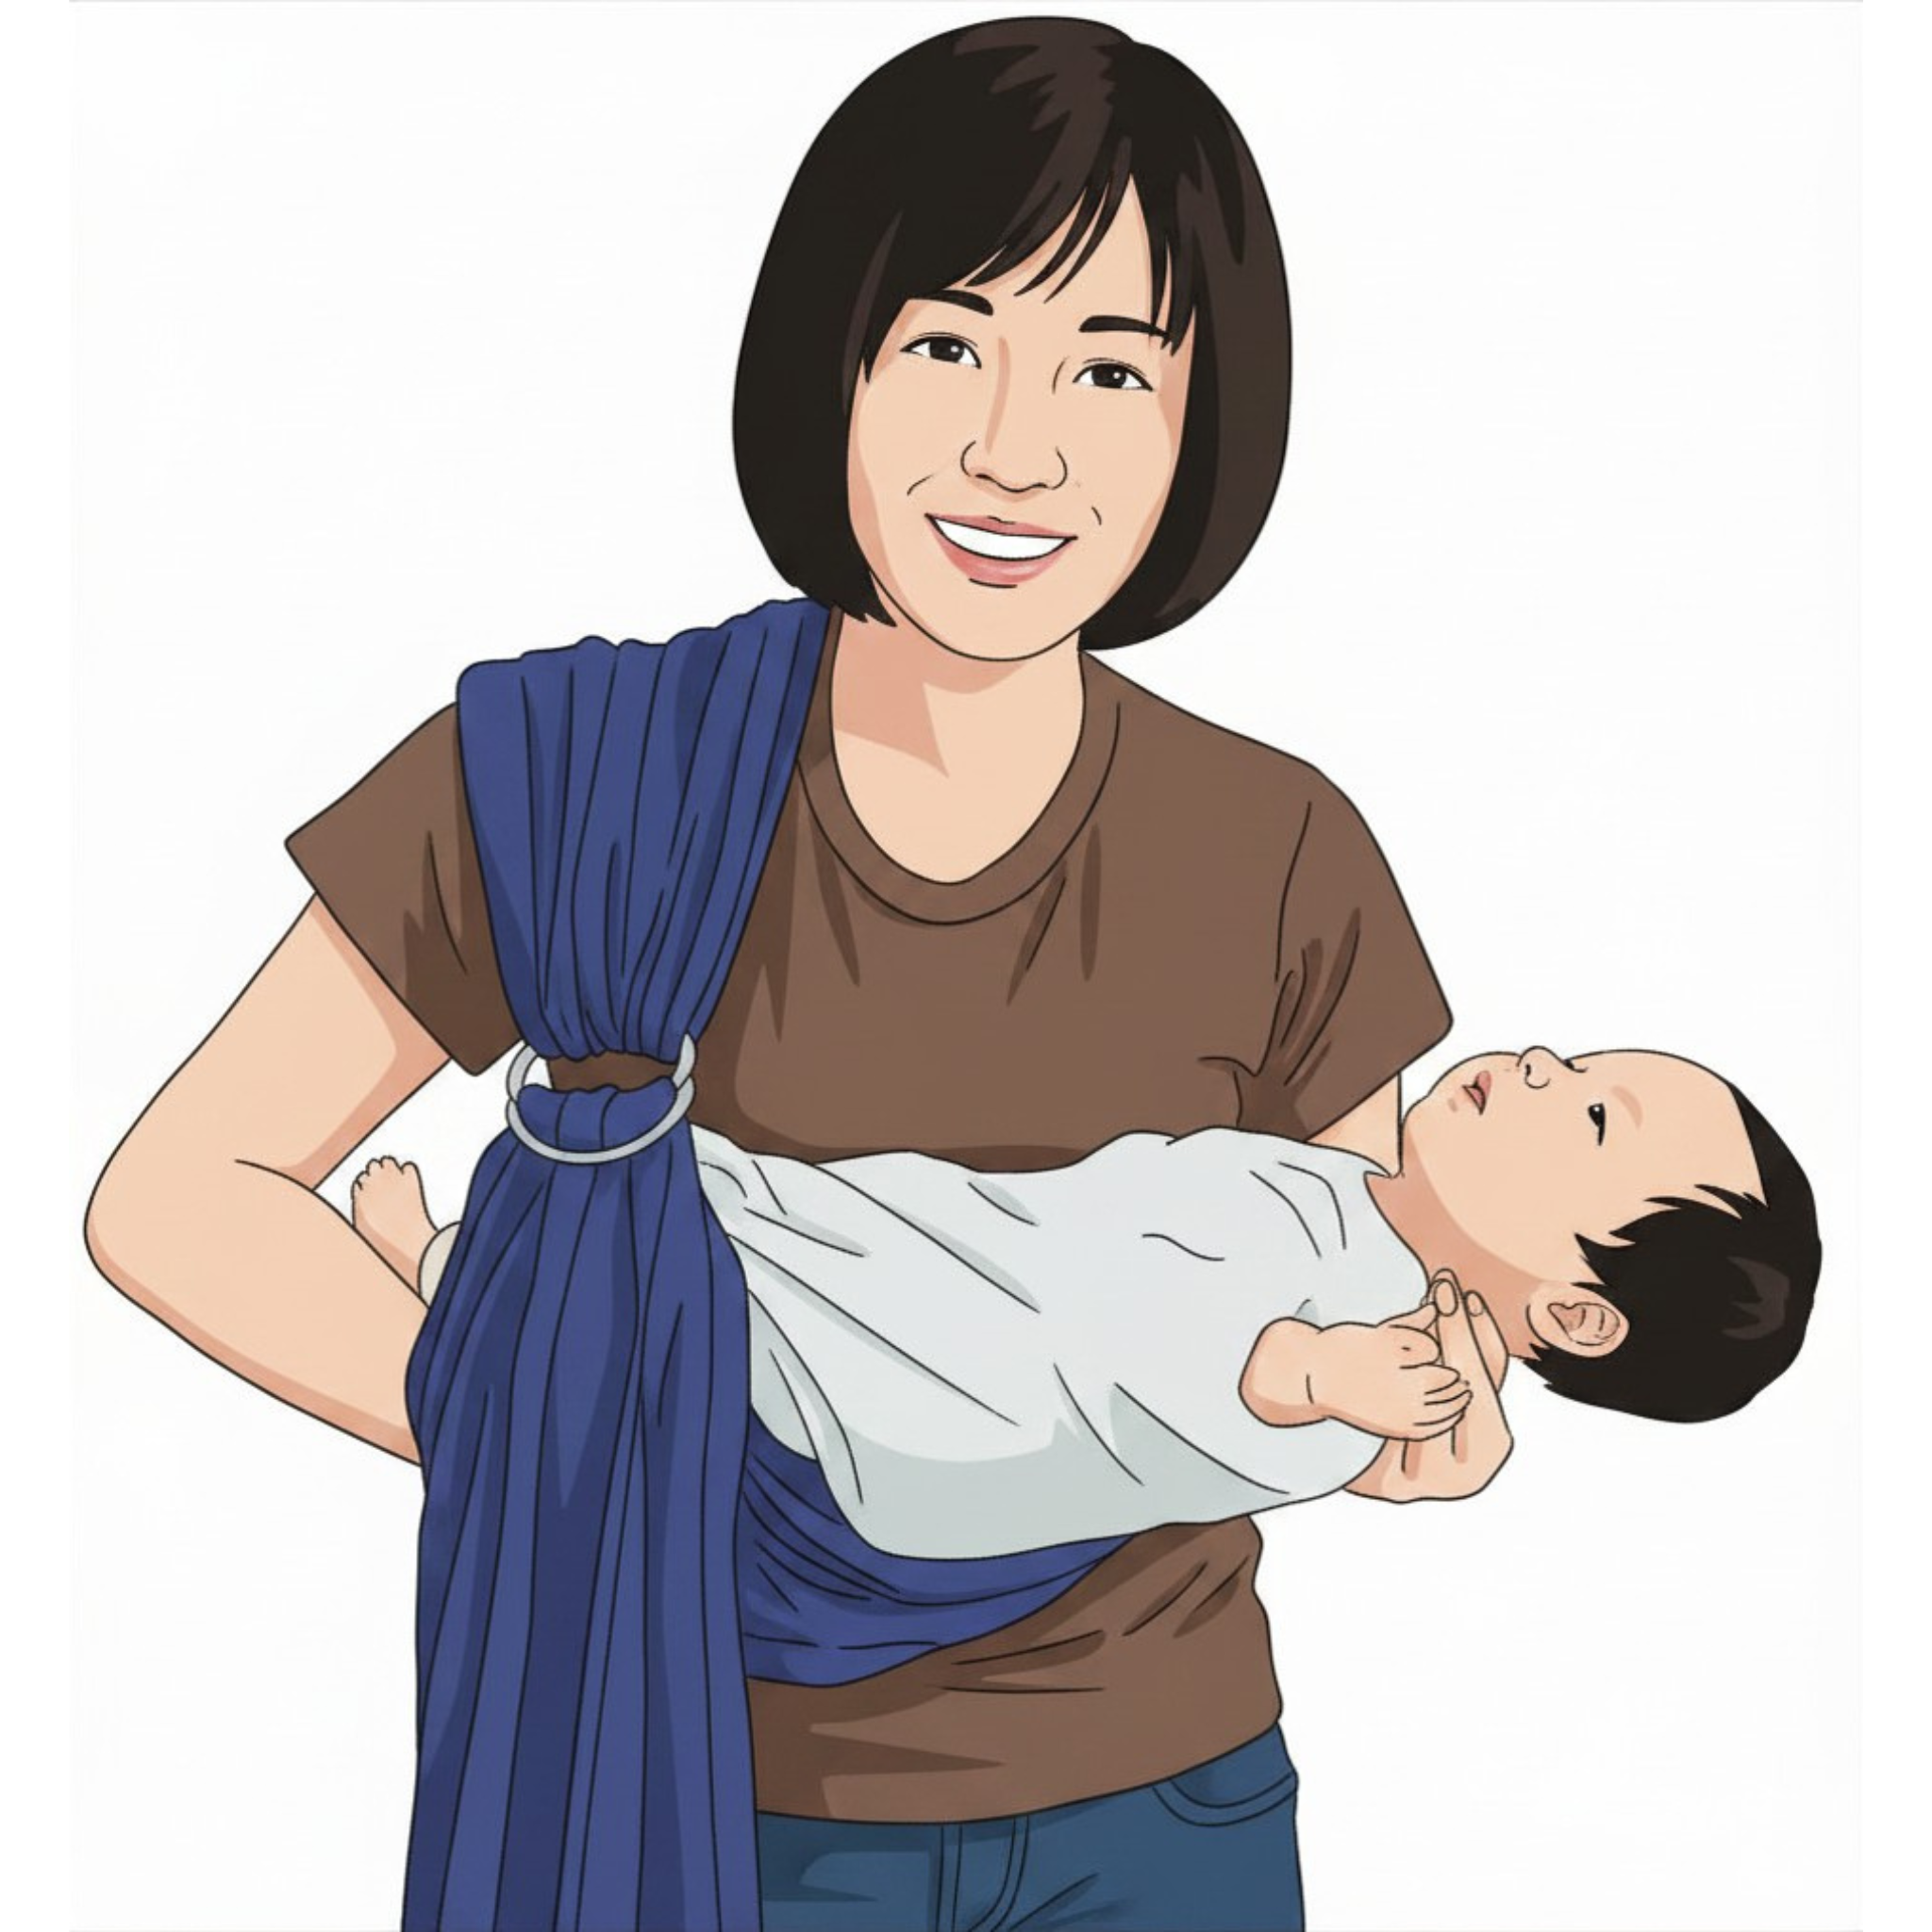
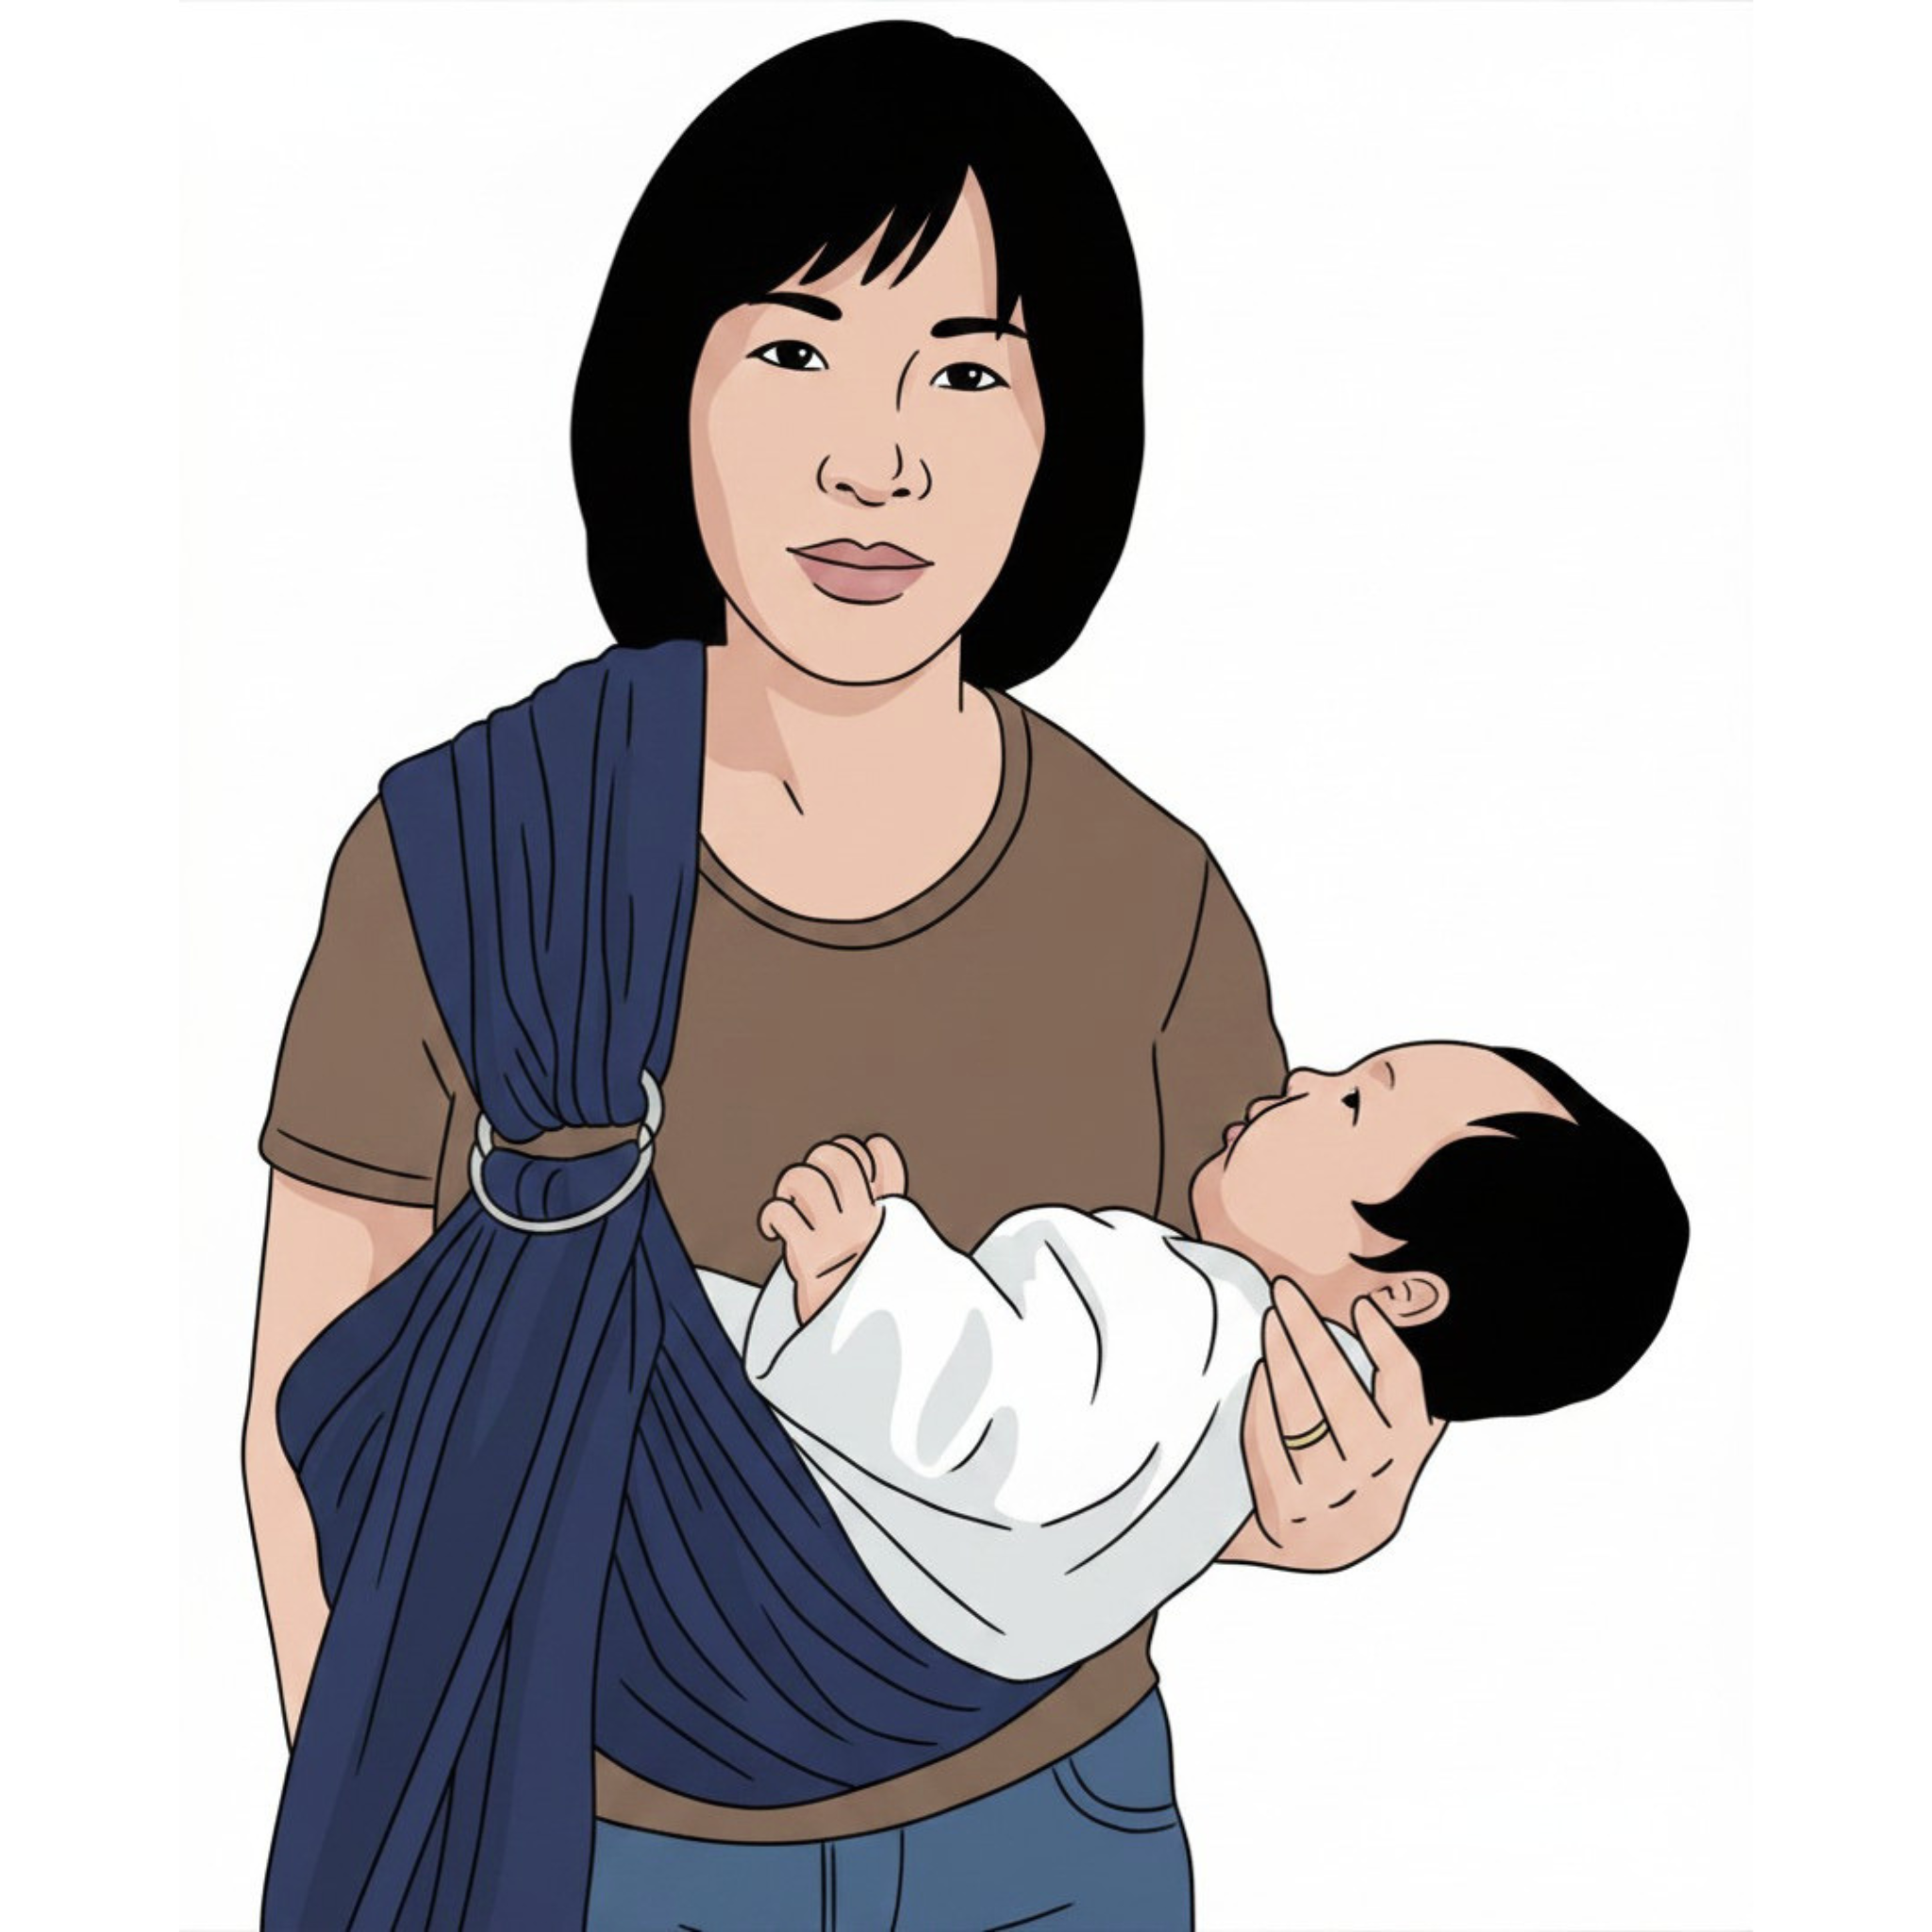
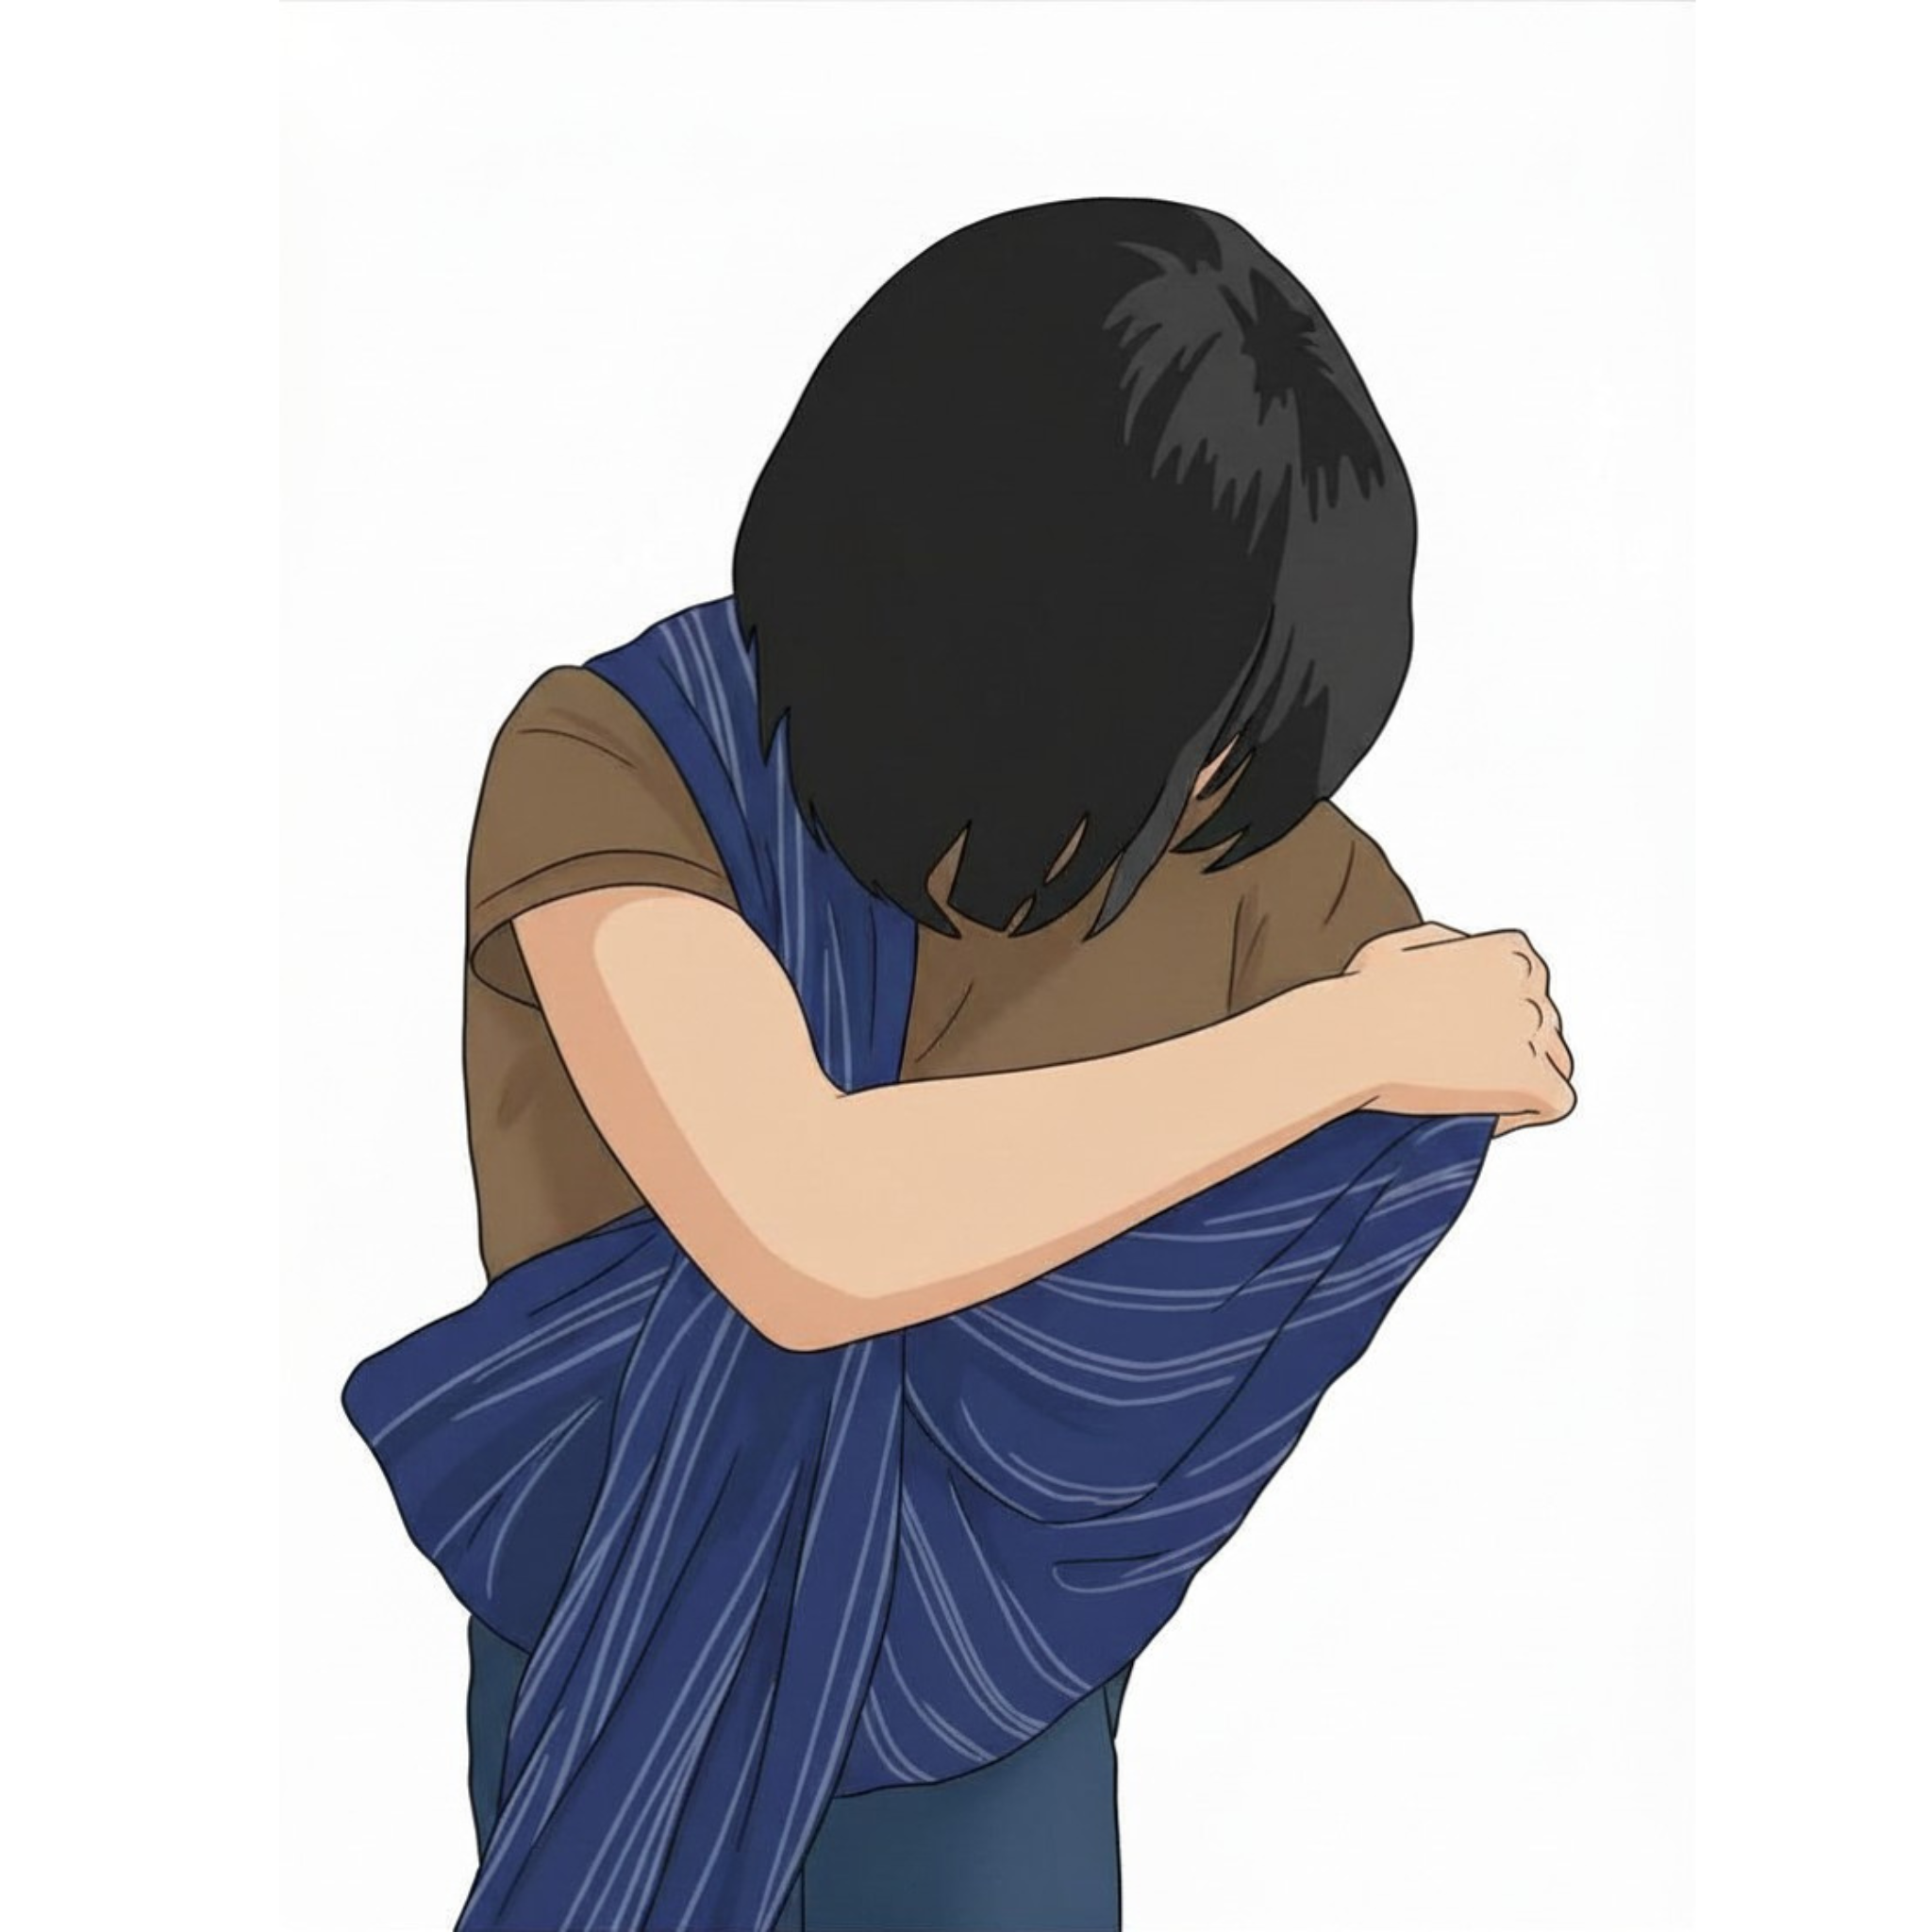
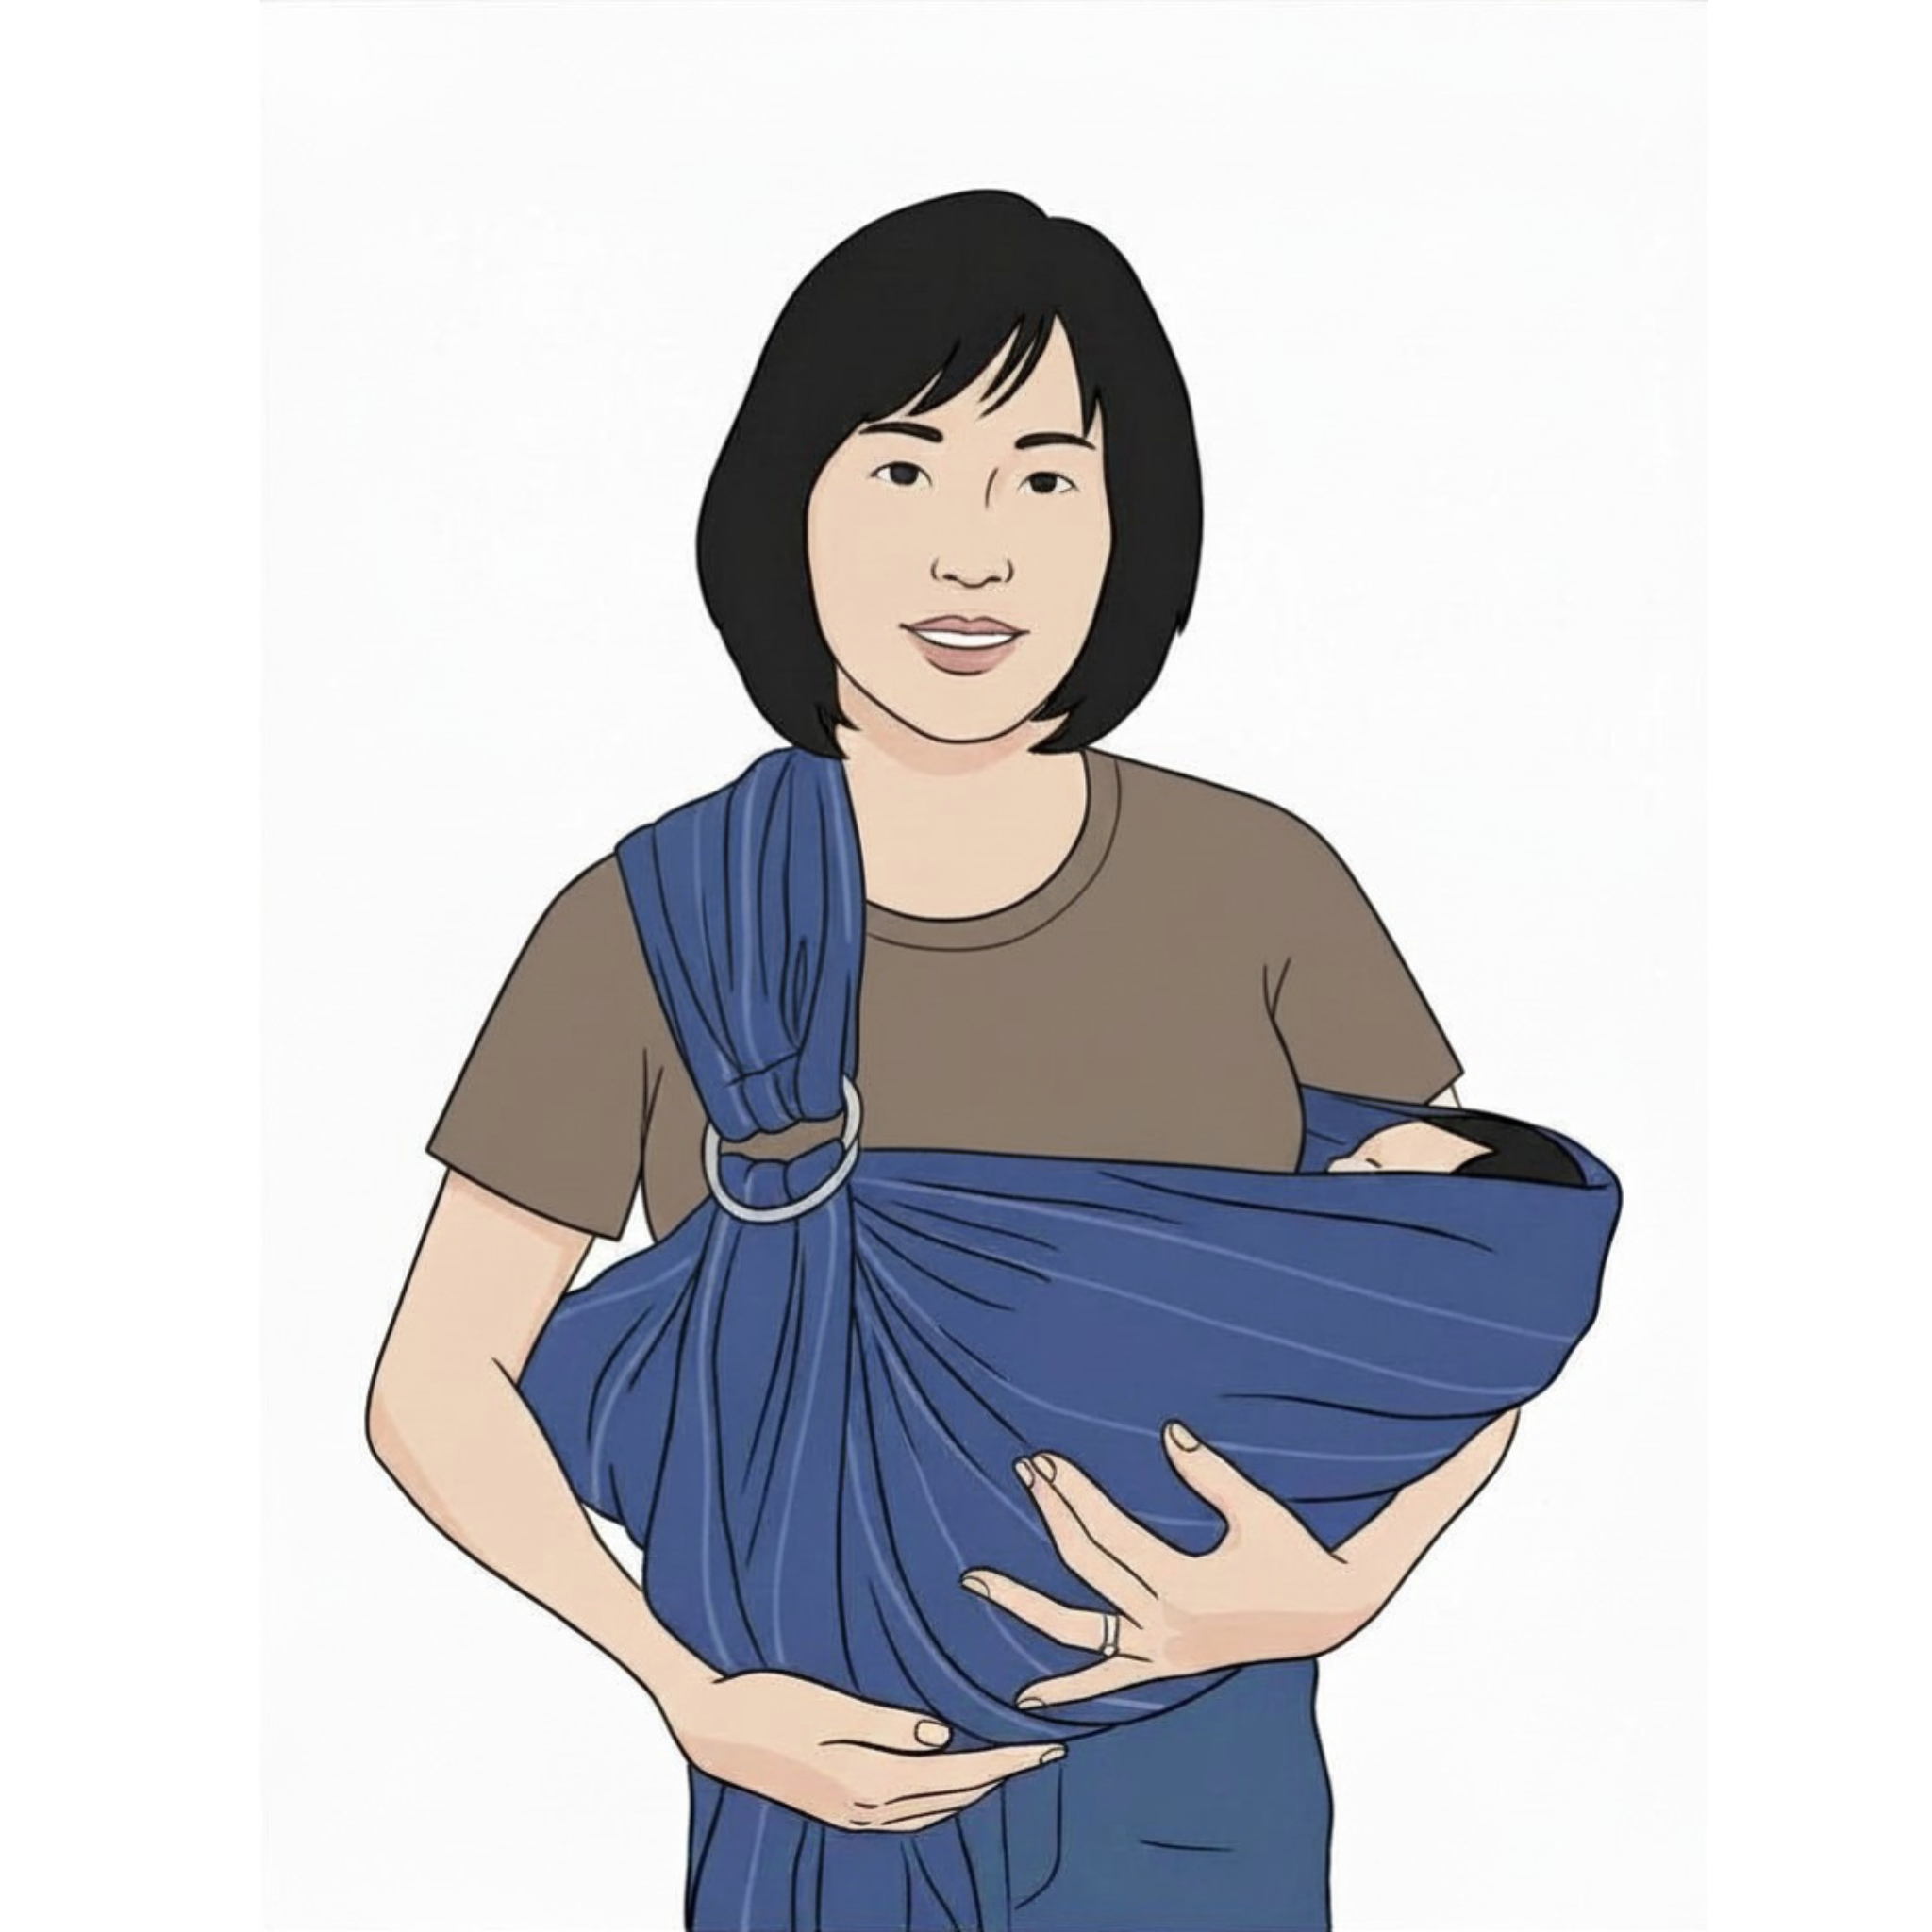
“I put my right arm through the inside of the pouch and begin with my usual cradle hold. Supporting the baby with my right arm, I use my free hand to spread the pouch fabric over the back. Once you can support the baby securely with one arm and understand the natural pouch shape, I found this method straightforward.”
“I put my right arm through the pouch and begin with my usual cradle hold. Supporting the baby with that arm, I spread the pouch fabric over the back with my free hand. Once you can support the baby securely with one arm and understand the pouch shape, I found this straightforward.”
This is a translated personal account retained for historical context. Follow the official instructions and safety checks above.
Moms’ Voices
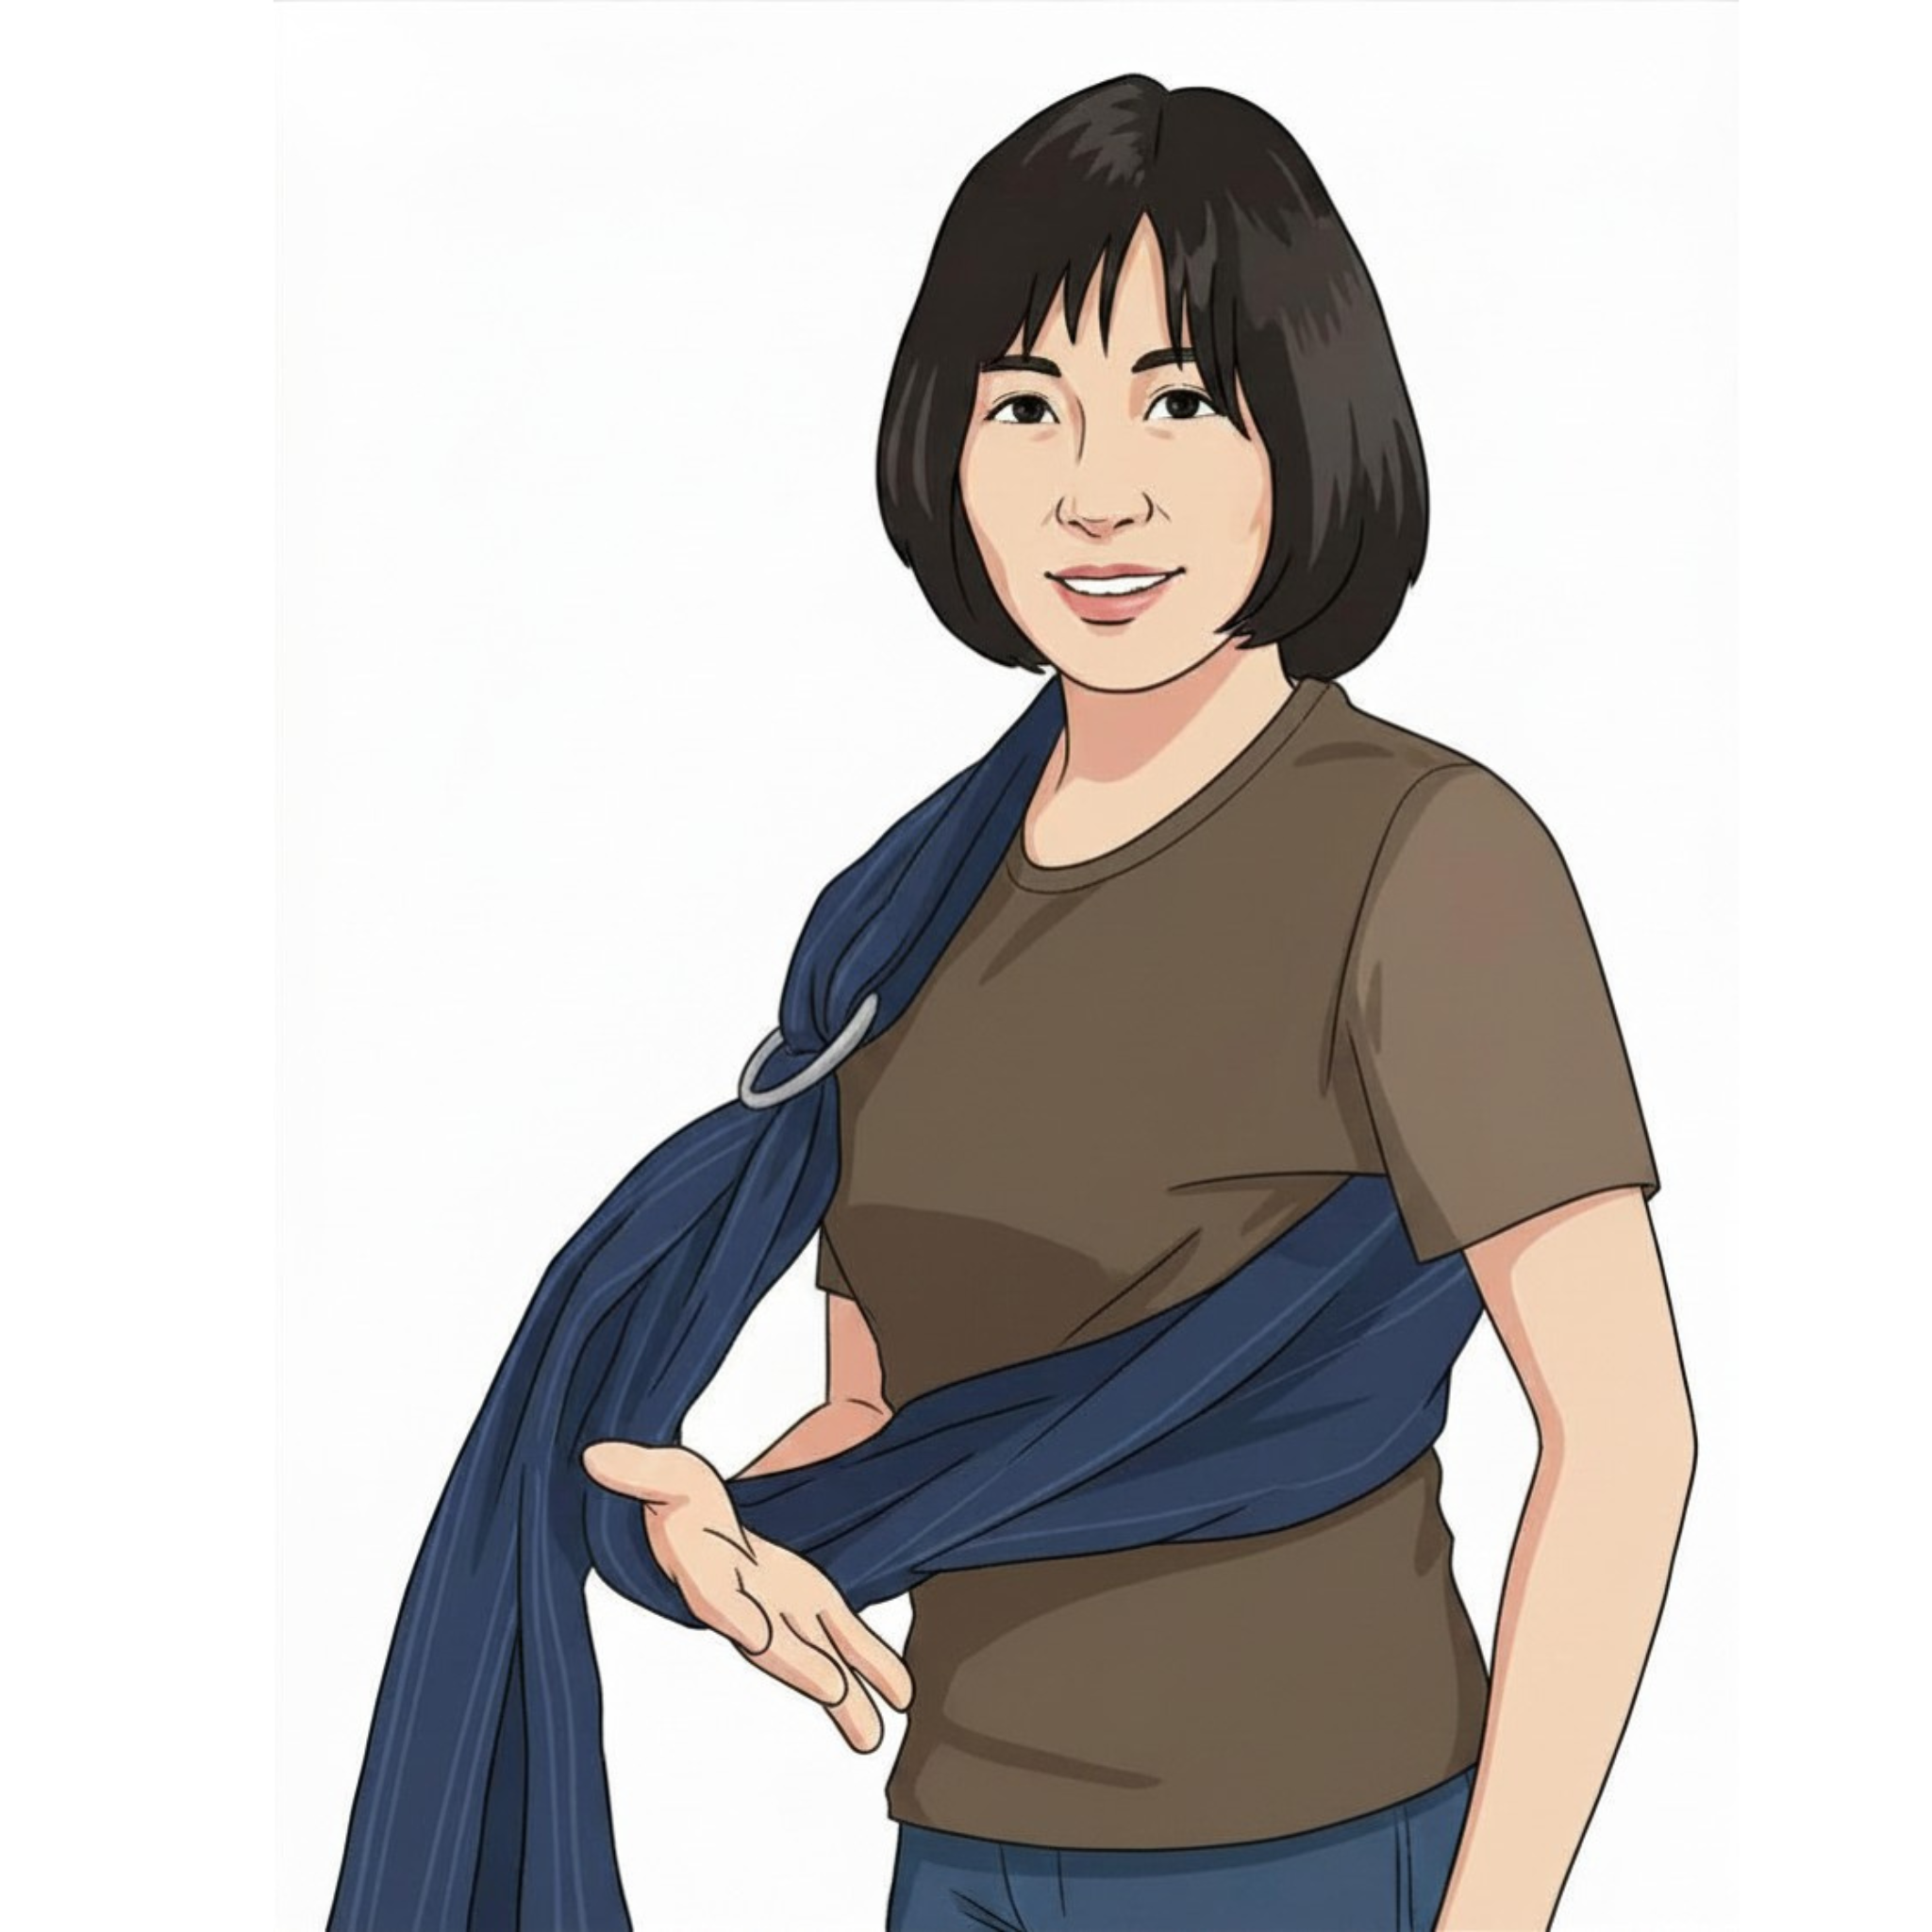
01 Pass the Arm Through
With the rings in front, pass the left arm through the sling loop.
02 Hold the Baby
Keep the right arm in place and hold the baby securely in the usual cradle position.
03 Bring the Pouch Across
Continue supporting the baby with the right arm while bringing the pouch across with the left hand.
04 Spread the Remaining Fabric
Use the free hand to spread the remaining pouch fabric over the baby’s supported body, keeping the face clear.
05 Shape the Pouch
Check that the pouch forms a natural supporting shape around the baby.
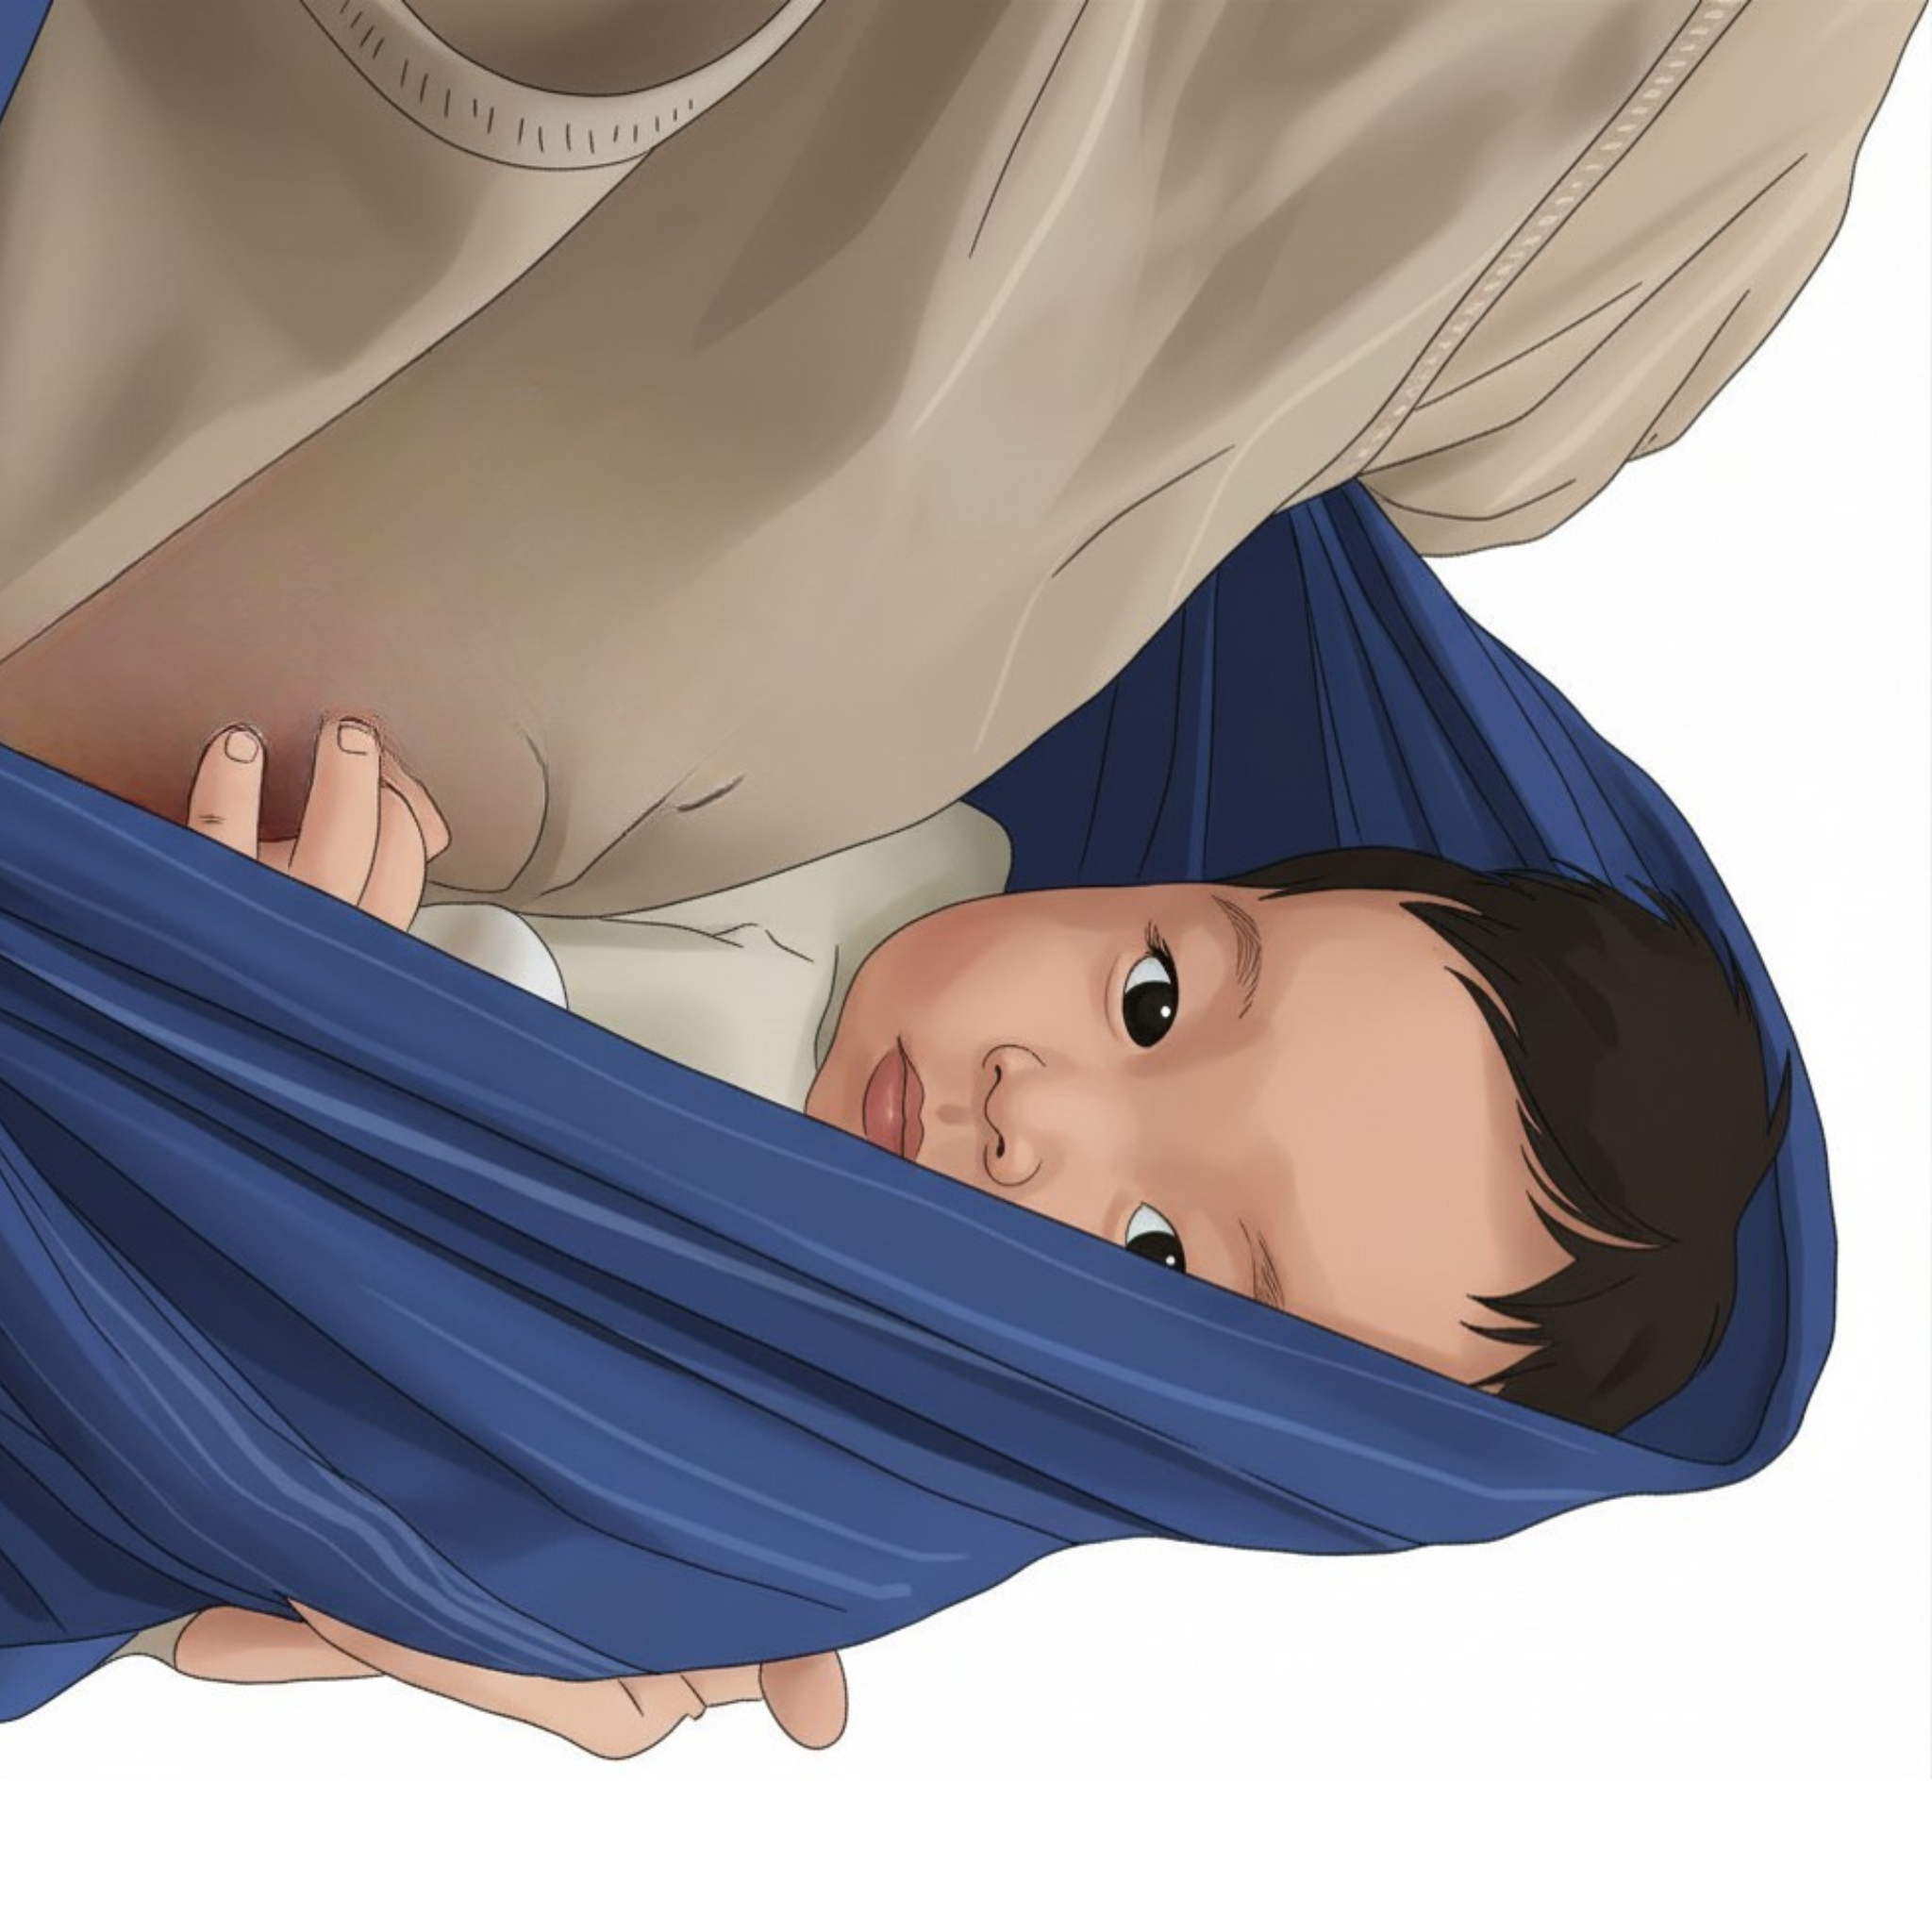
06 Complete the Safety Checks
Complete every Cradle Carry safety check above before relying on the sling for support.
Contact PsLing
For product availability, delivery destinations, use or care, please contact us before ordering.
Support availability and response times may vary by language and location.
Contact us about availability, delivery,
use or care before ordering.